I have a new project starting . . costumes for a production of “Chitty Chitty Bang Bang”. My sister is costuming this show and was planning on renting costumes. Unfortunately, that didn’t work out for her, so instead, it’s into the sewing room. The show hasn’t been cast yet, but in the meantime, it seemed like a good excuse to play around with some ideas and maybe make a chorus-suitable costume for the Fair scene. This show is costume intense, and it seems like every song requires another costume change–often for multiple people. That said, I was impressed by how many “good” parts there are, so if you are looking for a large cast show, this might be one to consider.
The show is set in about 1910, which has a slim, column-like silhouette, as fashions begin to move away from corsets and petticoats and toward the 1920s. The Director, however, specifically requested costumes with leg-o-mutton sleeves, which puts us in the 1890’s/early 1900’s. The show is supposed to be more “historically-inspired” than actually time specific, so we’ll go with that. Truly Scrumptious is described as “light and frothy” (no doubt inspired by the movie costumes), which implies fuller skirts.
I found this two-piece outfit in a size 16W.


The outfit is new, with tags. The jacket is double-breasted with a large collar and 3/4 length sleeves.
The dress is a simple shift with wide straps and a center back zipper.


When I bought it I was thinking 1910-1912 and thought this would be easy-pease, and I would just put some sort of border along the bottom, and add some matching trim maybe to the collar or the sleeves, possibly trim down the collar down to make it narrower, and called it good. However, after conferring with the actual costumer, she wanted to go with a fuller skirt (which does make it easier to dance, and use vintage 80’s dresses for the chorus). Therefore, I needed to add some fullness to the skirt. I also envisioned that this would be worn by an older lady/matron, and so a floor length dress was probably appropriate.
I paired up the dress with a coordinated ruffled bed skirt, and found a pattern to provide inspiration and to use as a resource, and possibly to use as a pattern for the sleeves. I tend to use patterns more as a reference tools than as actual patterns. (I’m not sure what size the bed skirt was. The tag didn’t say, and I didn’t measure it before I started). I began by removing the ruffle from the bed skirt, preserving the gathers.


I decided to make a ruffled train in the back, and to shorten the front of the dress. I began by opening the back slit, and then shaping the new hemline (raising the front to show the underskirt). Remember to leave a seam allowance when you cut. I used a heat-sensitive pen to draw the lines, which can be removed by ironing, or with a quick pass from a blow dryer.


My plan was to create gores to insert into the side seams out of the section I removed from the center back. Unfortunately, due to the shape of the piece I cut out, the gores wouldn’t be a nice wedge shape, but more of a lopsided triangle. I just made sure the two long edges were the same length, and then curved the hem between them. I inserted it one direction, and didn’t like how it hung (off grain), so I removed it and re-inserted it the other way, and liked it much better. (My feed dogs need to be repaired/replaced and are causing me some problems, and I fixed my tension issues as well . . so it looks better in real life). Typically the center of the gore is on grain, but for mine one of the sides had the straight-of-grain so it definitly hung differently depending on whether the straight side was to the front or back.


I had just purchased some horsehair braid and decided to give that a try along the hem. Mine was quite inexpensive, and did not have the thread along the edge (I found it in millinery supplies–but I’ll take the few wrinkles as a trade-off for the cheaper price, especially for a stage costumes). I stitched it to the skirt 1/4″ from the edge on the right side, trying not to stretch it, and then flipped it to the inside to make a rolled hem.


I stitched the top edge of the braid, and then added lace to the hem edge. I like it, even though I ended up with some wrinkles on the curves. I’m sure my technique will improve. I pressed hem using a teflon pressing sheet.


I wanted the dress to have a small train in the back. I have mixed feelings about this. The dresses of the time often had trains and it definitely adds to the period look. However, in practicality, with a cast of teenagers, and moving large choruses on and off stage, trains get stepped on and in my experience, can be the cause of more repairs than the effect is worth. But, I made a small one anyway . . . it can always be tacked up and/or removed . . . and after all, I won’t be dealing with it (hee, hee).
I measured along the floor from the side seam to about where I wanted the train to end to figure out how wide I should cut the fabric.

I used my pattern to give me an idea of what the shape of the back of the skirt should look like. The straight of grain is along the fold in the center back, and I sketched out a shape.


I then pin-basted this to the lining with safety pins until I liked where it was placed. The safety pins were replaced with standard sewing pins, and the train was stitched in place.


My original plan was to tack down the dress lining to give the train some extra stability. However, I had trouble getting it attached so it didn’t pull. In the end, I just cut it out, and ran a row of twill tape down the center back to help support the ruffles (I had used the very soft “middle” of the bed skirt for the train fabric). I ran the twill tape up to, and overlapping, the lower edge of the zipper for strength.


I determined how much I wanted the ruffle to stick out, and then marked the stitching line for the bed skirt ruffle. I didn’t put it all the way to the edge of the train as I decided that would have been too long.

The first layer of ruffle attached:


I then did a little math . . . placing the top layer of ruffle, and figuring out where to stitch the next ones so that they looked good. I marked these stitching lines on the train. The top two are parallel lines, and the third ruffle mimics the bottom curve.

I didn’t like the way the edge of the over skirt hung so I tacked it up in some pleats. I also tacked the middle two ruffles to over skirt side seam to keep them in place and neaten up the appearance.


I thought the ruffles needed some definition, so I added lace to the edges.
At this point it was time to move on to the jacket. I removed the shoulder pads, and then removed the sleeves. I used sections of the bed skirt for the top section of the sleeve. I found some petticoat net (left over from one of the “Cinderella” ballgowns, and flat-lined the ruffle. The net happened to be curved, and fit the ruffle almost perfectly. I just had to make a few tucks along the smaller edge here and there to keep it in line. I didn’t care if it didn’t fit perfectly since the sleeve would not be laying flat.


Once that was done, I simply stitched the gathered side to the armscye.
I took the original sleeve, and cut it narrower, and shorter to create the lower jacket sleeve. I opted not to make an inner sleeve to support the puff. Instead, I pleated the inner upper arm, and am relying on the lower sleeve and arm to support the upper sleeve. (One of these pleats could be released if by chance the sleeve was too short).


I then pleated the lower edge of the puff to the top of the lower sleeve. I bound this seam with some bias tape to help reduce itching from the petticoat net.


And this is how the jacket looked at this point:
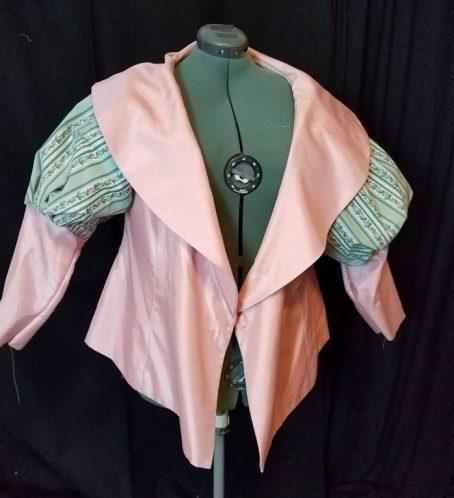
I liked how the front looked with the angles front edge so I added a frog closure to the center front and pleated the jacket down to shape it. I like to pleat along the existing seam lines. I made pleats/tucks along the front curved seam, took the side seams in (on the inside) and made two parallel tucks along the back seam to create a little box pleat in the center back. This creates a nice peplum-look. I do this with fairly large stitches so that they could easily be removed for alterations.


I REALLY wanted to reshape the collar. I twisted, folded and pleated the collar in multiple different ways and didn’t like any of them. In the end, I just left it as-is and added some lace around the edge. In retrospect, I wish I had run a row of zig-zag a couple of inches in from the edge and trimmed the collar down before adding the lace. However, I didn’t dislike it enough to change it at this point . . . and figure that could always be done at a later time.


The last thing I did was replace the shoulder pads (as I thought they helped to keep the collar up off the sleeves). In the picture above I am attempting to show how the sleeve has more shape when the lower edge is supported, as it would be when worn.
Next, I moved back to the dress and the neckline. I had a VERY small piece of the bed skirt left, and so using that was not an option. I considered making a new collar/neckline/sleeves to insert into the dress, but decided to be lazy and use a blouse. I found this one which had a great vintage look only it was a bit too small. I began by splitting it up the back. You can see how it is also pulling in the underarm area.


This was easily fixed by adding a gusset. I opened the underarm side seam, extending up into the sleeve itself.

I cut a square of scrap fabric and stitched it into the hole. You start by placing one of the corners at the underarm seam, and just stitching around in a square, pivoting at the corners. This is a costume, so it doesn’t have to be perfect. I don’t worry about perfectly measuring the hole, I just extend it as needed as I’m sewing in the square.


I added strips of fabric (folded in half) to the back opening, and top-stitched the seams. I used plastic snaps for closure. A little piece of eyelet substituted for the collar band and lace. From a distance, you can’t tell the difference.


This how things looked at this point:


I wasn’t completely happy, but, it was late so I went to bed. Sometimes taking a break helps you “see” the problems and figure out what is wrong or missing.
In the morning, I decided that the ruffles needed a little more body. I cut strips of the remaining petticoat net a couple of inches shorter than the ruffles, and lightly gathered them under the ruffles.


I felt that the outfit was disjointed, and I really wanted to add some green to the top of the dress, but, lacking inspiration, used my last bit of fabric to create a reticule.
I began by folding and shaping until I had an idea of the size I wanted (this literally was all that was left of the bedskirt).

I divided the fabric in half length-wise and made a narrow hem around the three un-hemmed sides.


I folded the top over and made a casing along the lower edge for the drawstrings. Then I decorated the top with lace.


I sandwiched the two pieces wrong-sides together and topstiched the sides and bottom, skipping the casing holes, and inserting some fringe into the bottom edge. I ran two drawstrings through the casing in opposite directions, and tucked the knots to the inside. A little petticoat net for shape, and it was done.


I think these little tweaks really improved the outfit. Now . . the thing that would make it perfect is an enormous hat with some flowers, tulle, feathers and draping. However, since I will be shipping this costume, the hat will have to wait until it gets to its destination :(.


This costume took roughly 6-7 hours to create. I’m not entirely happy with the jacket, but, I think it makes a decent costume. I considered making a belt, but, I decided not to, as I doubt the dress would be worn without the jacket. I still have mixed feelings about the collar. It does give the outfit a very matronly feel–I think Eulalie Mackecknie Shinn would feel right at home in this ensemble.
Cost: suit $5.98, bed skirt: $1.50, blouse: $1.60, petticoat net: waste, plus some horsehair braid, lace, plastic snaps, fringe and a bit of eyelet.
The length of the skirt could be adjusted by adding tucks to the eyelet. The train could also be shortened by taking tucks between the rows of ruffles, or removing the bottom ruffle from the back, or hemming it shorter. The dress could be shaped with a belt and altered smaller. The jacket could have a belt added, or the tucks made a little deeper.
This is a youtube companion post, and the video can be found here.


Amazing work! I can’t believe you created this for under $10! I loved reading and seeing how this costume came together – it was absolutely fascinating! 🙂
LikeLike
Thanks! I really like this outfit too 🙂
LikeLiked by 1 person
Pingback: Purple Jumper: Chitty Chitty Bang Bang | costumecrazed
Pingback: Pattern Testing: Turn-of-the-Century costumes; Pink Ensemble (Meet Me in St Louis) | costumecrazed