
The first transforming costume that Ella wears is for the “Impossible” scene, where the Fairy Godmother transforms her peasant dress into a white gown for the Ball. This is the finale of a long magical sequence that begins with the transformation of Marie into the Fairy Godmother, the Raccoon and Fox into Coachman and Footman, and the mice into horses. A study of YouTube videos will provide insight into various ways to do this scene, both from the Broadway version and the older Roger’s & Hammerstein’s version of “Cinderella”. Before you begin planning your costumes, you no doubt want to have some sort of production meeting to discuss set design and lighting as these can impact how you do the transforming dress.
Ours was going to be a straight on-stage transformation. In the older version sometimes body doubles were used to effect the change. In this newer version, the option of a simple transformation in low light, which a quick twirl off-stage and the addition of “more” costume/skirt would be reflective of the Broadway handling of the change. (It is worth making note that the promo shots of the Broadway transformation scene, ie the Macy’s Parade, are NOT the same as the actual stage production techniques, which can be seen with careful study of various online videos). Another older technique is to dump glitter over the head of Cinderella to help disguise the dress change. I never quite figured out how that could work, until we did our own . . and I will mention that later.
If you are reading this, you have no doubt viewed many of the more popular YouTube videos that show transformation dresses. They basically show someone, wearing a dress, twirling, and the dress changing. There are some that describe how the dress was made, but many are frustratingly lacking any insights into how the dress was constructed. While there may be recently published tutorials online now (with the increasing popularity and release of the show) when we were researching there was depressingly little help. Hopefully this post will share not only what worked for us, but also give some thoughts on what didn’t work.
What We Tried:
This is the original vest that my friend made. We are using it on a different chorus member for the show. It had a built-in peasant top. The front closed with a clever arrangement of jump rings that were held in place by a piece of plastic boning with a zipper pull at the top. You pulled the boning out of the row of jump rings, and the vest fell open. My question to her was: What about the sleeves? How will she get it off?
In retrospect, this is a viable way to get the top off, and we ended up using a similar technique for Marie. However, the way the blouse was designed, with little cap sleeves with elastic and a fairly snug corset top, it would not have slipped backwards easily. If you choose to try something like that, an early consideration is fit and how easily it will slip off.

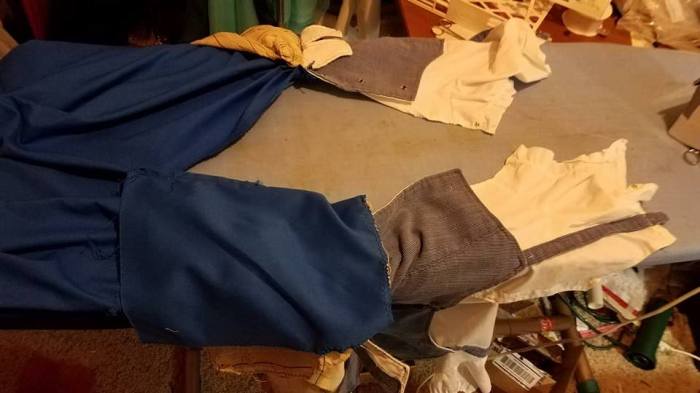
With that thought in mind, she remade the dress and it looked like this:


This variation closed with velcro at the top and sides. The skirt of the ball gown is tucked up around the waist, and the blue overskirt is stitched to the front and the back, and the sides are tucked up inside. This worked well. If you pull down on the front, the velcro opens, and the ball gown skirt falls down and she is transformed.
Key considerations are length. The overskirt cannot be too long, as the bodice will hang from it under the ball gown, and if you make it too long, it will stick out. That is why in the front it is not very full. You hope the person you are dressing has a short torso and long legs! It is also beneficial to make the Ball gown skirt as long as possible . . . you want all that length to hide the bodice/overskirt when they have dropped.
One thing to note–look at the difference in the fit of the peasant dress from the fit of the Ball gown top. It would be untrue to say the peasant dress is figure flattering. At the time, just looking at the dress in isolation, while it seemed a bit unfitted, it didn’t look unreasonable. I unfortunately, don’t have any really great pictures of Ella wearing this dress on stage. What I can tell you, though, is that when we saw her onstage, especially with the other villagers, we began to have some second thoughts about what was “good enough”.
Then, she went to do her transformation–and more problems cropped up. The hook part of the velcro on the bodice stuck to the organza of the white skirt, and her dress totally didn’t drop and the transformation was less than successful. While this had worked perfectly fine multiple times in the sewing room and during fittings, it did NOT work when she was twirling. We also wondered if the amount of time the dress was packed up made a difference. Instead of being up for a few minutes, it was packed up for several hours in advance. Did this make a difference? I don’t know. In retrospect, if you needed to use velcro, if you put the hook side on the white gown, and the loop side on the part that is being removed, it would keep it from catching. This would require vigilence between shows to make sure the velcro was staying strong and not filling up with strings.
The other issue she had was with mobility. She was supposed to do a dance in the Village scene that included high arm movements and kicks–and the costume pulled apart. Later, in the “A Lovely Night” scene as she and Gabrielle were frolicking around the table–her dress ripped apart. In retrospect, one possible solution to this would be dual closures. For example, the costume might close with a zipper AND snaps, or two sizes of snaps. The more secure closure would be used throughout the initial period of wearing, and prior to the “Impossible” scene, that could be opened, and it could be refastened with the alternative closures.
But for us, it was back to the drawing board on that one–the velcro came off, and snaps went on. What we also discovered with the snaps is that you walk a very fine line between snaps that are strong enough to hold the dress together and ones that are too strong. If they are too strong, or there are too many, or they are not in a place that gets enough tension, when she pulls the dress it will not come completely undone and it will hang up. The moral of this story is that it is important that your cast member do more than stand still at fittings, and, just because a transformation costume works in the sewing room, doesn’t mean it will work on stage.

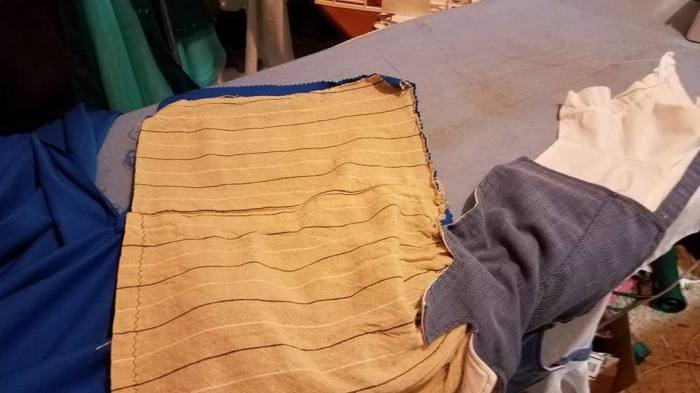
This is a mid-way version. The vest, in addition to being stiff, was also boned. The wide straps and the stiff torso make the outfit appear too big.
The change to the white covering did not help. It was a good idea–it would look like an apron and it matched the shirt, and the thought was the visual image and “idea” would help disguise the actual shape. But, the idea just didn’t translate well into reality. The white was also made from an old sheet, and so by the time there was enough fabric to be full enough to drop easily, it was quite bulky.
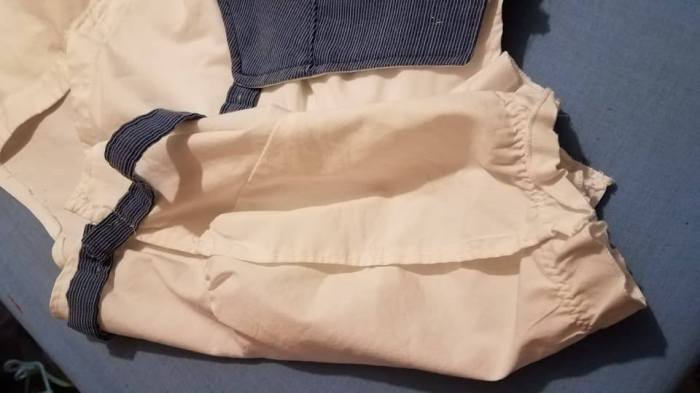
Eventually, the costumer also decided that the fabric she had made the corset vest out of was too stiff. Using a lighter-weight fabric and changing the style of the vest helped to fix some of the fit issues. Around this time, we came up with the idea of using a smaller “pouch” with a pepulum over the top. Initially we continued to try the “apron” look, with the “pouch” the same blue as the skirt, but we were not completely happy with the way the blue bump looked in the back. Then we put the white in the back as well. The white was very stark and stood out against the blue skirt and the stage background, and accentuated the bulkiness instead of trying to disguise it.


The final version of the overskirt was done on Wednesday the week of dress rehearsals. It was a Hail Mary attempt . . . either that worked, or we would have just gone with the blue bump on top and said “We tried. We are not professional costume designers”. My first attempt was with a steel blue ruffled curtain . . if you wanted to see a blimp look–THAT was it (I took no pictures in my incredibly awful fail). Luckily, my second attempt with the beige curtain worked.
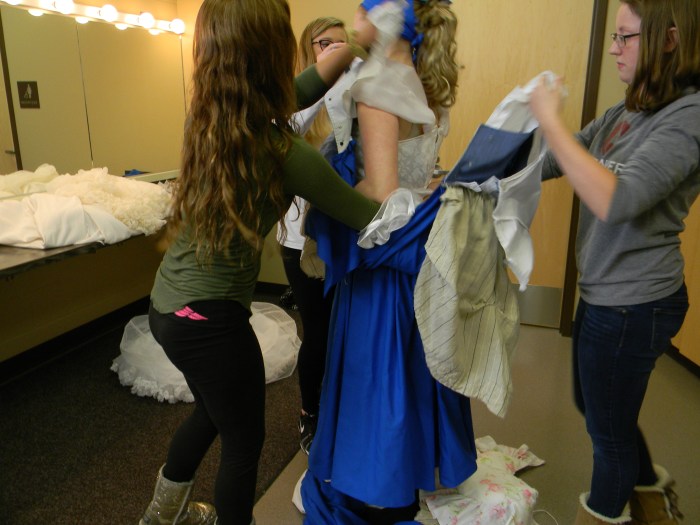
As we were beginning to trial the costumes at rehearsals we were also working on teaching Ella’s costume helpers to pack and change her costumes. Initially we had one, then two, and eventually we settled on three helpers. I would recommend beginning to use these costumes early and often–the more practice the helpers have, the quicker the changes will go. It is easy to do it in the dressing room for practice. It is much harder to make it happen back stage, in the dark, under a time crunch.
In the end, we decided that we needed a second peasant costume for Ella. This decision was party driven by how the transforming costume fit her. The other consideration was that we were struggling with the pink/gold transformation and came to the realization we were going to need to preset the costumes under the peasant outfit. We did this the weekend before the show. “Cinderella” (Broadway Version): Dressing Ella, Part 2 (Peasant outfit) discusses this outfit.
Our final Blue Transforming outfit:


There are variations from the original, but it is very similar. You can also see how well Ella fits in with the other Villagers.


The advantage to the actual performance is that the audience does not see the costumes side-by-side. The majority of the audience members are also seeing the costumes for the first time. They are also seeing them in the context of the entire stage–set, lights, other cast members. Is the skirt shorter? did it fit that way? Is she rounder? Those who are closely paying attention, especially those who are anticipating the transformation will be eagerly looking for these details. As a matter of fact, the most common complaint I heard from audience members was that they MISSED the transformations because they were looking at other things and all of a sudden . . it was over.
The Transformation Costume:
The skirt. The skirt is a matching one to the skirt on the One-piece dress. It has a waistband and pleats. Originally this was an elastic waist–that is easy, but it is too bulky and bunchy around the waist. This skirt is a simple tube that is two widths of fabric.


The top. The top is a combination blouse and corset vest that is open on the sides and shoulders and closes with snaps. It is attaches to a second skirt top, which fastens around the waist. When the bodice top is brought up and snapped this forms the “pouch” that contains the Ball gown skirt. The goal is to wrap the Ball gown skirt as low and tight as possible around the hips of Ella, with the excess fabric going toward the back, which is “disguised” as the bum pad fullness. How successful the dressers are in wrapping the skirt determines how effectively surprising the transformation is.
Originally, the transformation bodice “skirt” was too narrow to allow the bodice to drop easily. I ended up cutting slits down into the skirt, and adding”flaps”. The idea was to tuck these around the skirt and hide the opening. Again, how effectively this worked depended upon the attention to detail by the dressers. We had some inconsistency, which was mostly related to our late design changes and lack of practice. By the last show, the dressers were doing quite well!
Bodice parts hanging down from the waist. She put the closure in the front, thinking Ella would be putting this on herself.


Pulled up, showing the “pouch”, including the side slit and flap (extra piece of skirt blue, covered with overskirt fabric).


Vest: front and back with jump rings for lacing.


Side view: flaps are folded back.
Side flaps open:
Snaps on the shoulder/sleeve and side of bodice:


Sleeve & shoulder snaps closed:
The back of the overskirt had a small tuck, and this was also sewn to the blue skirt fabric pouch. This helped to shorten how far the overskirt fell down when it was under the ball gown. It also helped to shape the overskirt to cup around the pouch and decrease how much it stuck out. The overskirt was just topstitched on to the blue skirt under the vest, as it was a late addition.


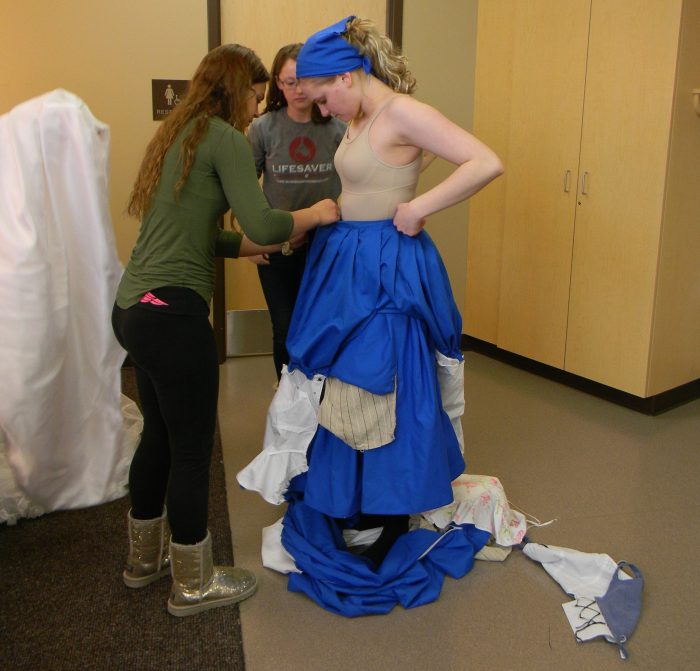
Changing from the Original Peasant Outfit to the Transforming costume:
Ella comes offstage, leaving the Village dance, and begins to take her vest off as she approaches. Her helpers are prepped and waiting, and each has their assigned role in the process.

Vest off, they quickly remove the overskirt and unzip and remove the one-piece dress and bum pad. The petticoat and bloomers remain.


The single blue skirt goes on.


The transforming top goes on. Note the white skirt off to the left of the picture ready to go.
The white Ball gown skirt goes on.


The white Ball gown top goes on. This has a separating zipper in the back.


The Ball gown skirt is prepped for packing. The skirt is grabbed at about the knee level and raised on the fold to waist level. The back is brought TIGHTLY forward around the hips, and the front is brought TIGHTLY back. Any excess “tails” should be bundled up in the back.


While Ella and a helper hold the white skirt in place, the other two helpers bring the bodice front and back up and do up the snaps.


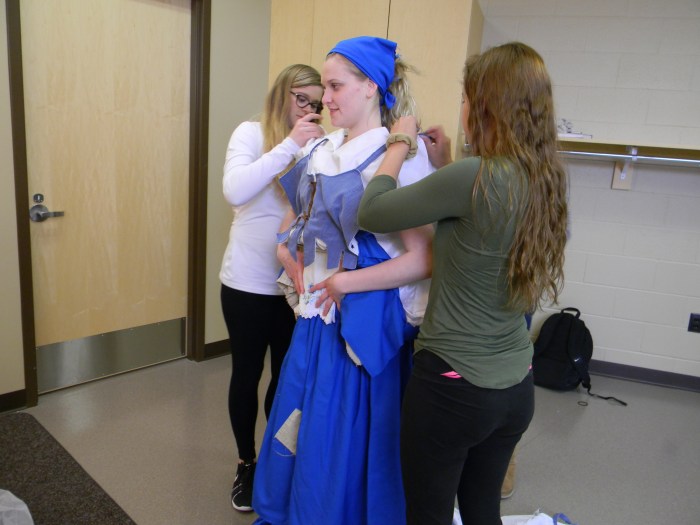


Tucking in the pouches and flaps:


A final adjustment:

And she is done:

To Transform:
She grabs her shoulders and pulls down:


During the actual performance, she would begin to twirl before she begins the process. Of note, this dress drops very easily. When she twirls, the blue skirt and the bodice fly out, which can actually impede the white dress from dropping. So, while the spinning helps to create the effect, the stopping will actually finish the transformation . . so don’t spin too long.
Remember I mentioned the older transformations that happen with glitter? This dress drops amazingly well standing still. The layers are tacked together at the bottom, and the hem is also weighted. If she pulled at the same time glitter was dropped on her head–ta da! Transformation complete.
Tips for the dressers:
Someone needs to be responsible for making sure the all of the costume pieces are laid out, and all are prepped for the change (ie any snaps done up ahead of time that need to be etc). Have a list of the order that the pieces go on posted on the wall. No matter how many times you have done it, if something goes wrong, and your mind starts to blank, the list can calm you down. I also coached my dressers that NO MATTER WHAT, Ella had to be completely dressed before she went back onstage. There is NO magic if her dress isn’t right. I didn’t care if the next scene was delayed, or if the actors on-stage had to do a little improv, her costumes had to be snapped and completely done up.
We also had to do coaching with the rest of the cast. Many of the chorus members were so focused on what THEY needed to do, and getting on and off stage themselves, that they were oblivious to what Ella was doing. The priority (especially later for the pink/gold change) had to be her costume changes. They were all great about it, once it was pointed out.
In the show:


Once the dress has changed, the Coachman comes behind her and takes the scarf and hairpiece that she removes. The Footman hands the tiara to Marie, who places it on her head, and then the Footman assists her in putting on the glass slippers. The Coachman then helps her into her cape, and she is ready to head off to the ball.
We did sometimes have some tucking problems here and there. I think in the top two pictures she is also missing her petticoat, and the added fullness helps to shape the dress. Those two are also from our LAST dress rehearsal which was actually the FIRST time we had used this overskirt. Nothing like cutting it down to the wire. I included the pics because even if she didn’t get quite completely tucked, it wasn’t horrible. In the bottom one you can see a strip of the white ball skirt, but, if you don’t know what you are looking it, it probably isn’t going to jump out at you. That one is during a show, and you can see with the added petticoat, and a little more tucking experience, how much better it looks.


You can watch a video of the costume changing process here.
The whole tucking and flap solution is not perfect by any stretch. It would be really nice to figure out a dress that could be pre-set such that you put it on through one set of fasteners, and then used a second set for the transformation.
I would highly recommend the two dress system. If you do decide to try and do it with one dress, I would suggest getting that dress done early, and putting it on stage as early as possible.
I hope this helps, and good luck in designing and creating your own transformation dresses. I’d love to hear different ideas or methods of doing this.


Pingback: “Cinderella” (Broadway Version): Dressing Ella, Part 4 (Ball Gown) | costumecrazed
Pingback: “Cinderella” (Broadway Version): Dressing Ella (Pink/Gold Transforming Costume–Act 2) | costumecrazed
HI this is a fantastic dress! I am doing a production of this same show this spring and was wondering if you rented at all. Please shoot me an email back thank you.
Nina Clark
Hillcrest Lutheran Academy drama director
LikeLike
Hi. We sold the costumes to another school shortly after doing our show, and I have no idea where they are now. Best wishes for your performance! It’s so fun.
LikeLike
Hi Liz, thank you for posting this article, i’m currently making a transformation dress and have used the two dress method. two bodices, one which is static for most of the show and another that collapses. i’ve used eyelets and fishing cable up through the bodice sides and through the built in sleeves. at this point and without the correct gown below it seems to be working well. (off the manequin and not the person) at this point. i am quietly confident that it will work but that remains to be seen! i will try to put all of the skirts under the bodice to avoid the bulk around the hips, so will be using lightweight fabrics to make the gown skirts in the hope that this will help. i should be ready for a test run by mid next week when i have the gown finished. Your article has been super helpful in construction and letting me avoid all the wrong steps. great time saver thankyou.
B Huey
LikeLike
I’m so glad it was helpful! I wish you the best of luck and I hope you show is fantastic 🙂
LikeLike
Just stopping by to thank you for documenting all of the work you did on Cinderella. We just closed our production on Saturday – and it was my first show ever to fully costume, with a cast of 50! Needless to say it was quite overwhelming but having your blog as a resource helped me to feel confident that it was possible (insert Impossible, Possible pun here). We rented a bunch but upcycled and sewed a ton, including this first transformation look. Thank you again for sharing your creative process!
LikeLike
I’m so glad it was helpful! Sometimes just an idea can help to spark the creative process! It’s a labor of love for sure. This is such a fun show… I’m sure you’re audiences loved your efforts!
LikeLike