


I have been itching to write this post as this was a super easy, and really fun transforming costume and I have been wanting to SHARE. Now that the show is over so we won’t spoil the surprise, and the costumes have been washed, I was finally able to get together with the girls and so am able to share with you how we did this costume. This was a very popular transformation in the show. I think partly it is because we had a gorgeous Fairy Godmother dress, and partly because it was somewhat unexpected. Since this show is so new, unless you had the good fortune to see “Cinderella” either on Broadway or one of the touring shows, most of the audience has never seen this version. So, while they know “magic” will happen in the “Impossible” scene . . . they don’t know when it will start and when it will happen.
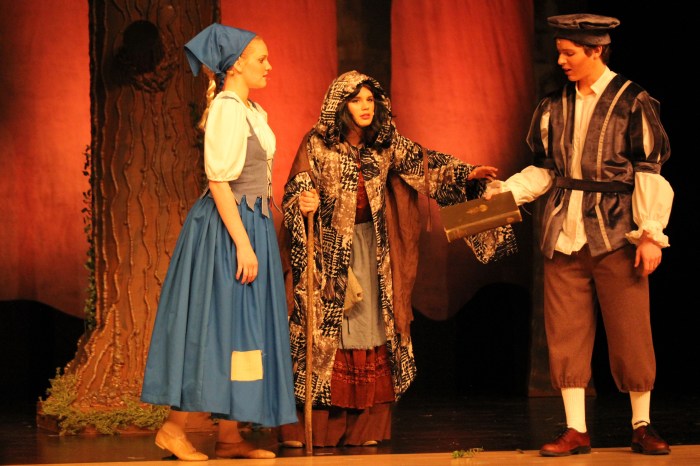
The dual characters of Marie and the Fairy Godmother are almost two completely different people. One is a crazy old lady, and the other, in her own words, is a crazy lady in a beautiful dress. Our cast member chose to play Marie as an eccentric, hunched over old lady which made the transformation into a beautiful upright Fairy Godmother all the more dramatic.
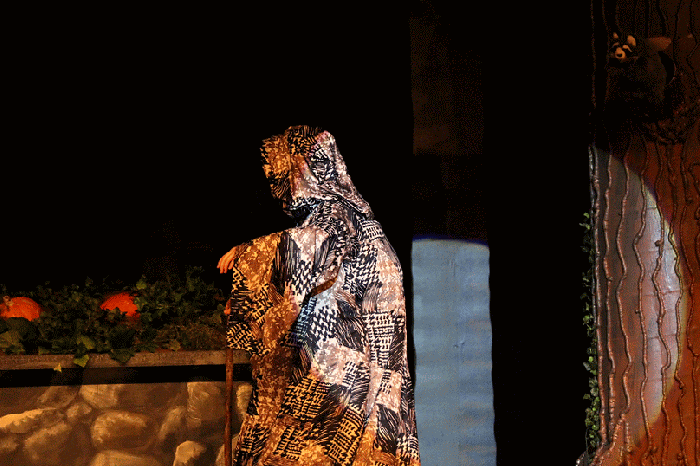
The Marie Costume:
The Cape is probably the most important part of the Marie costume. It is the main visual component of the Marie costume. It also needs to be a part of either the transformation costume, or, it needs to be voluminous enough to cover the FG dress in “Impossible” before being tossed to the side. It also needs to have a hood to cover the nice FG hair (and possibly a headpiece). Unless you had really creative staging, there is not time for Marie to go off-stage to change as Ella states “you’d have to be a Fairy Godmother” and surprise! There she is!
I struggled trying to figure out what to make the cape out of. I did not have a clear vision of the Fairy Godmother (FG) dress. which didn’t help. I had a few possible dresses to upcycle, but nothing that was “IT”. The Broadway version of the FG Costume is a voluminous pale orchid gown. The cape would need to go over the dress, and then under the dress . . . and I had an idea of how I wanted to try to do the transformation, but, it was like a puzzle where you can’t find the first piece. I had a vision of a full length cape in my mind, and I thought it probably needed to be a soft fabric so that it could fold under the dress after the transformation. So . . what fabric will look old and ratty, yet, be lightweight? It also needed to be affordable, since the cape would be large, and, not scream “modern”. I thought something with a print or pattern would be best, but I didn’t want it to scream “modern”, so I didn’t want a camo-type fabric.
I finally found a 9 yard piece of “Ivory/Stone Gray/Midnight Navy/Multi Abstract Print, Poly/Lycra Charmeuse 58W” from FabricMart in the $1.99 clearance section. I spent $17.91 on the fabric (and $8.75 on shipping). When it came, I was a little unsure, and thought maybe we would dye it a bit darker. (We tried, using brown Idye . . it didn’t take). I liked the patchwork look of the pattern. I also liked that the pattern would help to disguise any potential odd bumps or bulges that might occur with the transforming costume underneath. When I texted my sister a picture of the completed costume, her response was “That is one UGLY cape”, and I thought “yes!”. That perception of ugliness makes it look old, ratty and coarse, even if it isn’t. The large, bold pattern was also effective on-stage.


I found this pattern at Patterns of Time:

And recruited a volunteer to make it. I had envisioned that it would be floor length, and that the top would be lined to the waist. However, when I got it back, it was mid-calf length and fully lined (and gorgeously made, I might add). I did have a moment of panic that it wouldn’t work, but, after recruiting a daughter to be guinea-pig, I was able to roughly make the transformation work and I knew we had a winner! I actually am quite happy with the shorter length, and I love that the sleeves are fully lined. I also think with the lightweight fabric that the full lining made a much nicer quality costume.
I had forgotten the pattern didn’t have a hood. I always knew it needed a hood, and somehow I expected my volunteer to know that through mental telepathy or something. No worries . . I had some extra fabric and a hood is easy to make. I found a cape pattern with a hood. I didn’t actually use it, but I do like to look at the shape of pattern pieces and the instructions to make sure I am headed in the right direction.


I knew I would want a wide opening that would frame the face of Marie. I also wanted it loose so that it would hide whatever hair she had, as well as accommodate a headpiece (if we got that far, which we didn’t).
I did a little measuring and cut out the hood. I made the hood deeper front to back, and then gathered it a bit at the top. I also made the lining smaller than the fashion fabric.


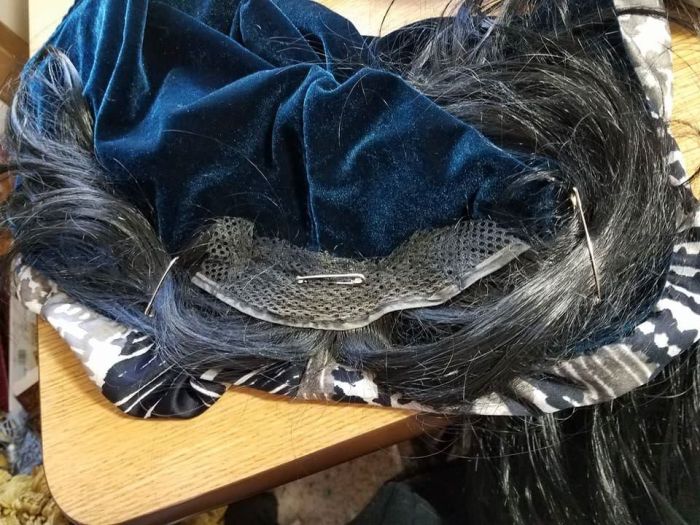
I used a piece of stretch velour to make the lining. I picked velour because it has enough of a pile that it “clings” to hair and I knew that would help keep it in place.


The fashion fabric. The first picture is just “as is”. In the second picture, I gathered some of the outer fabric at the top. That pushed the hood forward to help frame her face, and gives more shape to the hood.


I stitched it completely closed, and pinned it to the cape. I actually forget to go back and sew it to the cape, so it remains pinned. It worked.
I cut an old black wig and pinned some bangs to the front. We pinned them to the sides to keep them from falling in her face. These bangs fall back and away with the cape when she “transforms”. We chose to use a hair color similar to that of the cast member, and (conveniently) we had this ratty, uneven wig left from the Enid shower-scene in “Legally Blonde”. You could also use a gray or white wiglet or yarn to give an older look to Marie.
I knew that the transformation part of the costume would be more bulky and “padded” than the original costume. In order to make this difference less noticeable, I designed the original costume to have multiple layers and also to have extra padding.
Using an old crib bumper pad, I fashioned a “vest” for Marie to wear. The front tied shut, and the back had extra pads to give her a Dowager hump. This, combined with her stooped posture, perfected the look of an old lady. Basically, I stitched two pieces together in the center back, cut out some armholes, stitched the sides together under the arms, and added some folded pieces to the back. Old bumper pads are a great source of really stiff interfacing/filler. Some resale stores don’t sell them due to SIDS issues, so you may have to look around.


For her layers, she began by wearing a pair of bloomers. These are important as her dress will pull up as she twirls for the transformation. Next came a brown skirt made out of a tablecloth. This is so boring I didn’t even take a picture of it. I took the tablecloth and cut it in half and sewed it together to make a tube. This was not quite long enough length, so I gathered it to a yoke. I was thinking this would never show, so I used a piece of old sheet. It actually DID show in the transformation period, so I just stitched a piece of the cape material to the front to cover the sheet.


The next layer was a dress:


I picked this dress because it had a nice warm brown color. The skirt was crinkly and it had some bottom detailing. I cut the back open and finished the edges with a zig-zag and added velcro at the top for a closure. I also slit the sides part way up for movement.

Next I added a gray-blue overskirt out of a coarsely woven tablecloth. This was a simple skirt with an elastic casing for a waistband. I cut an oval in the skirt, folded the edges under, and made a casing. This is really rough sewing, lol, and if anything, the added bulk around her waist would add to the shapeless image of Marie. I picked this tablecloth because of the coarse weave. I also liked the color because it coordinated with the corset-vest Ella wears and provided a little visual interest to Marie. The addition of a horizontal line in the front helps to visually shorten her appearance as well.

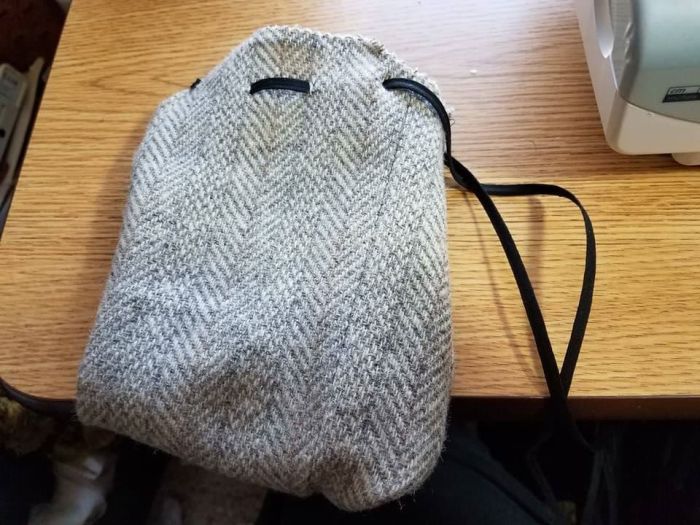
The pocket was made from a piece of herringbone wool from an old sport coat. I cut out an oval shape, folded it in half and sewed the sides. I ran some narrow corset tie through tiny slits in the fabric and then turned it right sides out. (The seam is from the jacket construction).
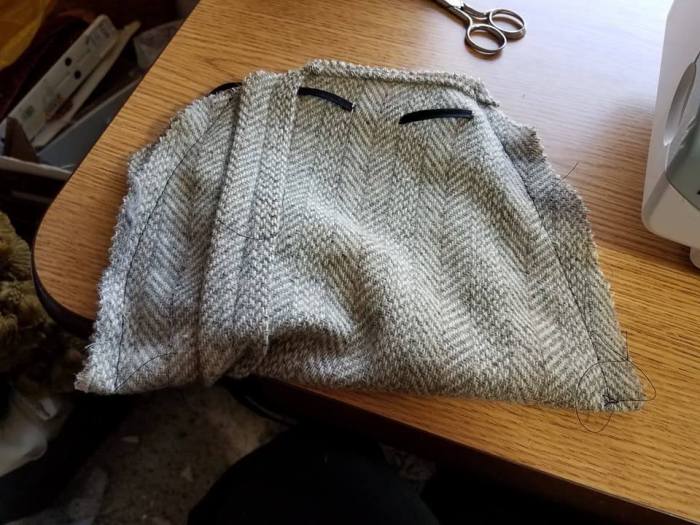
Done. I just pulled up the string and then pinned the ties to the overskirt at the desired height. I think a pocket purse is an easy way to “age” an outfit.
To finish the outfit I made a “cape” out of a brown linen skirt.


I didn’t bother much with shaping it around the neck/shoulders since it would be worn loosely over the top, and she would have the hood as well. This was a prop more than a costume piece.

I had my moments of doubt about the cape fabric when it arrived . . but I do really like this costume on stage.
The Fairy Godmother Dress:
As I mentioned, I did not have a good plan for the FG dress. As luck would have it, I posted a request for donations of old Prom, Bridesmaid or Wedding dresses on our Musical Facebook page, and I got a phone call. When I went to pick the dress up, it was a beautiful pale blue, mesh tulle dress COVERED in jewels and glitter. It just screamed “Fairy Godmother”.
Since this would be a transformation dress, the first thing that I did was to cut all the petticoat net out from the dress. I left the lining, just removing the petticoat net itself. There were multiple layers of tulle, but they squished down to a very small space. The dress was strapless, and the bra part was heavily encrusted in jewels and the corset area was sheer mesh. A volunteer hand stitched a lining into the bodice. We then added sleeves so it was no longer strapless. Sequin ribbon was added for trim and a little extra glitz.


The dress had a corset back and still had the modesty panel. We left that, and just laced up a few of the loops to close the dress. The sleeves wanted to slide off, so I just added some straps in the back and we started the lacing at the top around those straps to pull them in. It worked fine. There is plenty of time to get this change done. Once again, adding sleeves to a modern Prom dress (if you haven’t been reading my blog, several of my other posts about upcycling dresses describe doing this in more detail). The fabric for the sleeves came from a different dress/bolero outfit. I anticipated needing to add a small train to help cover the transformed cape, but in the end, with the mid-calf length, we didn’t need to do that.
Now it was time to put it all together. This was the first run-through for my cast member (ignore how I sound like an idiot seal at the end, lol):
How we prepared for the transformation:
Marie removes all of her costume except for her bloomers and her brown skirt. The cape has a twill tape waist band on the inside which is sewn to the back side seams in two places. This secures
around her waist. You can see it hands loosely in the back. (The cape material in the front is the extra piece that was added to cover the white yoke on the brown skirt.)


Next, she puts on her hoop. A flap of cape material is sewn to the INSIDE of the hoop.


Next comes the FG dress.


And her wand:

The FG skirt is rolled up WITH the hoop. Marie help to roll and support the center of the dress as her helper moves out.


The flap is brought up and tucked into the top of the bodice.


The helper goes to the back, and twists the hoops and skirt together and up, and pushes them against Marie’s back. This takes some practice. The hoop we used is an inexpensive 30″ circumference 3 ring short hoop. The memory wire will pop right back out during the transformation. I would suggest reinforcing the stitching on the hoop channels, or monitoring them for needed repairs. We did not connect the hoop to the skirt. We also did not add weights to the hem of this skirt.


While supporting the dress with one hand, pull up the cape one side at a time:


Final adjustments. She does not actually close the fastener at the top of the cape while she wears it. The skirt/hoop are held against her back by the cape and “trapped” by the ties securing it to her waist.


Dressed and ready to go:

To begin the transformation, she begins to spin and drops her head back to remove the hood while bringing her arms up to slide the sleeves off.


She then brings up her hand to pull out the want (we forgot to stage it) and pull the flap out of the bodice.


She then pushes on her skirt to make sure it is unrolling, maybe giving a hip shimmy to help it along if needed. And she is done. The twirling helps to pull the skirts out and makes the transformation more fun, but STOPPING is what completes the transformation and helps the skirts drop.


Marie transformation! more info at http://www.costumecrazed.me
You can see the video of our transformation costume here:
I really loved this costume, and so did the audience! Our high school participates in the IHSMTA (Iowa High School Musical Theatrical Awards) program, and the biggest comment that the adjudicators made was that they were so busy watching other things that some of them missed the transformation (a giant inflateable pumpkin was starting to appear about now, plus Ella was talking). There were several suggestions of spotlighting Marie for the transfromation. This sentiment was echoed by audience members that I talked to as well. As a costumer, I found this surprising because my goal to make the “magic” happen didn’t include audience appreciation of the event, I wanted it to happen for the “shock and awe” at the change, not the actual process of it.
I had hoped to create some sort of pop-up headpiece using a spring loaded hinge and a headband but we simply ran out of time.
I hope this helps you to make your own transforming costumes and gives you some great ideas!


Pingback: Places I like to order from: AFC-Express | costumecrazed
Hi, What size hoop skirt did you purchase for Marie’s transformation? We bought one that is too big and yours looks just right. : ). Thanks!
LikeLike
About 30″ diameter, three ring tea length…the ones you can get pretty cheap. Hope you get it figured out! You can also usually make the hoops smaller by sliding then together in the casings.
LikeLike
This would be a really cool idea if William Ivey Long hadn’t already done this in 2013 and won a Tony Award for his work. Now everyone feels compelled to steal his concept and claim it as their own.
LikeLike
I’m sorry you feel that way. These were our costumes, designed and produced locally by amateurvolunteers. The show is licensed for production by theater groups. Not sure how you think a show can be costumed without….umm….costumes. His, by the way, were infinitely cooler (and MUCH more expensive) than our efforts.
LikeLike
Hi there! Do you all rent any of your costumes? I am interested in renting this Marie-> Fairy Godmother costume from you
LikeLike
Hi. Glad you liked the costumes…unfortunately they were sold years ago and I have no idea where they are now.
LikeLike