
It’s been awhile since I had a good excuse to work on some costumes, so I was excited when I was asked to help costume some of the main characters in an upcoming production of “Meet Me in St. Louis”. I was familiar with the stage production as my older daughters were in a high school production in my pre-costuming days. I really enjoyed costuming this time period when I helped with “Chitty Chitty Bang Bang” and welcomed the excuse to delve into it a little bit deeper. Add to that the severe boredom of sewing bazillions of masks and scrub hats in this time of Covid . . . and I am ready to PLAY!
I’ve been doing some research into different productions of the show, well as the original movie costumes and historical garb of the time (helped along by my hours sitting at the sewing machine while watching videos). This show is somewhat unique in that the exact year is pivotal to the plot, and historical pictures of the event are available. I’ll address some of my thoughts about costuming the show in a future post. At this point, I haven’t seen the costume plot or “vision” from the director, so the costumes I am making are just for fun and exploring ideas, techniques and silhouettes and are not intended for the upcoming production. I get crazy busy during zombie/vampire season in my Etsy store, so I thought I would start with some some pattern testing and concept costumes while I have the time. Starting with a pattern sometimes helps me “see” the shapes, and is a step toward upcycling and visualizing “costume possibilities”.
As I work through a series of costumes, I’m going to try to explain more about some of the things I look for when I am looking at resale shops. If you are an experience upcyler it may be redundant, and if you have other bits of advice to add, be sure to comment.
I had a lot of fun making this costume, and have been singing “Put on your Sunday Clothes” on repeat.
Edwardian Blouse:
The first pattern that I decided to try was Black Snail # 0816. This was a digital download purchased on Etsy (https://www.etsy.com/shop/BlackSnailPatterns).
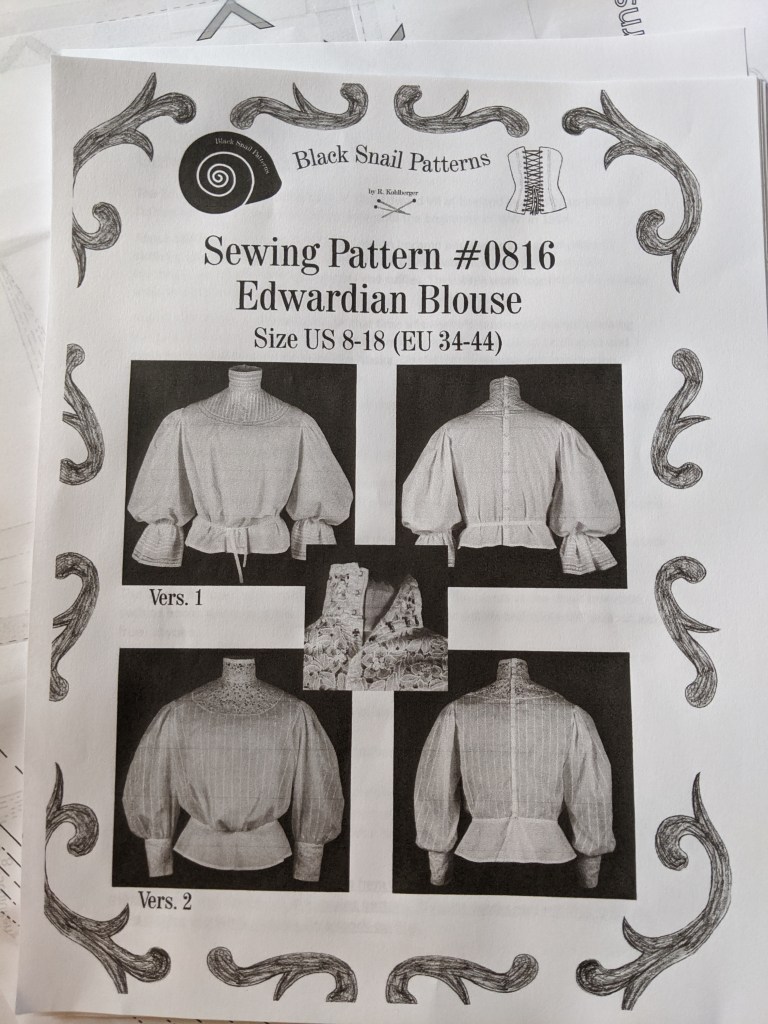
I haven’t purchased full size digital patterns before. While they are less expensive, and have the advantage you would print out individual sizes . . . 49 sheets and lots of tape later, I had my pattern. This one comes with a nice plot of the pattern, so if you want a different size, it’s easy to go and print the appropriate pages.
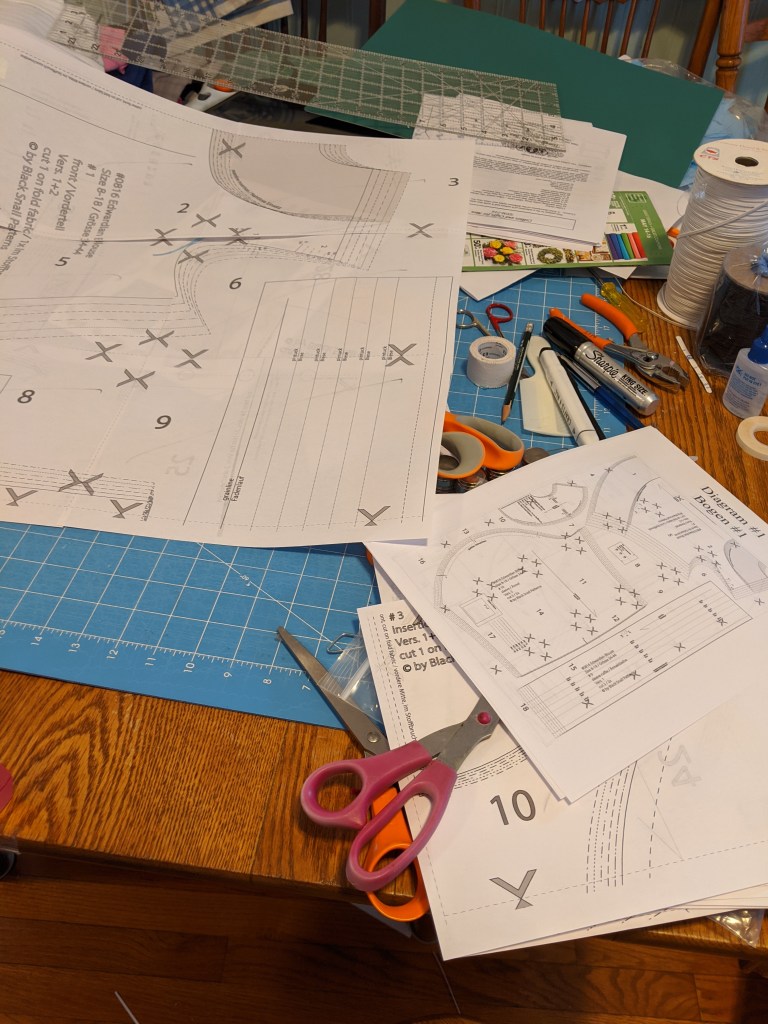


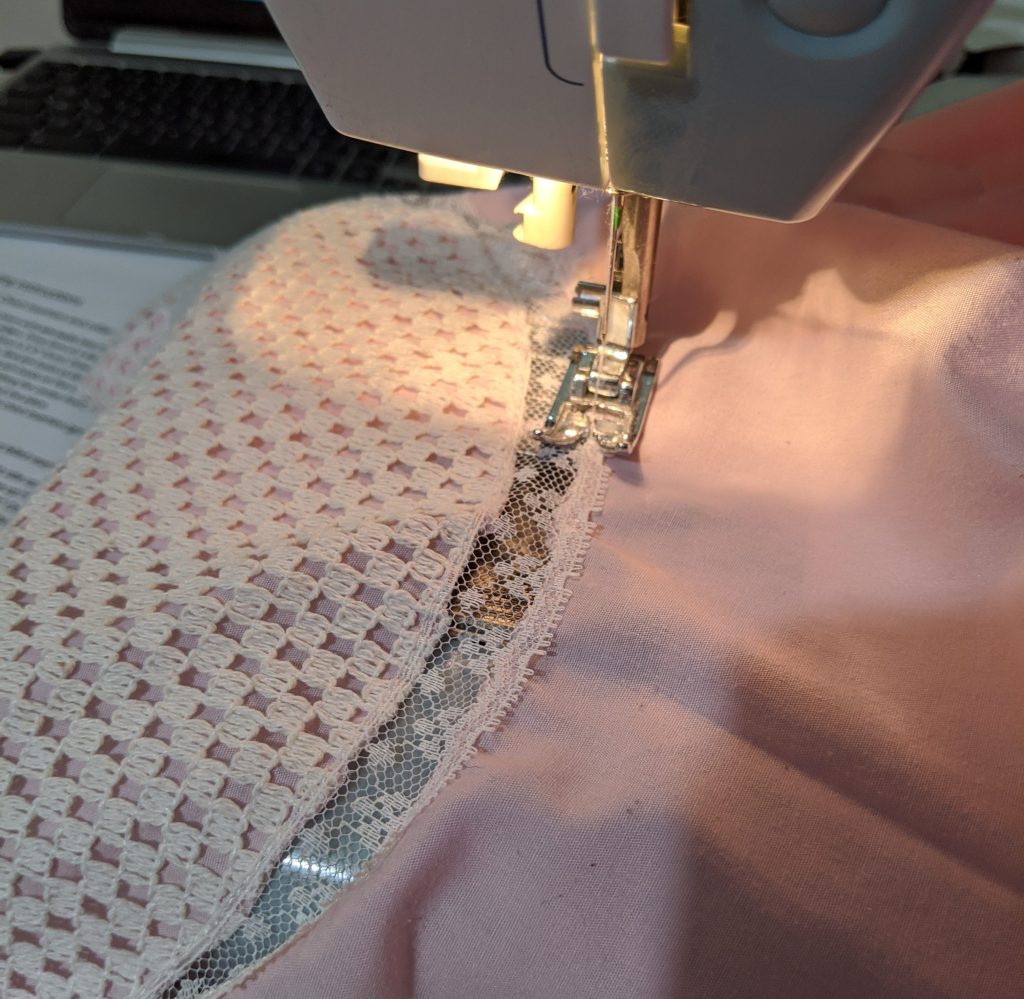
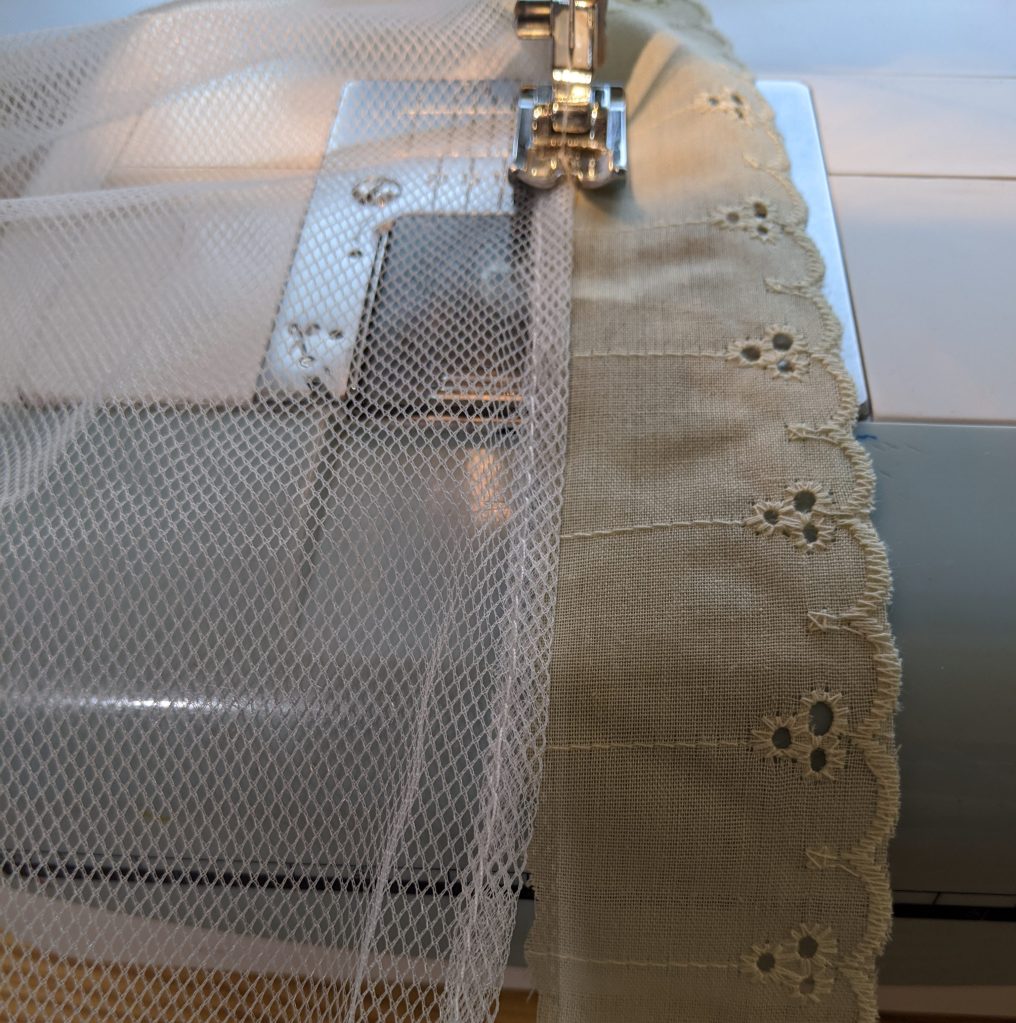
I decided that I was just going to use scrap fabric and do a real basic test without improvisation (great goal . . . not something I’m good at, lol). I used an assortment of worn/stained crib sheets in various shades of pink. I cut the pattern out as directed, and decided use the lace yoke option (cut from a valance).
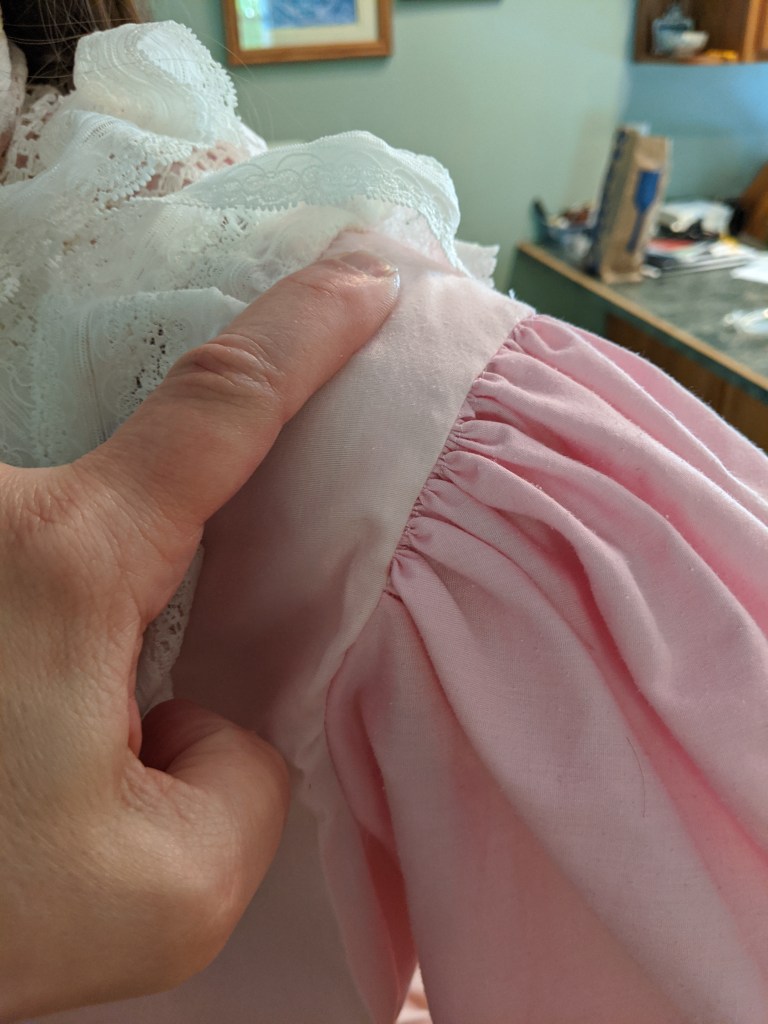
The yoke was a separate piece that was basted to the bodice. The insertion lace was stitched over the yoke.

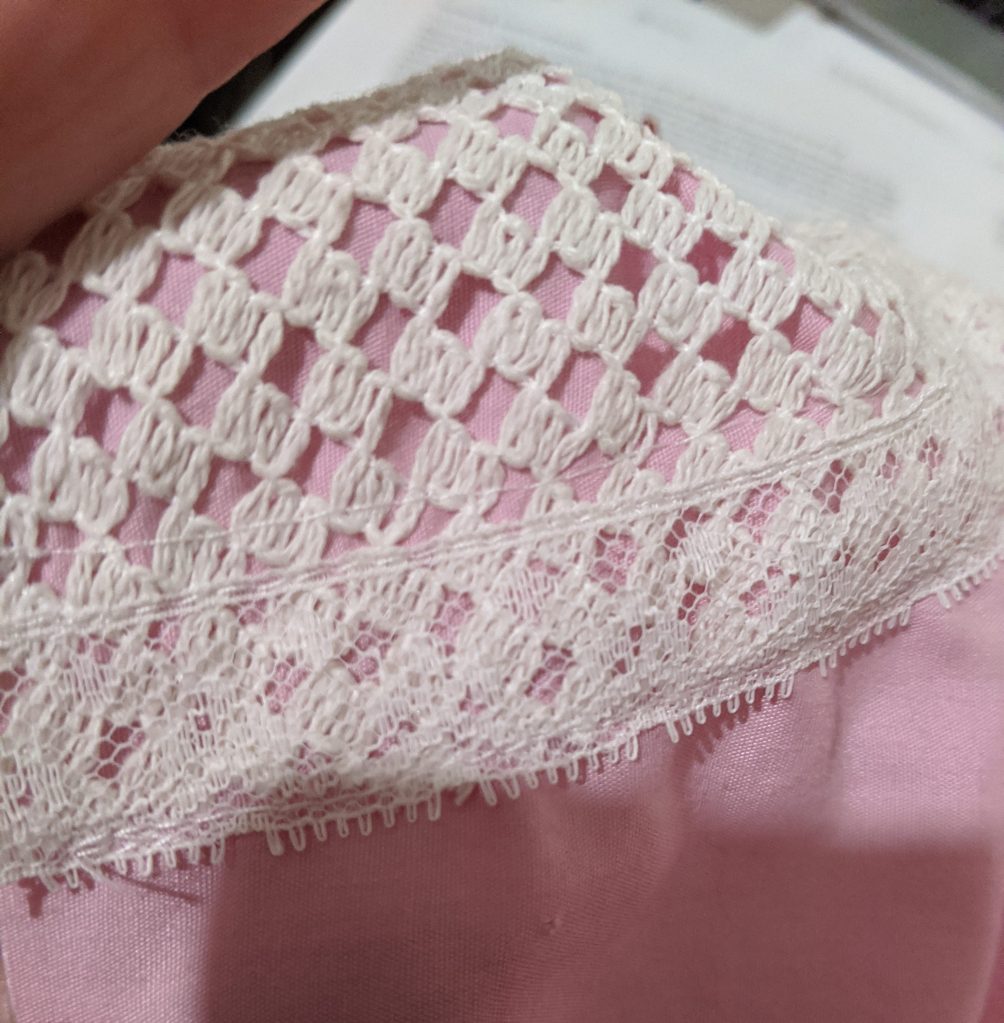

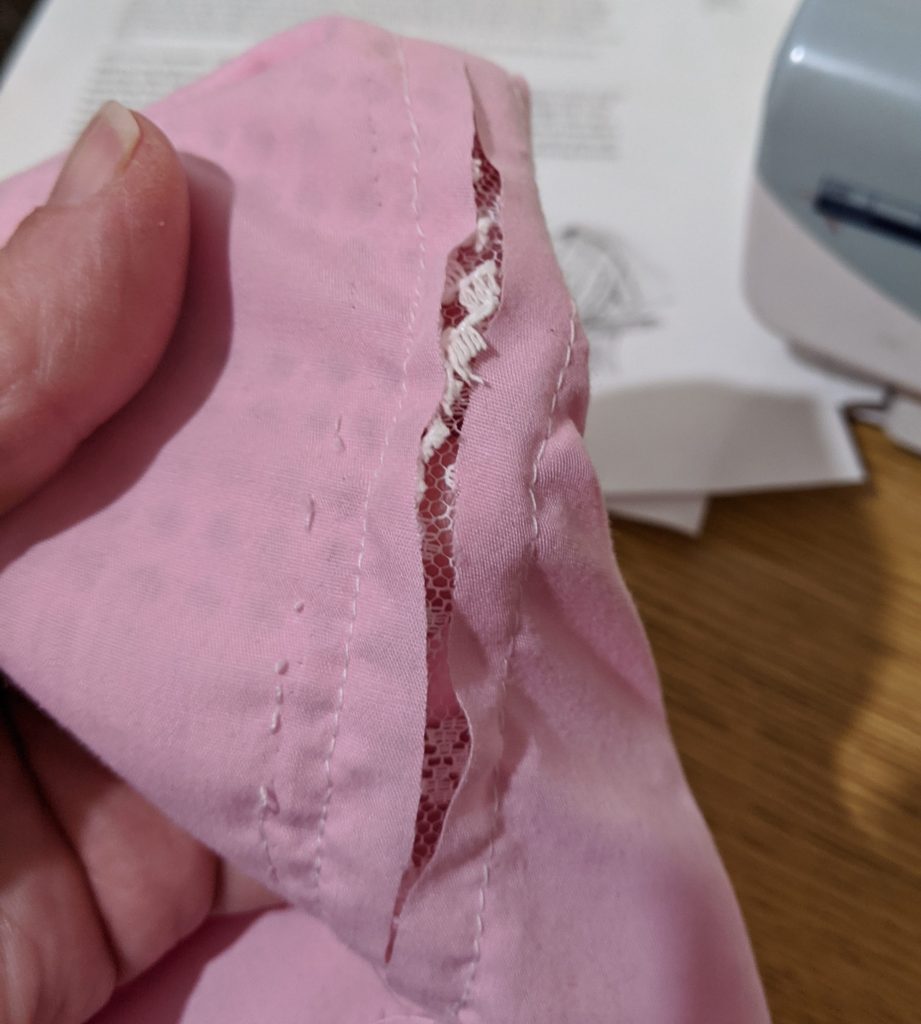
Next, the fabric was carefully slit over the lace, and then trimmed away. A narrow zig-zag was used on the right-side edges to add strength. I’m not sure basting the yoke was necessary as long as a good pin job was done. This was actually easy and fun. The pattern suggests running an easing thread along the top edge, which I can see would be helpful, especially if the lace was wider.

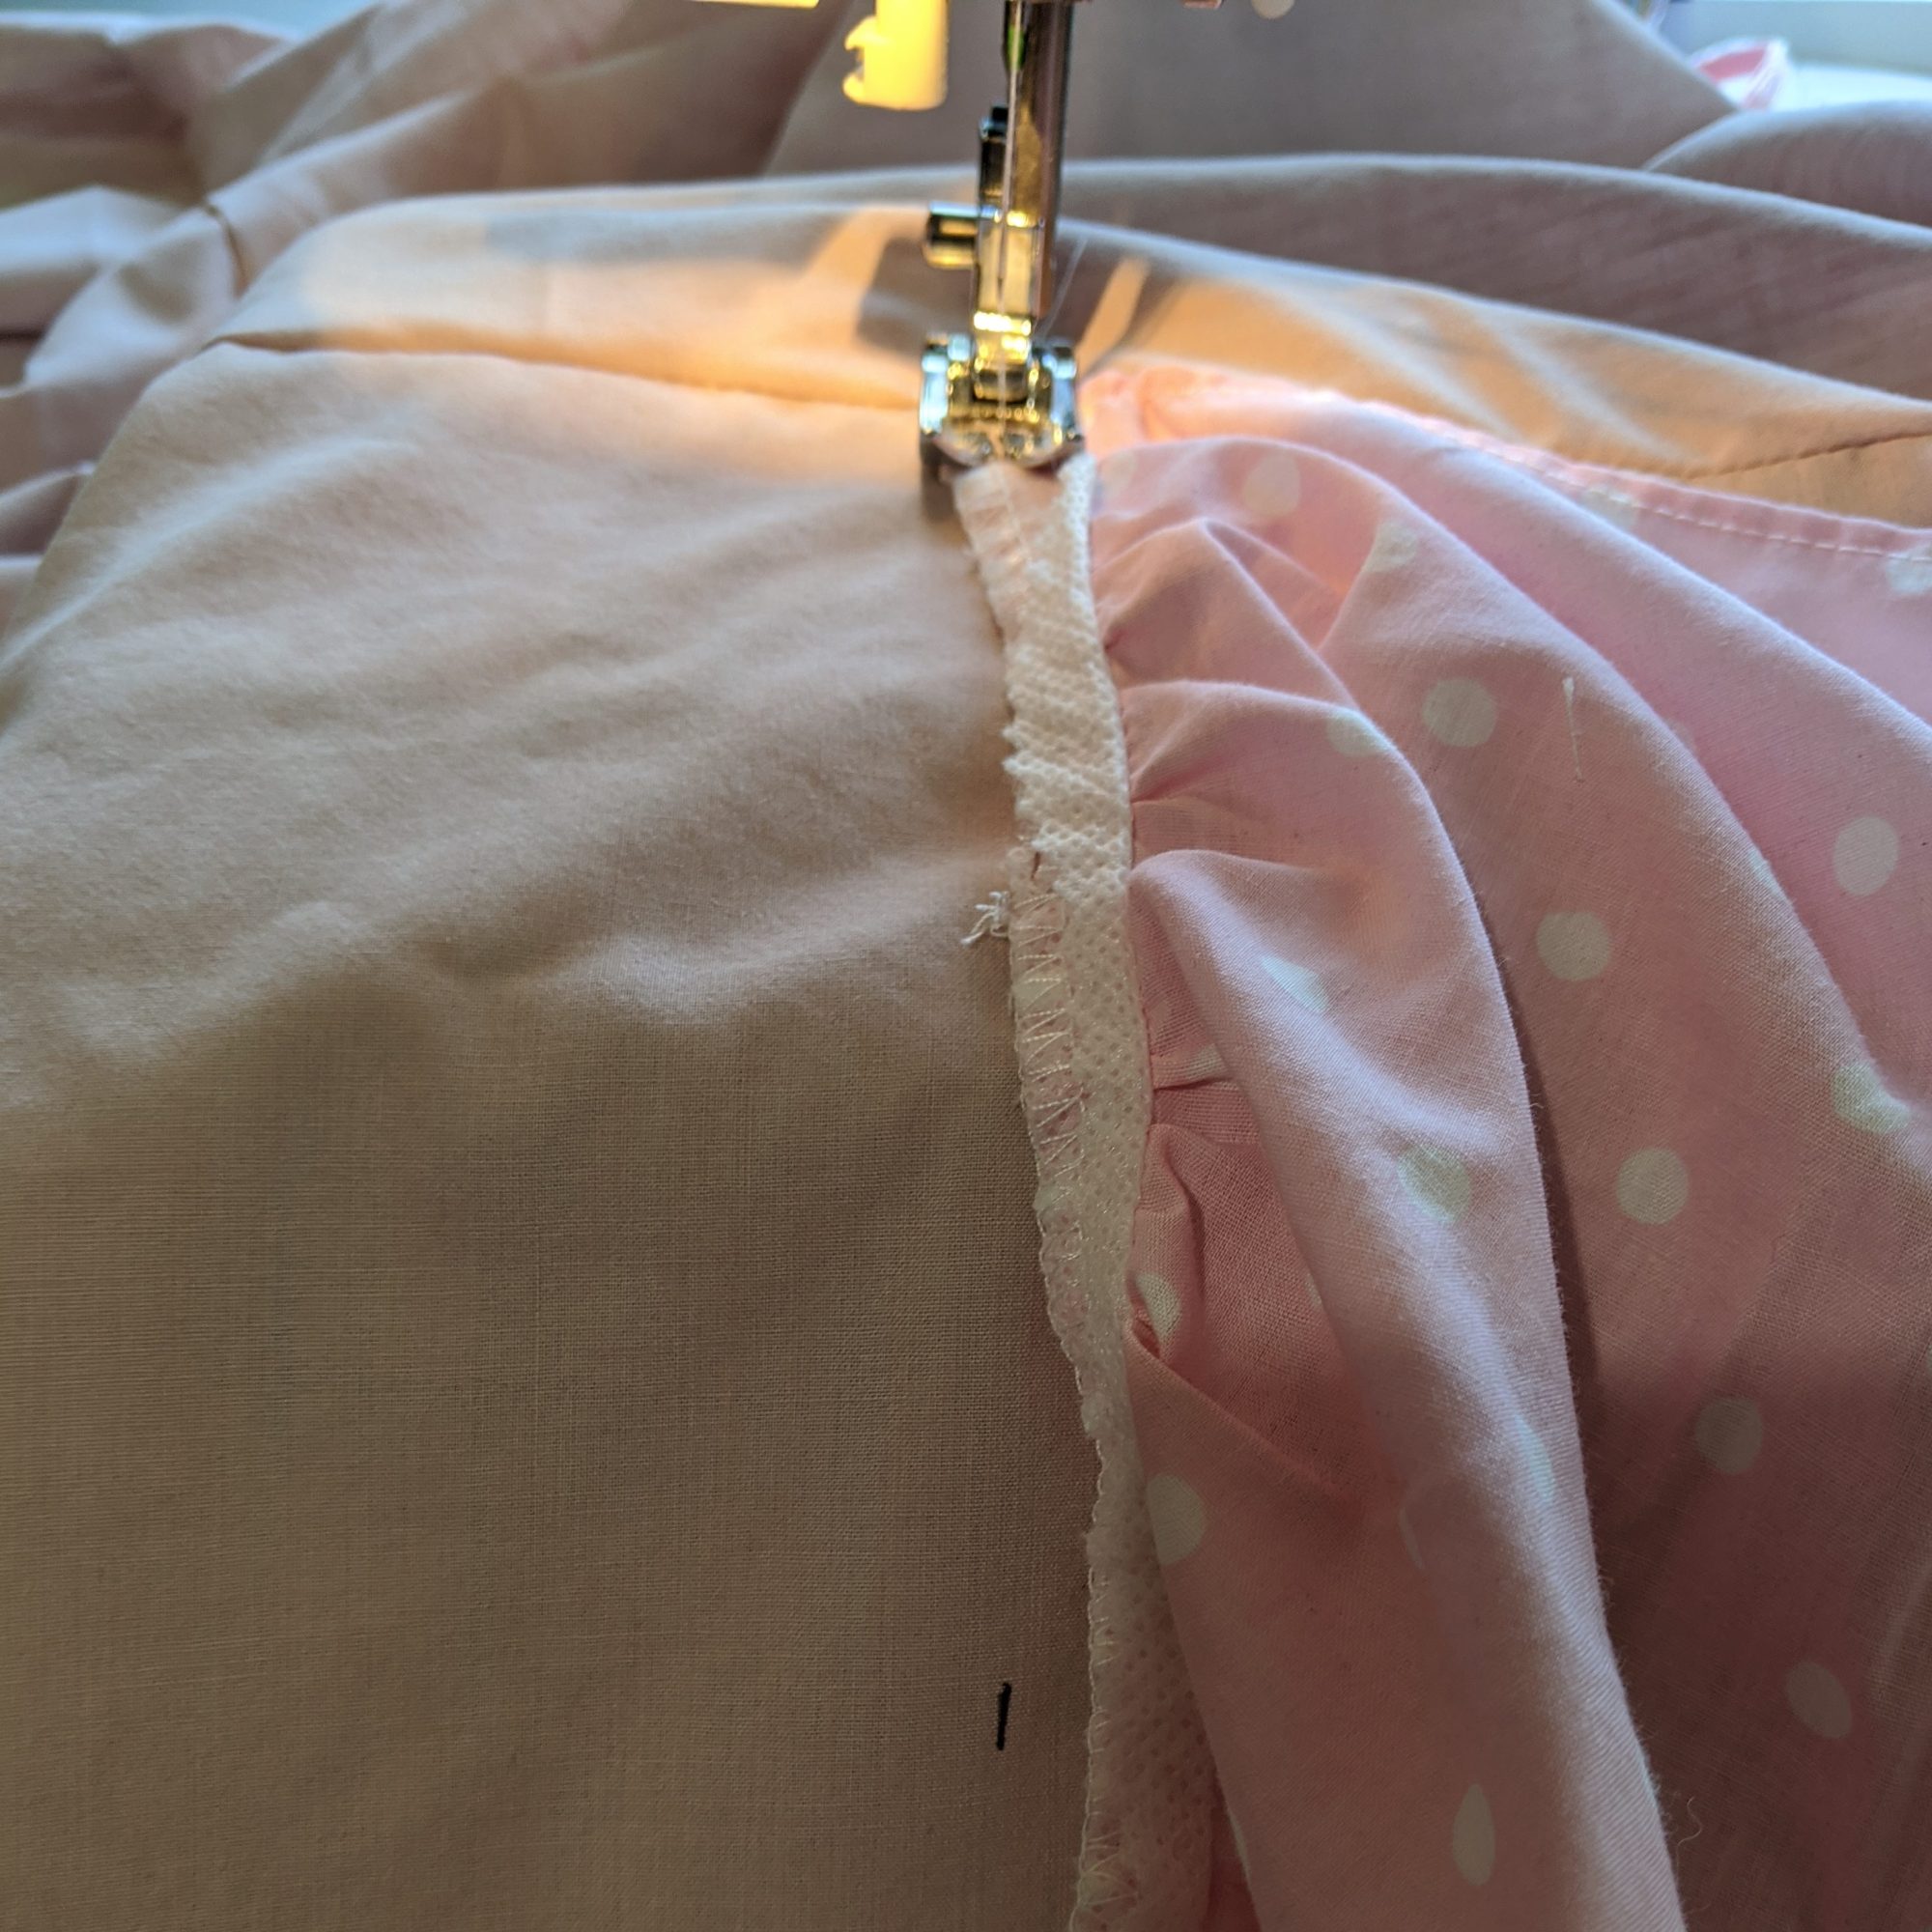
So . . . then I went off-track. What if I added a little detail to the yoke using a similar cut away technique? I drafted a pattern shape, stitched around it (or over it, lol), and then cut the extra fabric away. I think I vaguely planned to cut away the fabric around the neckline, and I cut away the lower fabric instead.


It worked . . but then I decided it needed a little extra emphasis, so I added a wider lace ruffle along the curvy edge. . which actually hid the insertion I did. Not the best planning on my part, but I did learn some new techniques, and I was surprised how quick it went, and how much detail was added to the costume.
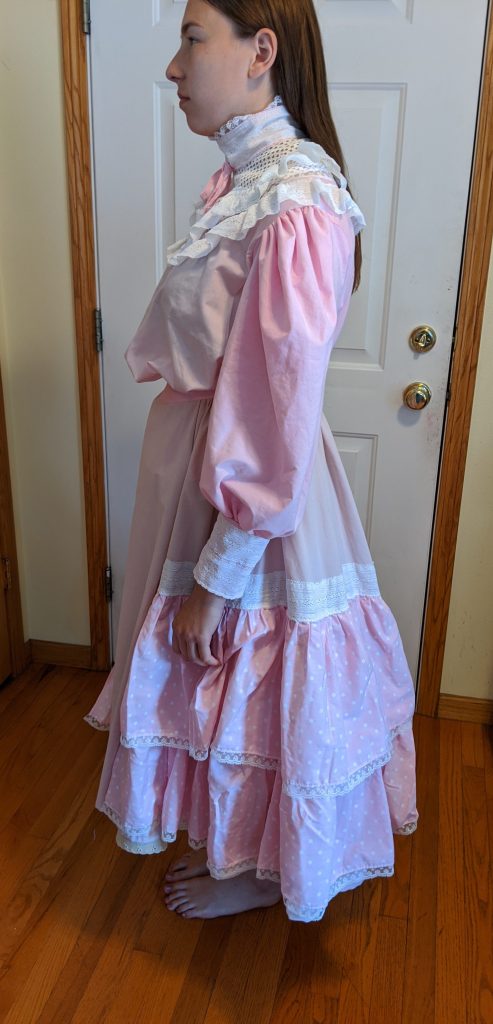
The next step was adding the collar. It is a single layer, decorated it with lace, with a piece of boning in the back for support. I attempted to finish it as directed with a placket. I got totally lost at this part of the pattern, but I wasn’t too obsessed about it since the placket on the edges of the collar is designed for hook & bars, and I wasn’t planning on using those for a costume anyway. I just fudged it and used snaps.
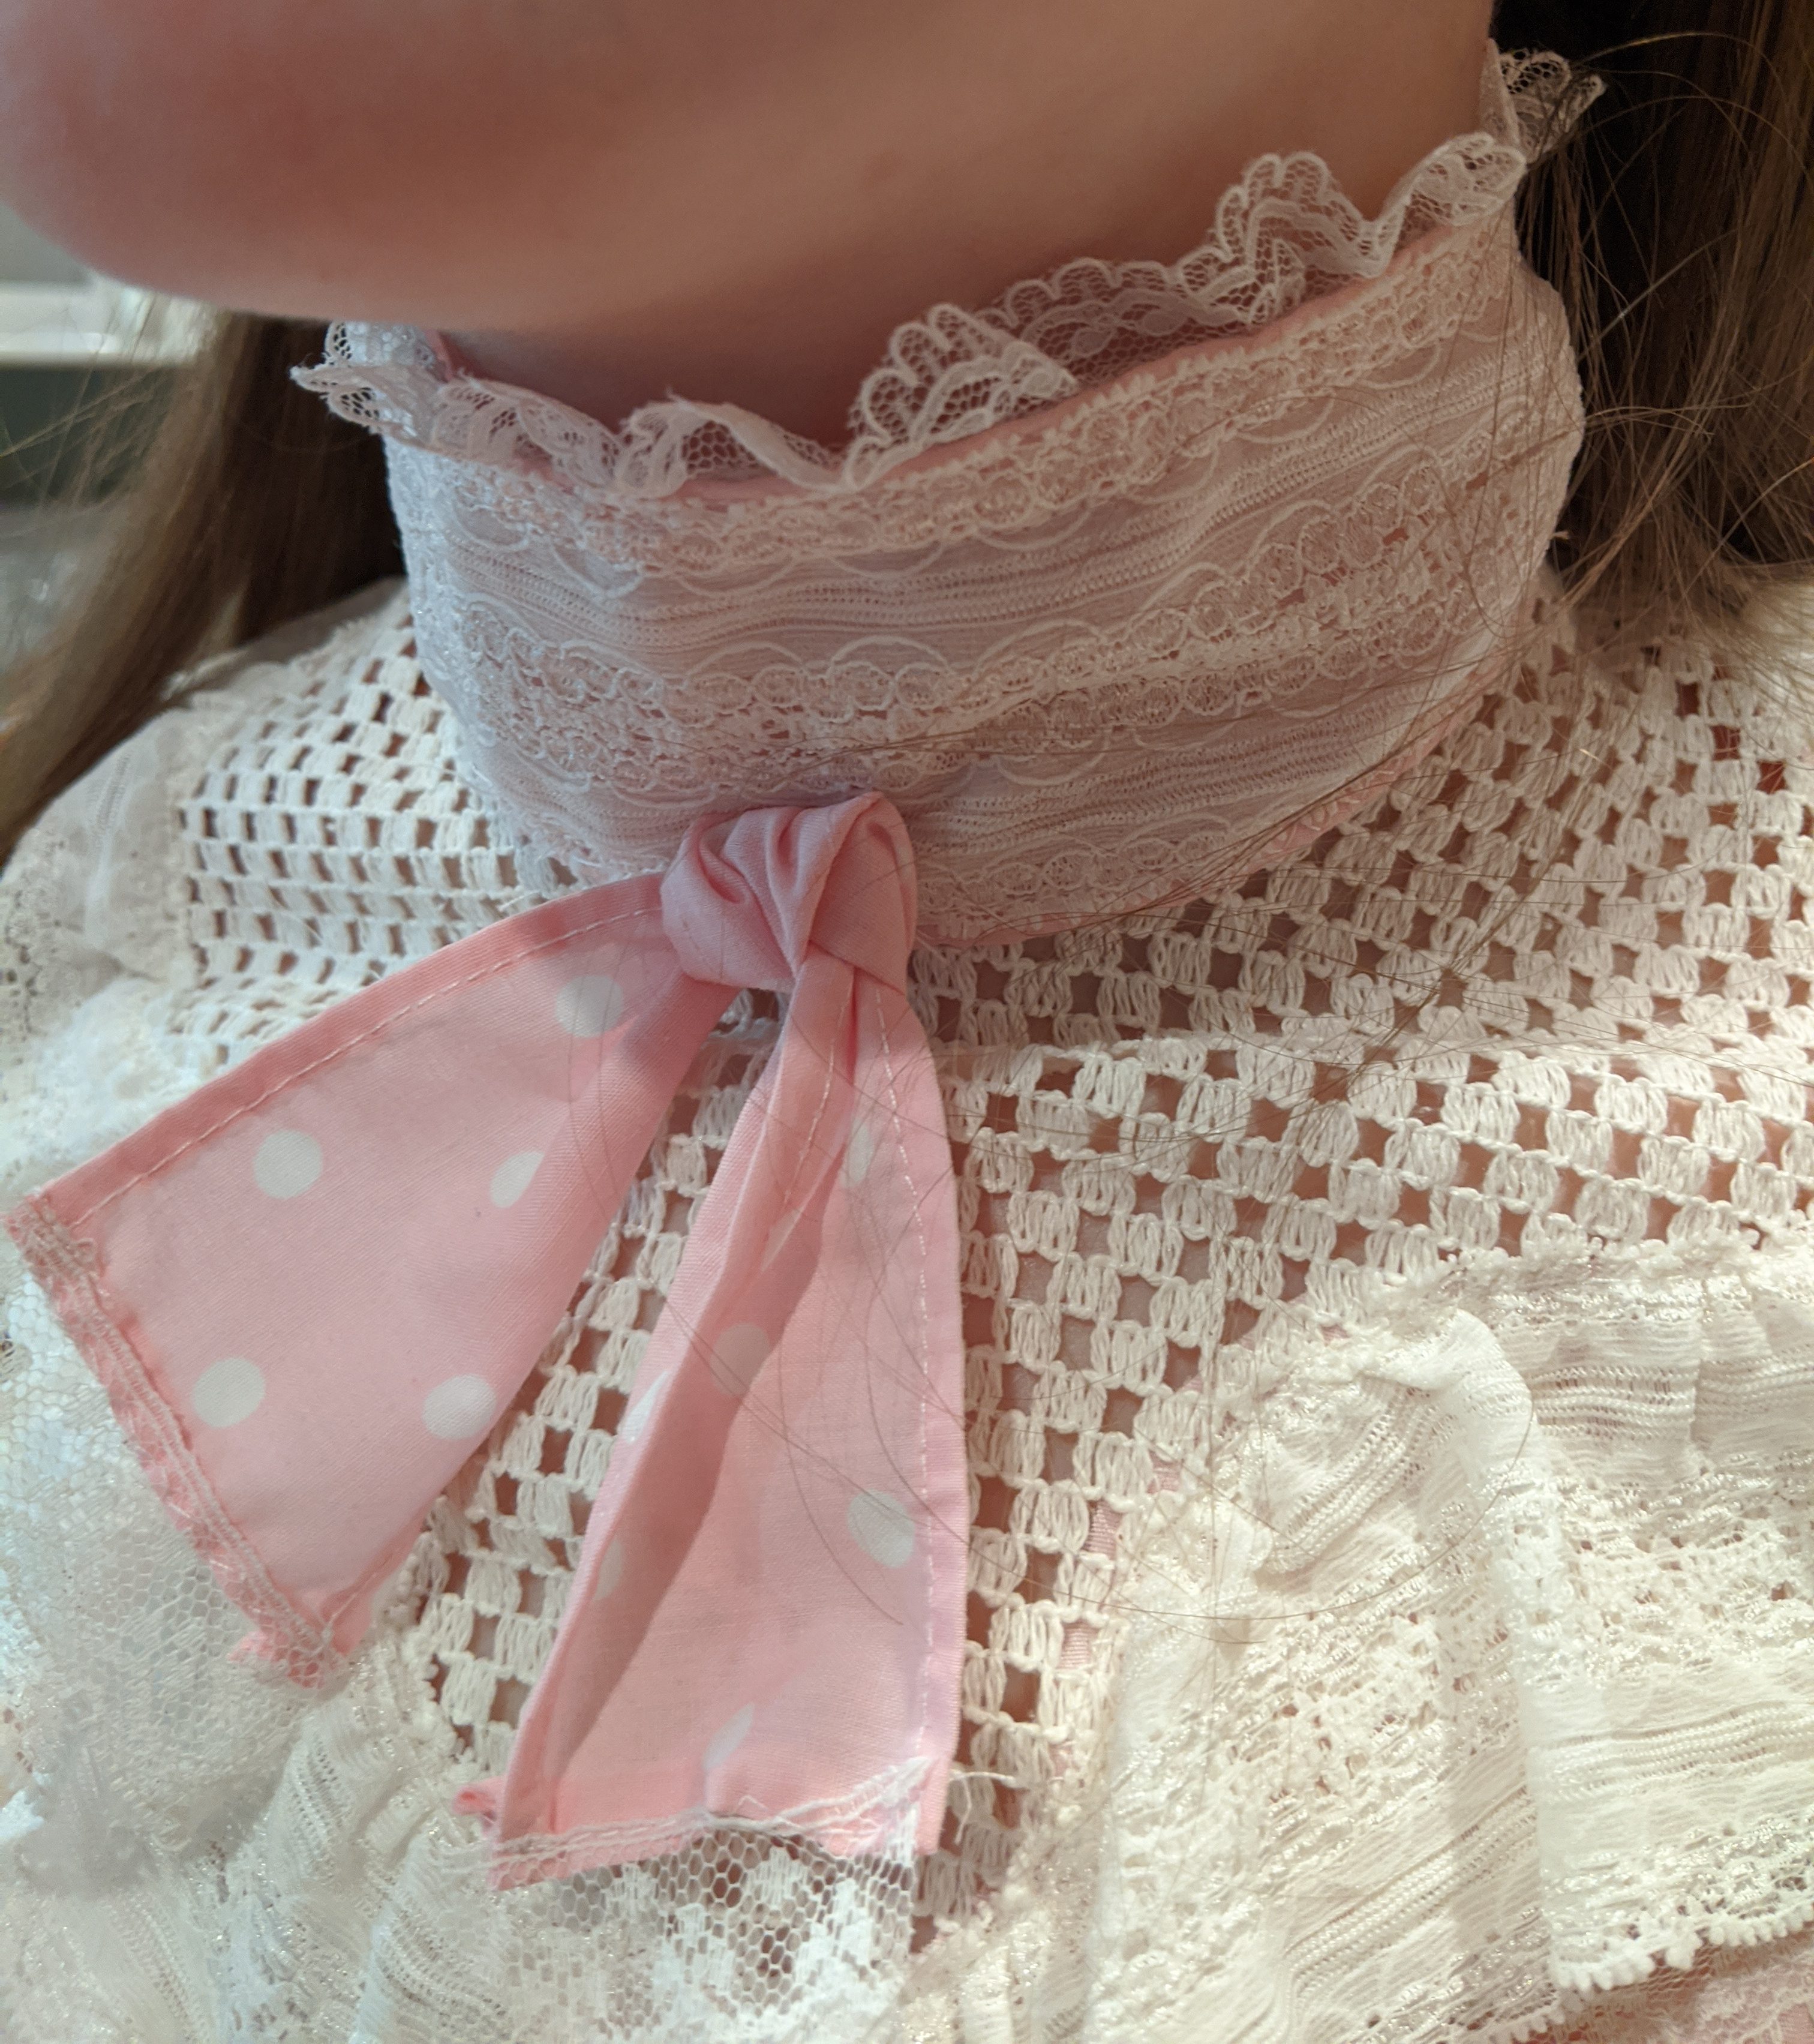
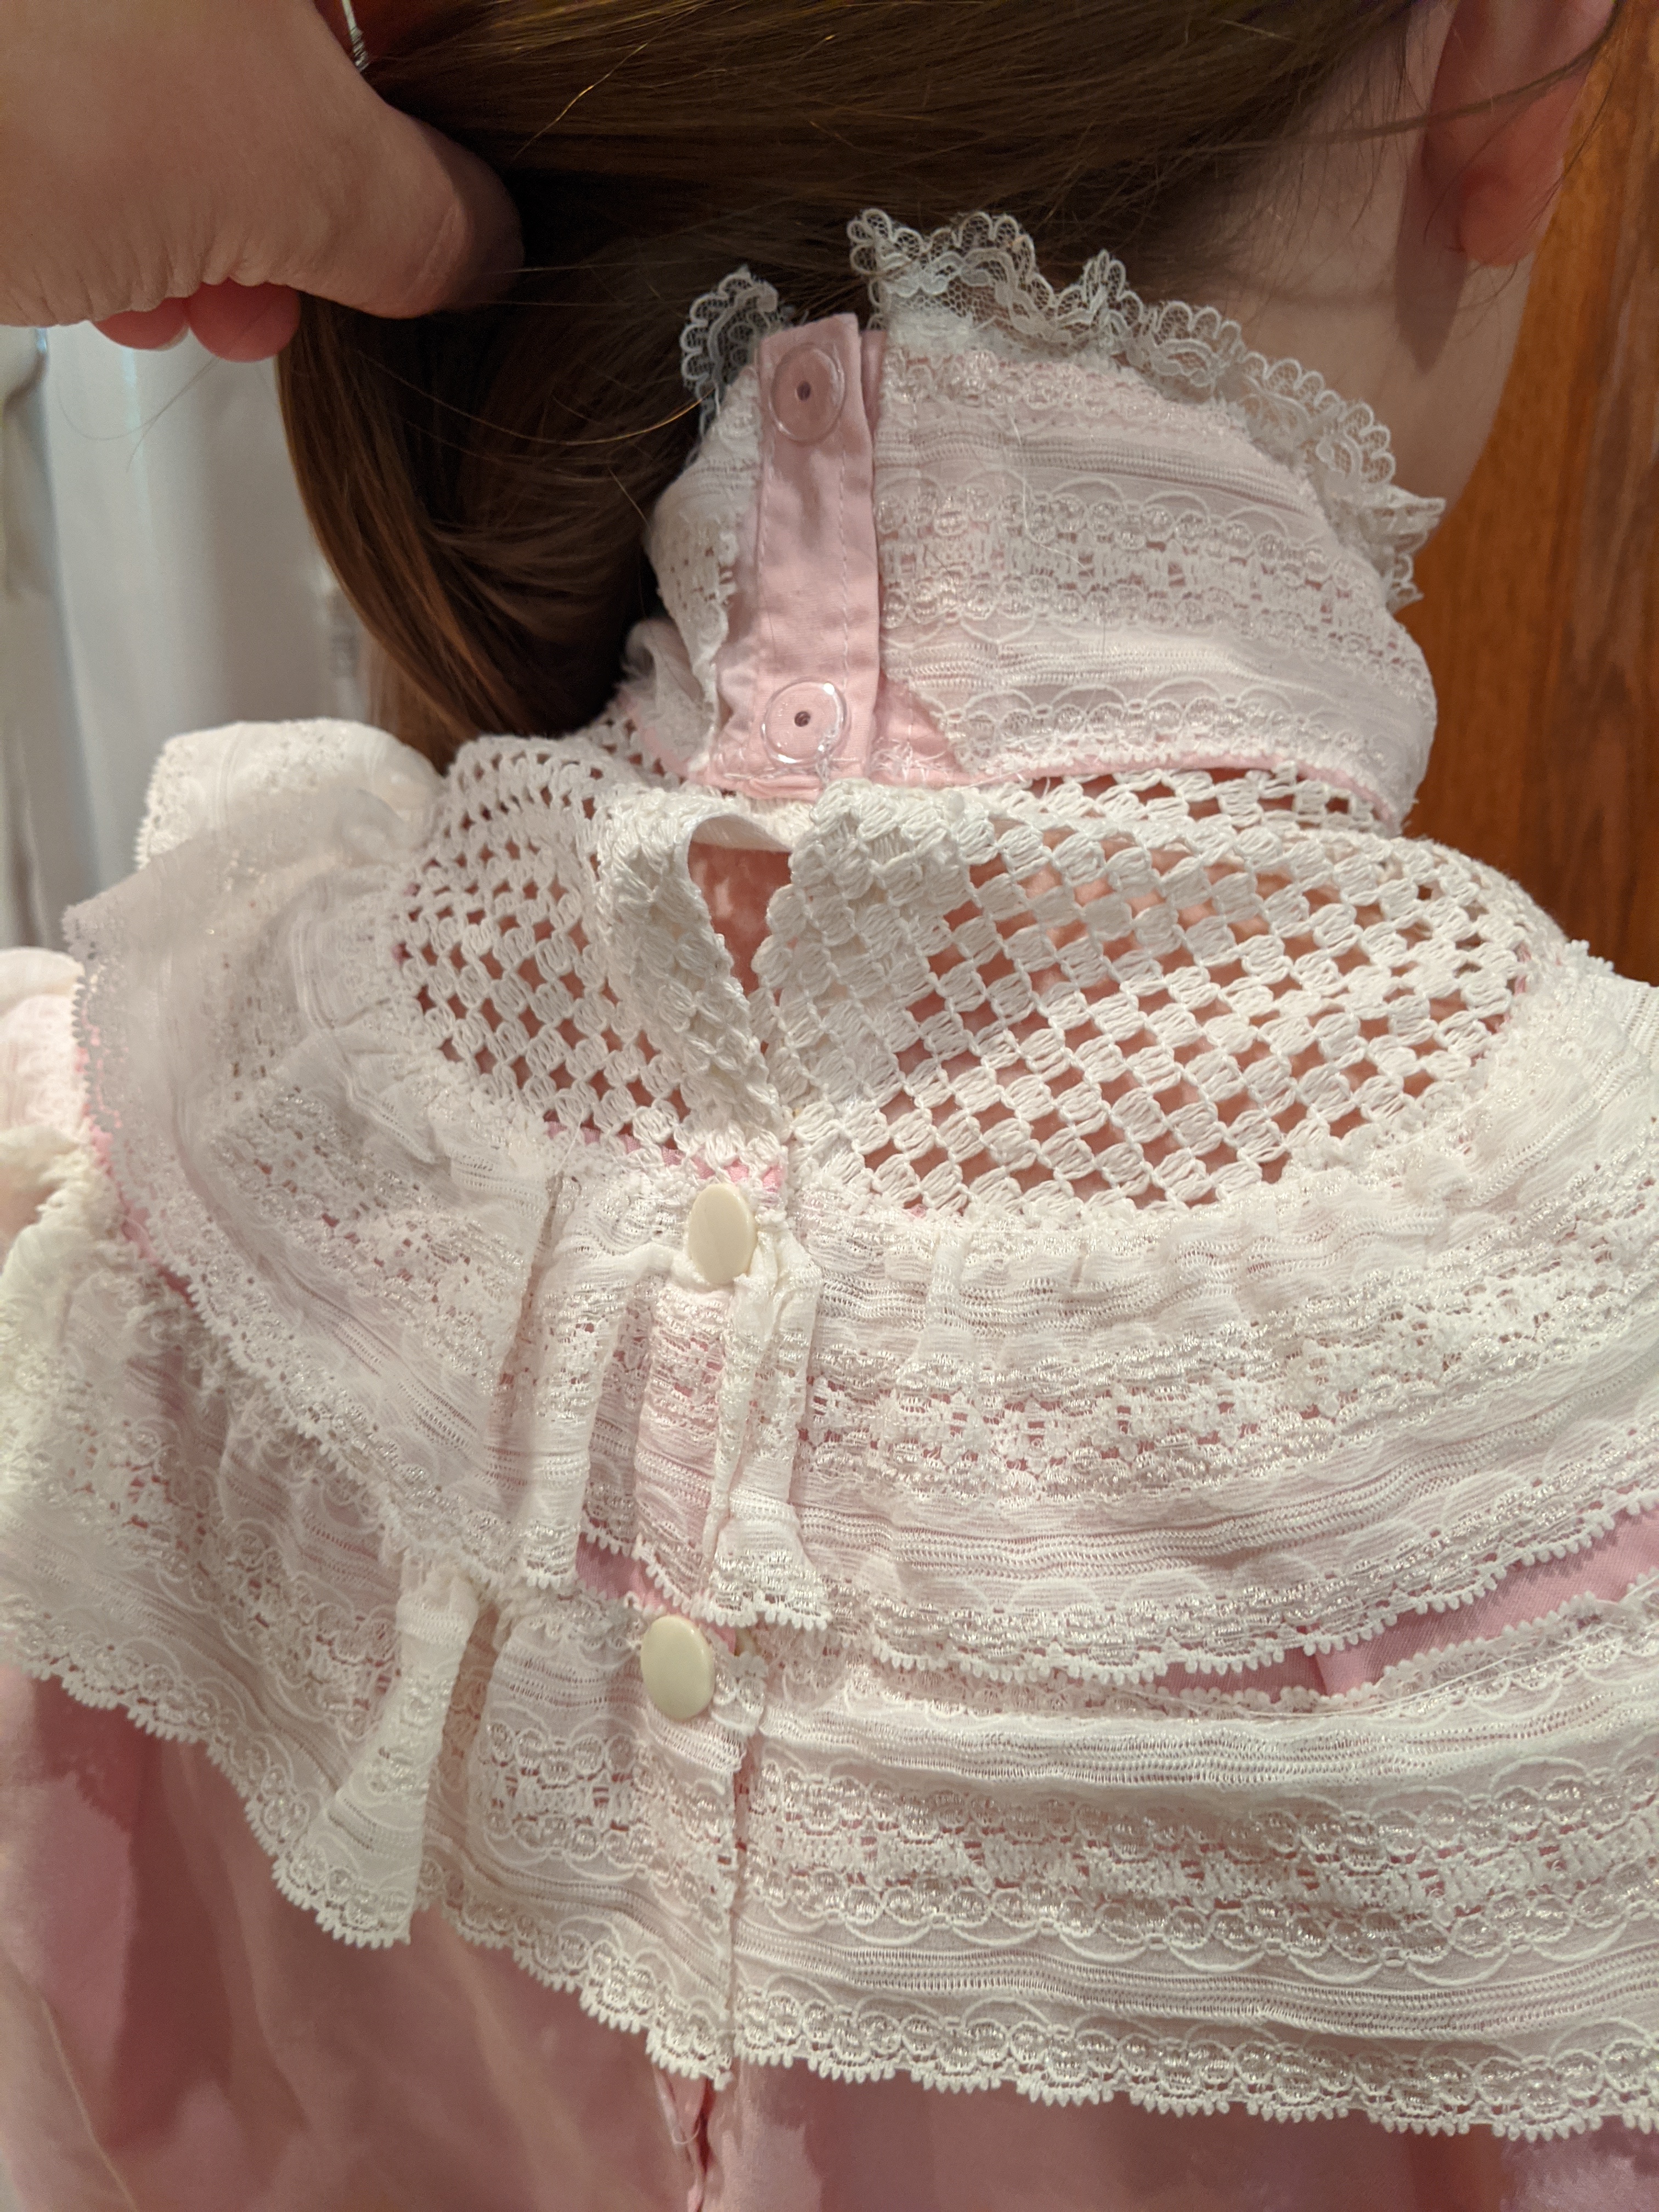
There were a couple really nice techniques suggested. One was to use twill tape to finish the back opening. The other was to construct the cuffs/cuff lining in a tube, understitch the lining, and flip. (I’ll show pictures of these in an upcoming post).
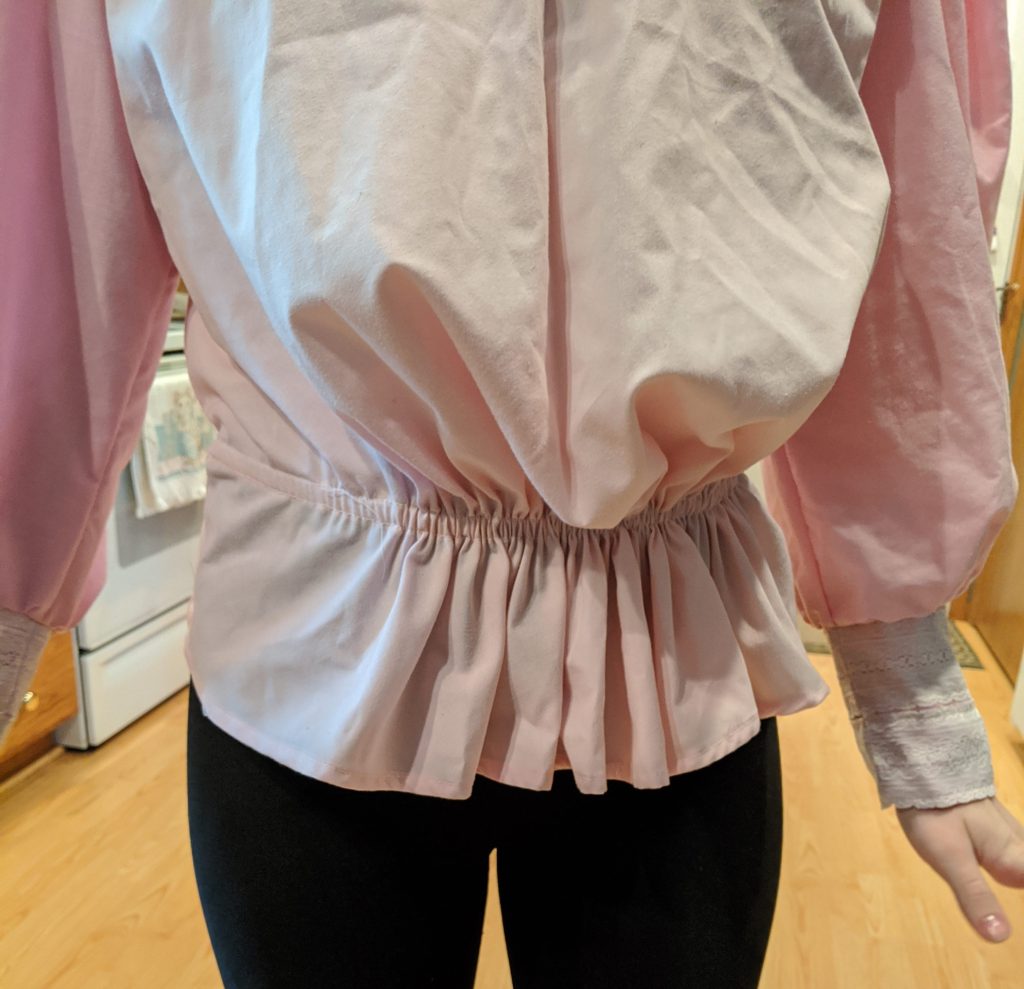
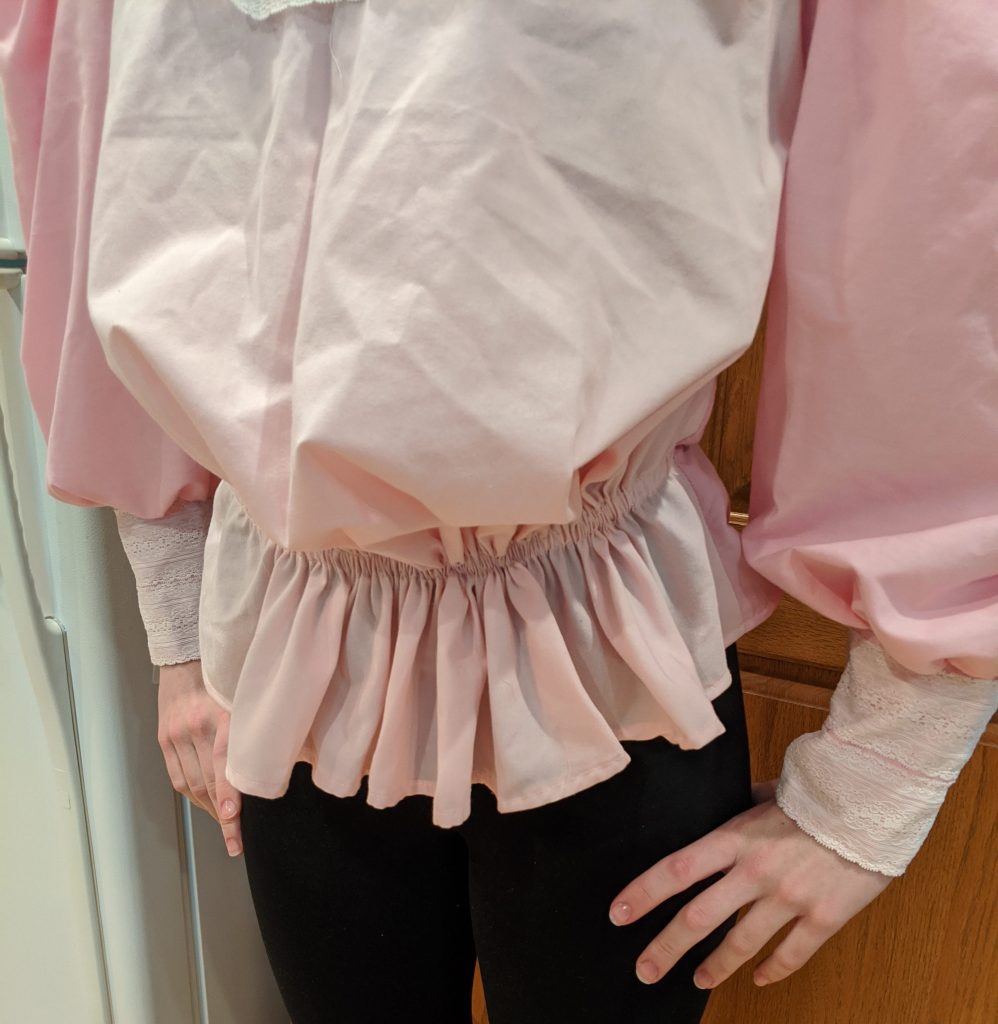
The pattern offers two finishes to the lower edge–one is a separate shaped peplum to which the bodice is gathered, and the second is to add a simple tie to shape the front. I opted to run a casing along the cutting line for the peplum version. This worked fine and I like how it keeps the top in place.
Pattern eval: I like the bodice, sleeves and general shape. The collar was easy to put on. It was hard to find the sizing square to make sure it was printed out correctly, and I did get lost in some of the directions. Not perfect, but not bad.
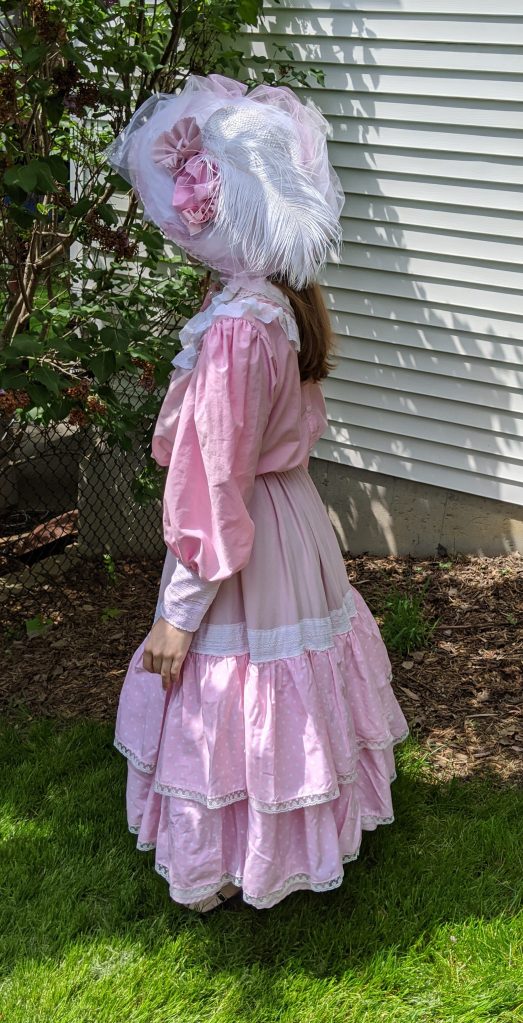
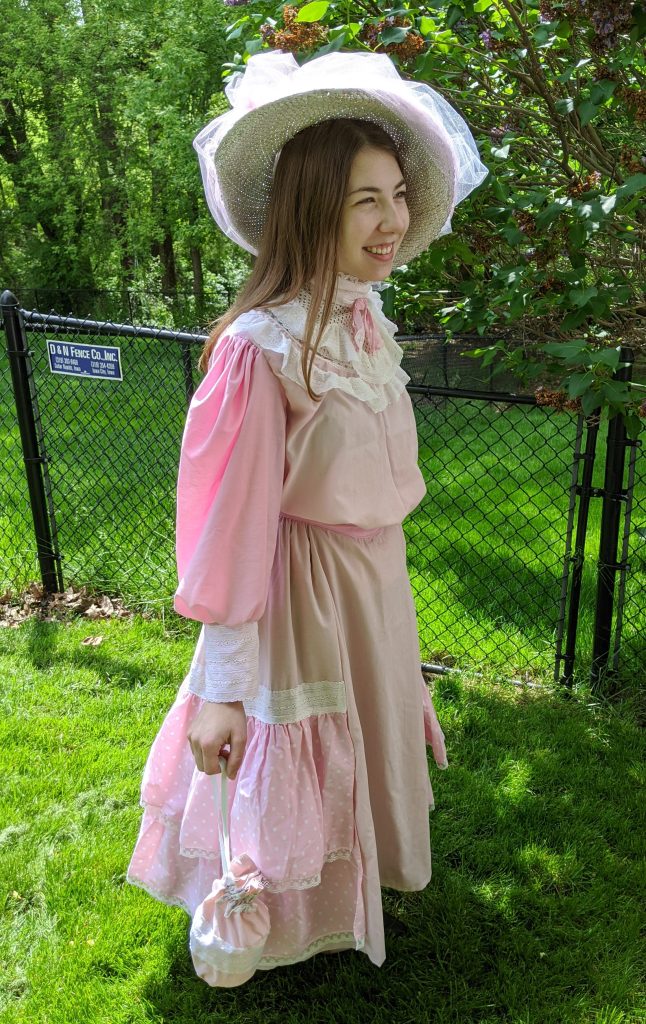
I had opted to make the size 14 blouse, and daughter V typically is a XS/S (now a college student she was willing to trade food for photographs). I also had one of my older daughters, K, try it on. She usually wear a medium, and has a fuller bust (her pictures will be below). The blouse looks fine, especially with the extra lace ruffle on both of them. It does bubble a bit around the neck, but I think that is because it is too big. If you were doing historical dressing this would be a fit issue–for a costume, it’s fine. This top has an estimated 9″ extra fabric in the waist as compared to the size 8 that I estimate would be her size . It also hangs off the shoulder a bit more than desired (although under the ruffle it still looks OK). There is a fair amount of extra room under the arm. This does allow for ease of movement/choreography, which is actually why I started with a larger size. I’ve made the smallest size (8) since this trial, and I’m looking forward to having her try it on and evaluate it for fit and movement.


To note: On this pattern, the shoulder seam slopes to the back. I’ll have some pictures of this in an upcoming post.
Skirt:
I decided the blouse turned out nice enough, despite, or perhaps because of, my mix-matched fabrics, so I thought I would make a skirt. I chose Simplicity 9723. This dress/skirt has a small train. I opted to cut it off along the trim line for a mid-calf/ankle length skirt, vs floor length (and certainly no train!)

The skirt is cut in three pieces: a small A-line front panel, and a two part huge side/back panels. (The original back skirt has an inset wedge–I taped the pattern together and cut it as one piece). I used a sheet for fabric, so width wasn’t an issue. The skirt has a shaped waistband with an optional belt. I used a slightly darker pink for the waistband to emulate a belt. I wish I had taken a picture of the skirt “as is” . . but . . . that will have to be saved for an upcoming post because . . . I decided to add some pink polka dot bed skirt ruffles.
I placed the ruffle where I wanted it, measured the distance, marked it with a heat-removeable pen, and then stitched it on. I was able to add a second row–with about 3″ left! I added some lace to the ruffle edges because, why not? TOTC (turn-of-the-century) clothes are often dripping with lace, ruffles and other embellishments.


The waistband is cut on the bias, and is designed to have a zipper & button/hook closure. I couldn’t find my zipper box (beware of re-arranging your sewing room . . ) so I just left the gap open for now. I cut the skirt on the size 20 markings, and just cut the waistband shorter. I figured I’d just ease in the extra fabric. And, that worked reasonably well, but the front panel is wider than if you cut the skirt appropriately (I’ve done a later one the correct size). That said, I think this is OK, and if you were prepping costumes ahead of casting, I’d feel comfortable making the costumes larger and then just adding the correct size waistband. (I used some snaps to close it because I forgot to bring a pin the day we were doing modeling).

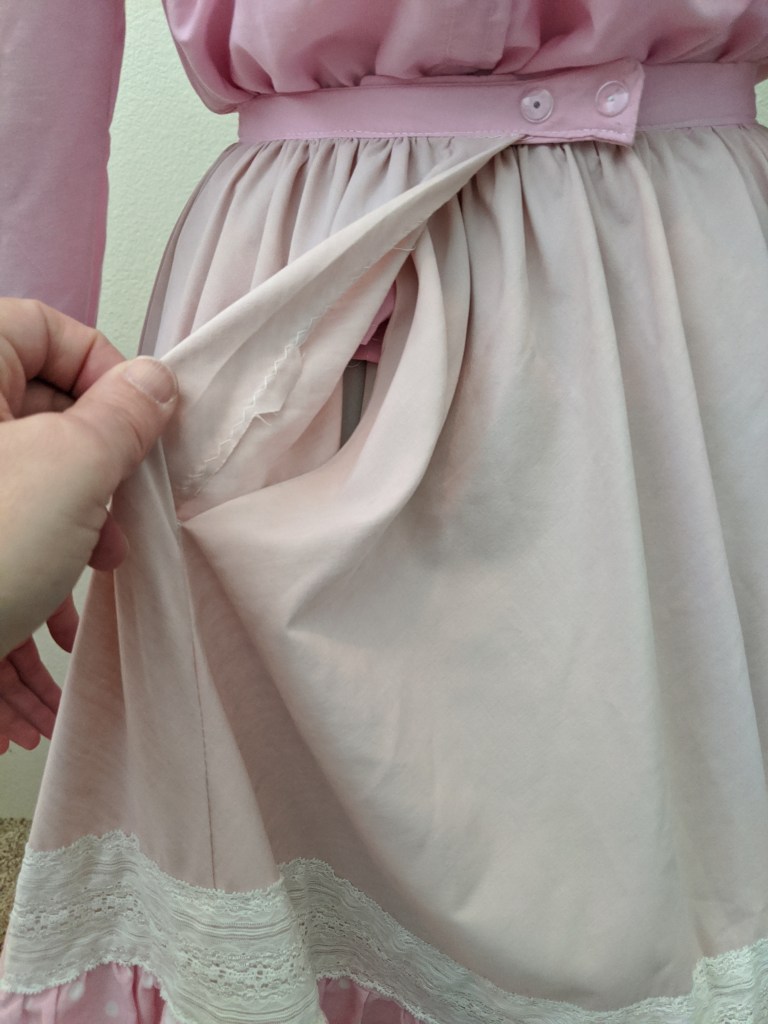
The skirt hangs a bit lower in the back, and could be used with a small bustle/bum pad if you needed that look. Shown first with petticoat alone, and then with a lightly stuffed bum pad.


Pattern eval:
I like the shaped waist. I also like that the skirt can be cut in three pieces. If you want a smoother fitting skirt, you’ll need one with more gores, but, for a quick, easy, gives-the-idea skirt, this isn’t bad. It is very full, very fun, and my daughter was in love.
Petticoat:
Every good period dress needs a petticoat. I have several previous posts about petticoats including Petticoat Upcycle: Youtube DIY Companion Post , Peasant Skirt/Petticoat Tutorial for “Cinderella” Sewers: Over the Bum Pad and Cinderella Waltz Petticoats. But . . . . I also happen to have a stash of petticoats that I have cut out from under wedding dresses & prom dresses that I’ve used for other purposes, so why not make use of what will otherwise be trash?
I took one of those, measured it to the appropriate length for the skirt, made a casing on the top and ran some elastic through, added some trim to the hem . . and voile . . . petticoat. Quick, easy, cheap— enough to give a flash of ruffle during choregraphy and give our skirt some shape.


But, wait . . . I can hear you saying, ummmm?? Cheap?? have you priced eyelet? Well, yes, as a matter of fact, I have. Resale sites are your friend. Look on Ebay, Mercari, Poshmark etc for “lace rolls”, “lace yards” etc. You can buy stuff in wholesale rolls for give-or-take 10 cents/yard. I bought like 1200+ yards of that cream eyelet for about $100, including shipping. A cheaper option is organza ribbon, and it will give some stiffness. You could also try some bias cut strips of fabric, or pre-cut strips of petticoat nylon. Want it fuller? Use a ruffling foot to add it. I was happy with the petticoat net and trim.
The cat? That is Pterra. She is my sisters’s cat. She thinks V and I are her friends. We think it’s because we don’t play with the dog. She was all into taking pictures. I didn’t know I needed to bring a costume for her too, lol.
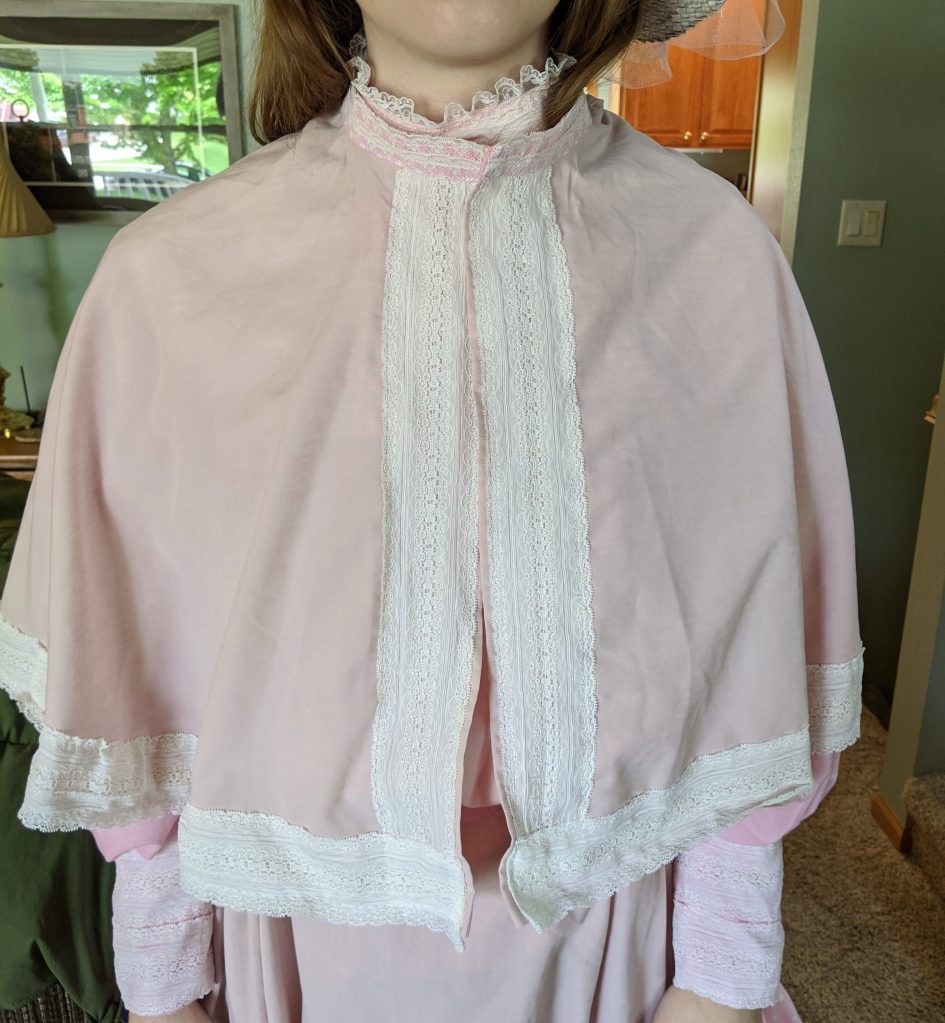
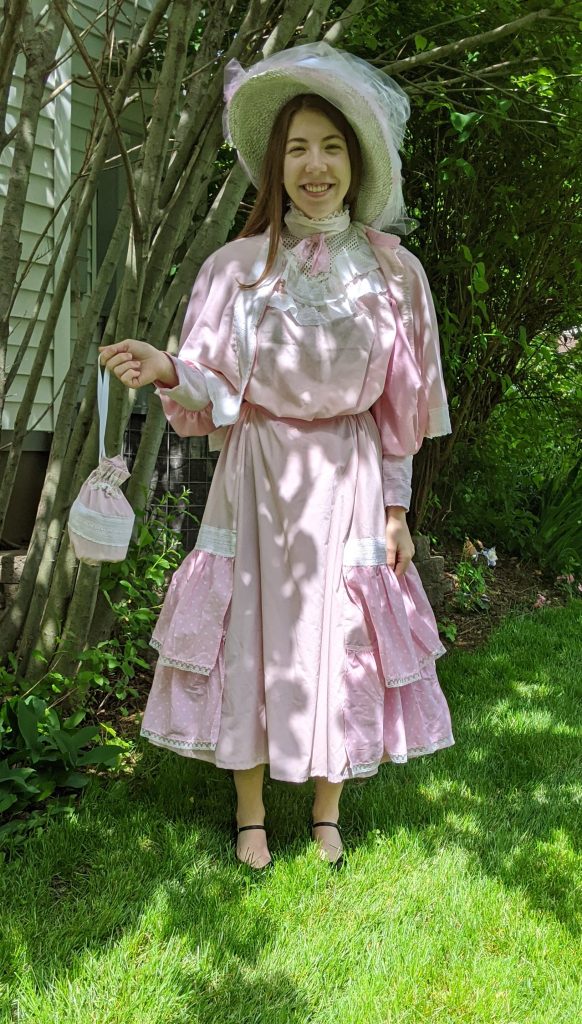
Cape/Jacket:
So . . . one of the versions of “Meet Me in St Louis” that I watched had any number of the chorus in the trolley scene dressed in little capes. I thought it was a wonderful period look, and an easy add-on to change a costume or change era. I had this pattern:

It’s a simple two piece cape, cut a little lower in the back. I made it out of a single layer of fabric, with a small collar (since my costume had a tall collar). I added some lace for decoration.
I actually prefer the look when it it left a bit open in the front so the costume shows through. I haven’t added a closure yet.


Purse/Reticule:
If you are going out for a trolley ride . . . you might want a bit of money or your handkerchief. (My daughter was eye rolling at about this point as I was pulling stuff out of the bag).
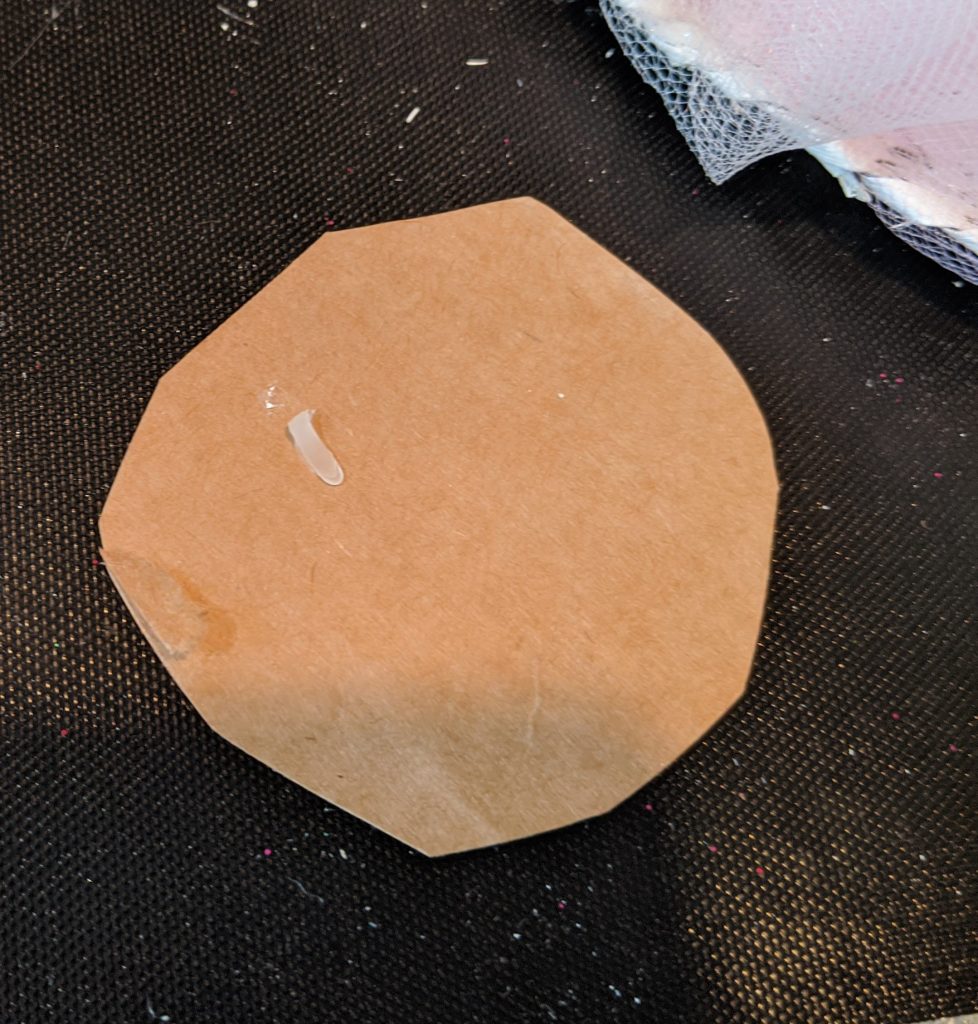
I started with a plastic container. I traced the bottom and cut it out, plus a seam allowance. I measured around the container and cut out a strip of fabric. This one happens to be the top edge of the sheet.

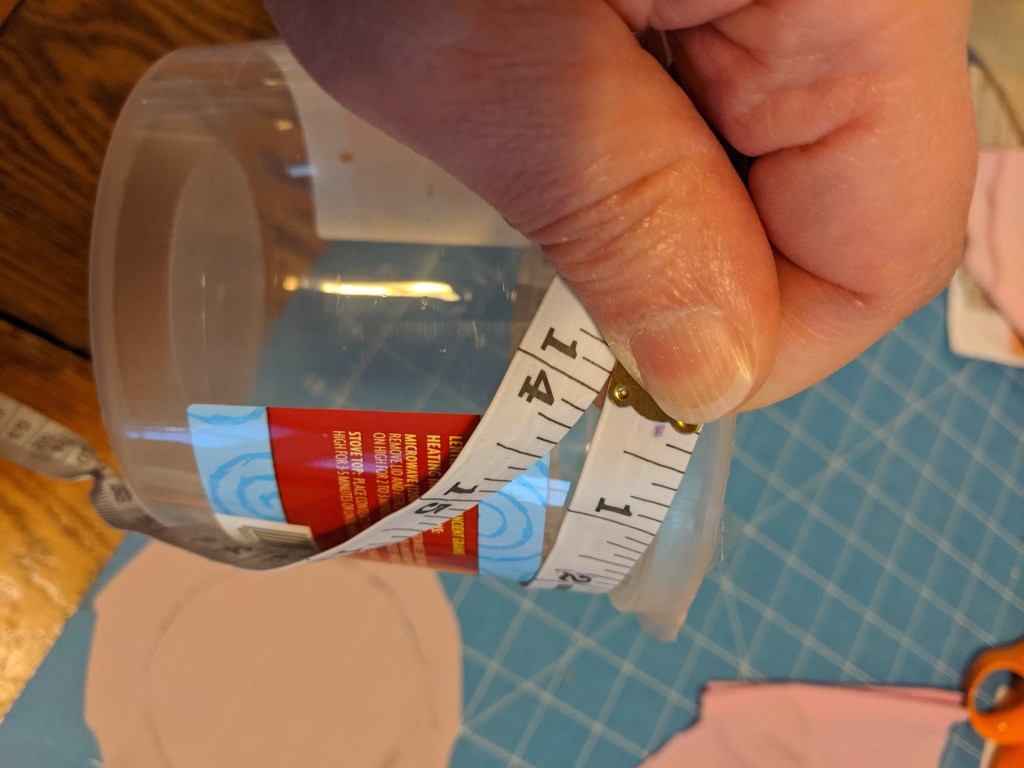

I added a channel for the drawstring, and added some embellishments. Then I sewed the tube together, added an easing thread, and stitched the bottom in place (dividing in quarters).


I tucked the container inside, ran a drawstring through the channel, and there’s a little purse. (I actually prefer the reticule I made here, with the double drawstring Turn-of-the-Century Inspired outfit: Chitty Chitty Bang Bang)


Hat:
Every good Edwardian/late Victorian TOTC costume needs a great hat. If you’ve been reading my blog, you know that when I was making “Chitty” costumes they were being shipped across country, so the hats were created locally (much to my sadness). So . . .NOW I get to make hats 🙂 Because I have “problems”, cough, cough, I might umm, just happen to have a few old hats sitting around for upcycling purposes . . .
First step: find old ratty hat and spray paint. Next DECORATE!! I began with a large chunk of full width white tulle off a bolt.


There IS some pink tulle on this hat–but it isn’t very noticeable. Tulle should be several shades darker than what you expect you might need. The hat had some weird warped shaping to the edges, so I just swathed it in tulle to soften the image.

Flowers are standard decoration. I didn’t happen to have any fake flowers, so I cut some leftover strips of fabric with a pinking shears and hot glued them to cardboard bases to make “flowers”. Probably not great for up-close viewing, but from a distance–they look great–and are basically free.


An additional feather–and we’re done. (These feathers came from a bridal resale shop–CLEARANCE! Even C, daughter who was with me, despite the eye roll, said they were a good deal. SEE middle daughter–I DID “need” them, lol). Other sources of reasonably priced feathers include Ebay, and various linen/bridal supply stores). The hat is too big for her, and so kept shifting. I would hot glue some felt/foam to the inside to make it fit if it were for her.

So now . . . the whole costume!


Here is the costume on my older daughter. She said she felt like Miss Muffet (she is NOT a pink ruffles kind of girl). You can see the gap in the skirt for size difference, and how she is broader through the shoulders/bust. This does motivate me to try and figure out a way to make the skirt more sizing flexible than a zip/button waistband.


Supplies Used:
4 flat crib sheets, large flat sheet (queen?), lace valance, ruffled bedskirt, assorted lace, discarded wedding dress petticoat, old straw hat, tulle, feather, plastic bowl, twill tape, bias tape, elastic, kam snaps, interfacing, hot glue
Conclusion:
Overall I was happy with this concept costume–as evidenced that my “pattern testing” of the shirt out of waste fabric ended up with a six piece ensemble. I’m liking the blouse pattern, and am eager to make it in a smaller size to check range-of-motion. I like that it does not have an under blouse, and yet seems to maintain it’s shape. I don’t like how the peplum shows through the skirt, but, a smaller size blouse and/or a heavier skirt fabric would help that. The blouse could also be tucked under the petticoat. The pattern also has a separate peplum and a different sleeve option to try. A definite plus is the ability to print out extra sizes instead of needing to trace the pattern. Working with this pattern also helps me “see” possibilities in pre-made garments for possible upcycle. The full-front (pigeon breast) look was fairly transient, and not readily upcycle-able. I’ll share my thoughts on that in an upcoming post.
I like the general shape of the skirt. I want to play around with it and see if I can make an adjustable waist–either an apron waist or elastic in the back. I really like the shaped waistband and using a different color to simulate a belt (although it doesn’t show well in the pictures). My pattern is the 14-20 size, so I’ve ordered the smaller size, and I particularly want to try the bodice.
I think this is a very use-able costume–it WOULD work for Miss Muffet, lol. It also could be Ermengarde from “Hello Dolly” or Zaneeta Shin from “Music Man”. The pieces have potential to be building blocks/stepping stones for further costumes. The general shape works for all ages, depending upon the colors used, embellishments, and length of skirt. A petticoat is a definite “must have”.
The best thing I learned while making this costume, however, is about combining fabrics. The outfit has about six different shades of pink. The blouse has a different color front than back, and a third color for the sleeves. I would never have combined those fabrics when making the blouse if I hadn’t been doing for testing . . . but, it makes a costume with a lot more visual interest than if it were a single pattern/color. I actually really like the sleeves a different color from the bodice. This is a great observation for upcycling because sleeves are often very influential in giving the impression of an era, and difficult to upcyle as they take a lot of fabric.
I think this era allows more more mixing/matching of patterns & colors and it should be fun to experiment and see what works and what doesn’t.
If anyone has any favorite patterns/resources for TOTC, late Victorian/early Edwardian costumes I’d love to hear about them. I’m working my way through some different costume/historical fashion books, and have a list of patterns to try.
*******
Happy Mother Memory Moment: So . . .When my older daughter K was a sophomore (2010), the girl who was playing Tootie had to drop out of the show about a week before tech week. K. was a quiet, serious kid, and public speaking wasn’t easy for her. In a leap of faith, the Director asked K to take over. My daughter learned the part, and this is one of my favorite scenes. She is in the brown dress.
Participating in the arts and theater provides opportunities for kids to grow and achieve that they might not otherwise have. It’s fun to dress the lead, but I have the fondest memories of making the awkward kid in the chorus feel special because I made a costume just for them.


I love what you did with this. I have the On Stage pattern but haven’t ever used it. Look at you doing lace insertion which is usually an heirloom technique! I love how you just keep adding. That is my problem, I stop too soon. I am very tailored and tend to costume that way but the extra touches really do show up on stage. I like what you said about various shades and mixing them up. I am going to keep that in mind.
You know how as costumers we have always wished to just have another few weeks of time to do all the finishing touches on our costumes. Well I sure got it this year. We were two weeks from opening. Once our school closed which was way earlier than the public schools we still though we would be going back and just delaying. We are now scheduled for July 10 which we will have to change to the fall and hopefully not to next spring. So while I was home I kept going and got pretty much whatever I needed to do finished. So Bye Bye Birdie will happen eventually since the sets are built and the costumes are done and we think the 3 seniors with leads will probably be able to come home for the weekend and at least do their parts one or two nights.
So now I say, “be careful what you wish for – you just might get it”
LikeLike
What a mess. I do hope the show eventually goes on, and the Seniors can participate. I was thinking about have endless extra time to tweek costumes–that could definitely be a mixed blessing. Sometimes it’s just better to say “good enough” and get the show over with, lol.
I did have fun with the lace insertion. I’ve done it on a few other pieces so far with mixed efficacy (time vs effect). It’s fun, and the joy of a costume is that you don’t have to be “heirloom” quality :). I picked up a few doilies at the thrift store today. I’m thinking that I should back them with net before using them. I think (??) at some point I bought some spray fabric adhesive (if I can find it . . ). Attach them to a sheer backing, and then use as an insertion. Something to play with at any rate.
I have no motivation to work on zombie costumes because who knows what fall and Halloween will look like. Sewing (non-masks!) is much more fun right now.
LikeLike
Pingback: Blue plaid Edwardian Upcycle Blouse (Meet Me in St. Louis) | costumecrazed