I was in the middle of making assorted Fun Fair costumes, and I had already made a number of the two piece jacket/skirt ensembles that I have previously blogged about, so . . . I was getting bored. One of my favorite “personal challenge” games is to find something inspirational at a thrift store, and then walk around to try to find coordinating pieces so that I can go home and make a costume RIGHT THEN. Sometimes I will “up the game” by trying to use only things out of the clearance section. I’ve had some pretty spectacular fails . . but I’ve always come away learning something, and it is pretty cheap entertainment. This bar was raised for this particular challenge-costume because I needed it to be for a certain era and a certain event.
So, today’s project began when I checked out the curtain section of one of my favorite local thrift stores. I found a cafe curtain, a valance, and some strips of ruffles. Don’t these just beg to be used together?


I was able to find a base skirt (which had a few spots, but I was OK with that as my rough-draft-vision had them covered up).


The skirt was 50 cents (that’s the size 16 tag), the ruffled valance (2 pc 8″ x 108″) $1, the cafe curtain 25 cents and the checked valance 50 cents.
I envisioned making the same type of split front skirt that I had been making from the suits. I folded the skirt and slit it up the center front until I reached the waistband. I wanted to add the ruffles to the base skirt before making the front insert.


I lay the ruffles out on the skirt and determined the distance that I wanted them to be apart. I marked the stitching lines with a heat-sensitive pen. After I had the first two layers done, I determined that I had enough ruffle left for a third layer. I’m loving this skirt already.


The curtain and valance were positioned so that I was happy with how they looked proportionally together and where they hit the ruffles on the base skirt. I cut some fabric off the top of the curtain to make it the correct length. The hanging tabs were left as a decorative feature on the skirt.


The top was pleated, and then the waistband was replaced.


The old elastic was pretty worthless, and was totally stitched into the waistband. I used wide bias tape to make a new casing in the back (starting and stopping at the front insert) and ran new elastic through it–just leaving the old stuff in place.


And, my skirt was done.


There were a few more stains I hadn’t noticed earlier, but I think they won’t stand out when the costume is on stage and moving. A petticoat and legs will help the front hang better.

I didn’t have a blouse that I liked to go with this, so I decided to make one. I had recently purchased the Angela Clayton McCall’s M7732 pattern, so I decided to try the blouse, since I’d been curious how her patterns would be to work with.

I basically cut out the pattern and made it as directed, more-or-less. The blouse has a tie at the back of the neck. I didn’t want this, so eliminated it. The blouse also has a band at the bottom that ties at the back waist, and I also eliminated that (not without creating an oops!, but I’ll talk about that). The entire blouse was also supposed to be lined, and I didn’t do that since this is a costume. I used some vintage/old cream fabric to make the blouse.
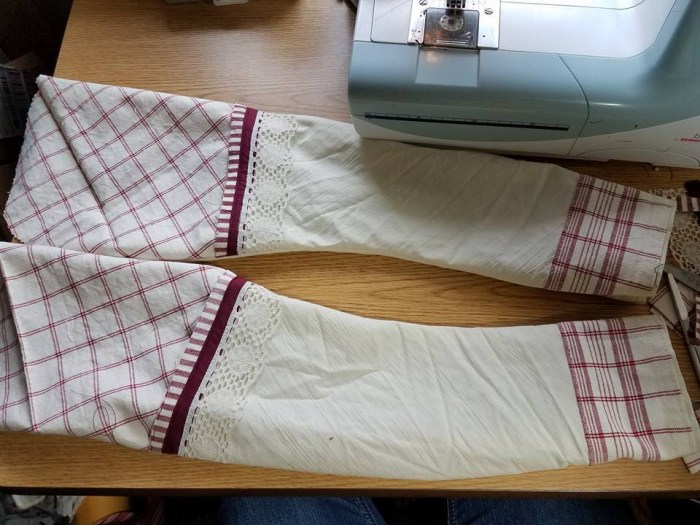
I had originally planned to decorate the front of the blouse to coordinate with the skirt. However, this blouse had a gathered front and I wasn’t sure where and how to position the embellishments. Instead I decided to decorate the sleeves. This blouse has two piece shaped sleeves, which have a nice period look. I used the fabric sleeve pieces as the base for the decorations, appliquing them on flat, and then constructing the sleeves as directed. I only decorated the outer sleeve, except for the part around the wrist, which wraps around the entire sleeve. Pictured below is the pattern positioned on the valance to create the top section.


The bottom of the blouse is an interfaced and shaped waistband that is higher in the back than in the front. As mentioned, it is supposed to have a band/tie across the bottom, but I just tipped them seam allowance up and stitched it in place. Later, this proved a mistake as the blouse was too short. At that point, I cut a band and added it to the bottom of the blouse.


The front gathers create a nice period feel . . . even without proper undergarments.
The neck is also gathered in the front and back. As mentioned, I eliminated the bow at the back neck, and so I finished the neck with a band.


I opted to finish the back of the blouse with a separating zipper. I only had one for a jacket, so I put a tab over the neckline to cover it up. Pictured open, and then pinned closed. I had to mess around with it a bit as I was changing the back closure.


Original back (no band) and with added length:


Zipper in place. I cut the band extra wide and just left the extra fabric in the blouse. The band could be lengthened for someone with a longer torso. I also left the extra fabric in the center back. The blouse could be adjusted by removing and replacing the zipper.


This blouse will probably require a partner to get it on and off, but the back closed nicely, has less bulk than hook and loop tape, and can be easily adjusted.
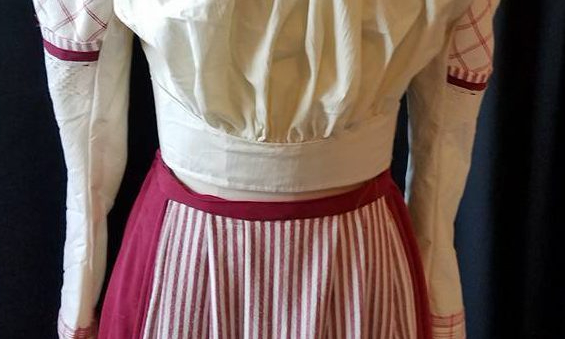
My finished outfit:


I like this blouse for a variety of reasons, but especially because of the fit of the front. It can easily be worn by a variety of sizes and shapes, and it would be easy to tweak the pattern and add a little extra fullness. I also think that it could bridge a variety of historical eras when paired with different style skirts. One thing that I do not like about the pattern is that it does not show very good pictures of the back of the blouse, especially the back wasit tie. I finally searched out the original blog post by Angela Clayton where she made the original blouse. I have a few adjustments in mind to make it more quick-and-dirty-need-to-make-20-of-these friendly, and I will share that in my next post. The waistband has a nice look, again, without requiring period undergarments, and looks harder than it was (note, I eliminated all of the hand-sewing, and just stitched and top-stitched by machine as needed).
I love the colors and look of this outfit, and it was one of my favorites in this round of costuming.
Cost: $2.25 for skirt pieces as noted above, plus bias tape, elastic, blouse fabric: $1, zipper 50 cents, plus interfacing, a bit of ribbon and lace for sleeves


My goodness really a tough challenge but hard work pays off beautiful outfits!!
LikeLike
There is a hand cleaner called “Goop” which you can buy at automotive supply shows (Autozone, etc) that works wonders on grease spots like the one pictured. I think most of the auto stores have their own brand or a generic brand, and they all work just as well. Before washing cover the spot with a thin to medium layer. I prefer to let it sit on there for a bit, even over night, but I’ve also put it on, rubbed it well and thrown right into the wash and had good results, though a time or two I’ve had to repeat.
LikeLiked by 1 person
That’s a great tip! I’m going to have to try that.
LikeLike
Pingback: Purple Jumper: Chitty Chitty Bang Bang | costumecrazed