Thanks to my Mom for her initial draft of the instructions!
For my blog followers/readers: this is a tutorial written for the volunteers who will be sewing for our “Cinderella” production. This is a little different format than my usual posts.
TUTORIAL:
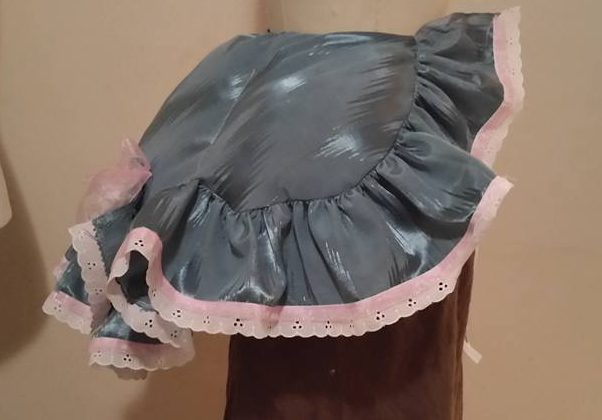
Thanks for volunteering to sew for “Cinderella”. These are the instructions for the Peasant Skirt/Petticoats to be worn over the bum pads. Basically a bum pad is a pillow tied around your waist to make your dress stick out. This is an oversized one I made for the character “Charlotte”, because, well, she is kind of an over-the-top kind of girl. The villagers will wear a smaller version.
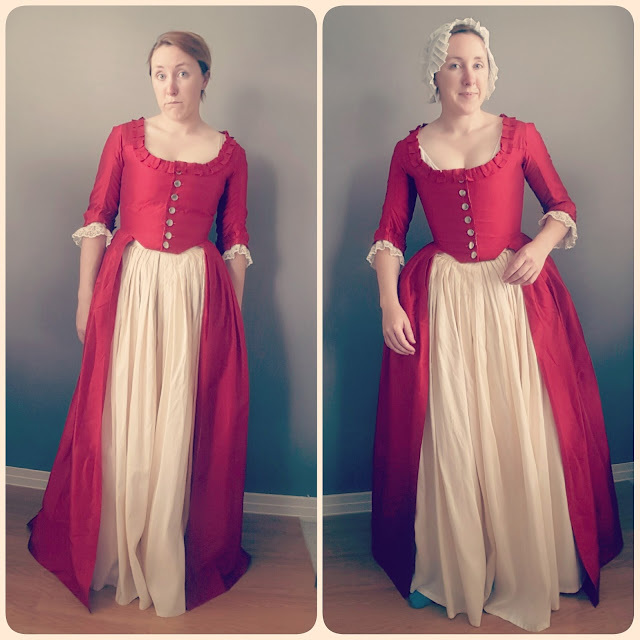
We are using bum pads for this production because it will add to the historical “feel” of the show. It is a little detail that will hopefully help in our quest to “raise the bar”. You can see the difference below in these pictures from The American Duchess (a great blog if you are interested in historical sewing). Other details we will be adding include petticoats, overskirts and yes, some little white hats in various styles.
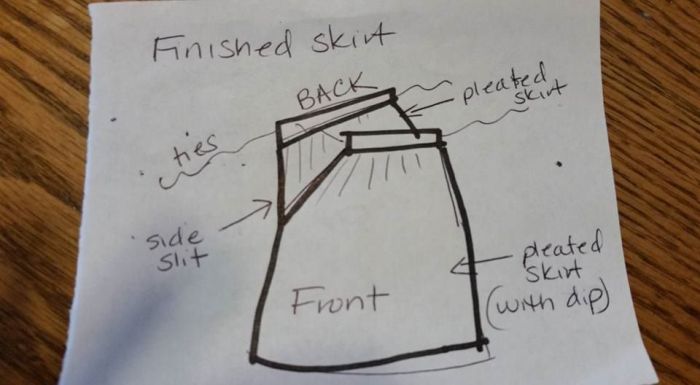
The bum pad adds a little challenge for costuming because the padding in the back pulls the skirt up, and so makes it shorter in the back. You can see we need the back of the skirt to be about 3″ longer than the front. This extra length will start at the sides. ****A different size bum pad would result in a different height difference****


This is a tutorial to make the skirts without using a pattern. We have tried to simplify the instructions in case you haven’t sewed for a while. Please don’t hesitate to ask for help if you are confused or get stuck. Our finished skirt will be between ankle and mid-calf in length.
Overview: This skirt is designed to have a flexible fit, with less bulk at the waistline than a gathered skirt. This is accomplished by having the waistline overlap–think 2 aprons sewn together at the side seam. One apron is tied back-to-front, and the other is tied front-to-back.
The measurements given are for a small person–probably a Junior 2-4. You will want more width for a larger person. You will need at least 3x the waist measurement. Adjust your skirt accordingly. For example, a 27″ waist uses the 100″ of fabric.
You can see a more detailed description & pictures of this in the underskirt section of this post.


For most of the high school girls in our cast, try for a finished length of between 36-38″. Have the two top waistbands each 20-22″, with ties long enough to reach around the waist and tie. If you have been assigned a particular cast member, use her measurements (which will be provided to you).
The Fabric:
First we need to get lengths of fabric. If you are using new fabric, skip to the second paragraph. If you are using a sheet or other “found” fabric, read the next paragraph to prep your sheet for the skirt. We are assuming you are using a WOVEN fabric.
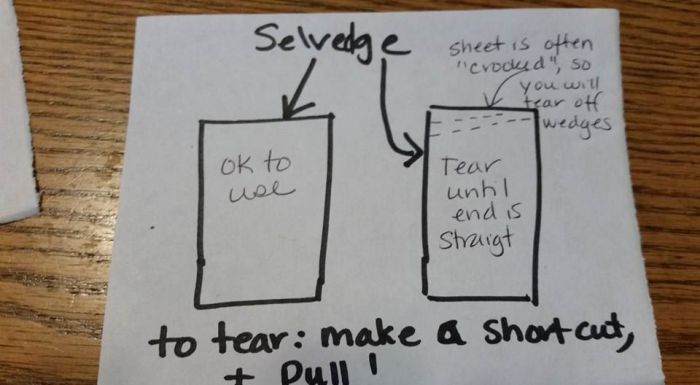
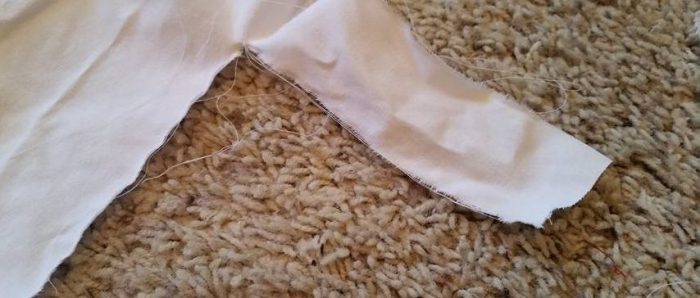
Prepping the sheet: If using a sheet, begin by getting the fabric on-grain. Determine where the selvedge (the natural “side” of the fabric, not a cut edge) is–sometimes it is on the side, and sometimes it is hidden in a hem. The selvedge is on-grain. If the selvedge is on the side, snip just above the smallest hem, and tear it off. It may take several tries to get a place where you can tear across the entire sheet. If the sides are both hemmed, you can assume the selvedge is in the top or bottom hem and that they are straight. Tear off the side hems. It is going to seem like you are wasting lots of fabric, as sheets are often very off-grain, and you may be tearing off 6 or 8″. But, the skirt will not hang well, if cut off-grain.
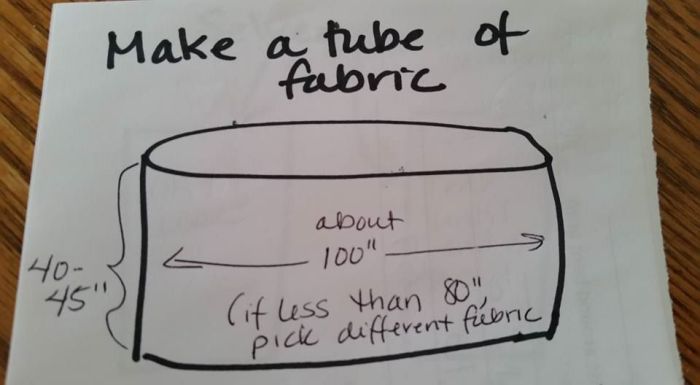
For any fabric source: Our goal for the skirt is to make a tube of fabric. The length should be the desired skirt length plus 4-5″ (for the hem, top seam, and enough ease to ride over the bum pad). Using the generic length of 36-38″ finished length, your fabric should be 40-45″ in length (this may be dependent on what you can get out of your sheet–before tearing strips, measure the amount you have available and divide appropriately to get a logical number of strips. If the fabric has no pattern, especially for a sheet, it can be divided cross-wise or length-wise) The circumference (width) of your tube should be about 100″. This may take some piecing. Do not make seams going around the body, but rather up and down. If you can only get 80″, know that your front will just be slightly gathered. Anything less than 80″, set the fabric aside for another purpose. (For a larger person, you will want some additional width–a minimum of 3x the waist measurement–roughly 1/3 of the fabric will be in the front panel).
Sew the pieces of fabric into a tube.
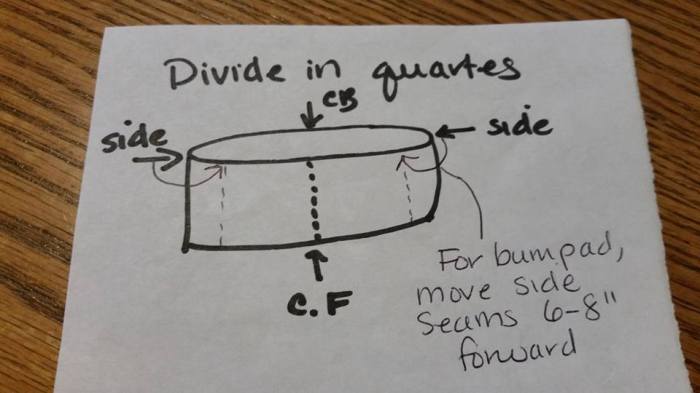
Determine the CF (Center Front) and CB (Center Back) by folding your longest section in half and marking that part as the CF, and the opposite position as CB. Fold in quarters. Because we want extra fabric in the back to go over the bum pad, mark the side seams 6-8″ toward the center front (if you don’t have much fabric . . only move them forward 4″, so that your front panel doesn’t get too narrow
You can make the marks with small snips in the fabric, a sharpie or pins. I usually use a sharpie.
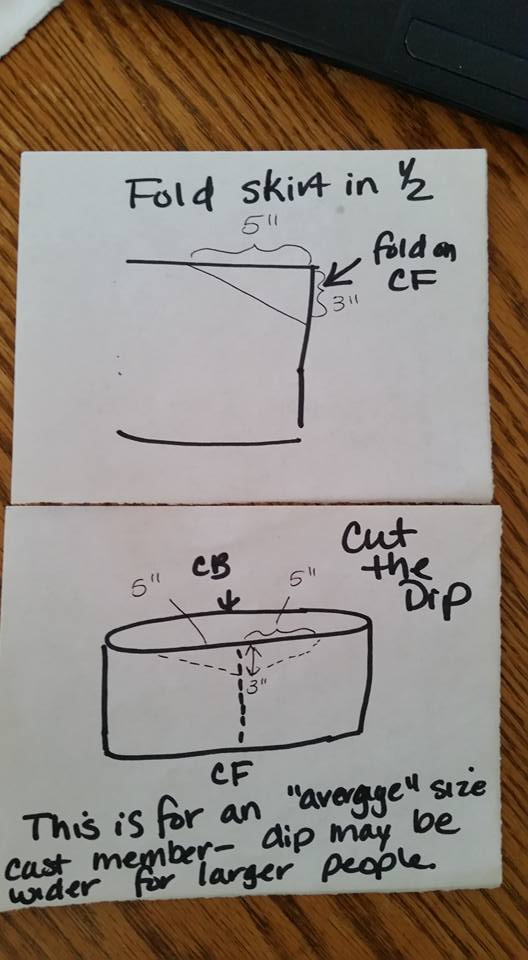
To make the dip: (The “Dip” is what makes the front shorter so that the back is longer to go over the bum pad.) Fold the fabric along the CF line. Measure out about 5″ from CF and mark. Measure down about 3″ and mark. Cut from the 3″ mark to the 5″ mark, making a wedge shape. (The wedge may need to be longer for larger people).
Make your side openings by slitting down 8-10″ at the side seam markings. Finish this cut edge somehow. You can bind it with bias tape, use a close zig-zag (if the fabric is fairly firm), or fold it under and make a narrow hem (if you do this, at the point, reinforce with a small piece of fabric and zig-zag it down–or any other method to keep the fabric from tearing).
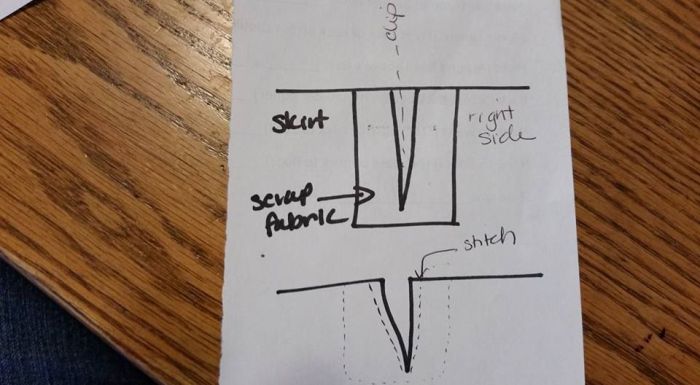
For really lightweight fabric, or something you want “nicer”: Another method is to cut a piece of scrap fabric somewhat longer and wider than the slit. Place this on the RIGHT side of the fabric. Sew a narrow “wedge” shape. Slit the fabric on the inside of the wedge being careful not to clip the stitching at the point. Turn the waste fabric to the INSIDE of the skirt, and top-stitch along the edge of the slit.
The Waistband:
Tear some fabric strips for waist bands. You will need two. If possible, make them 3″ wide and more than 40″ long (40″ is the absolute bare minimum–60-80″ would be better, especially for the back ties). If you don’t have that much fabric, you can use ribbon, twill tape or bias tape for the ties. If you use something else for the ties, the waistband pieces will be 3″ x 24″. Fold the waistband in half length-wise (wrong sides together) and press. If your fabric is thin or unstable, add a piece of interfacing. (For other sizes, the waistband should be 1/2 the waist measurement plus 3-4″ on each side for overlap, not including the ties).
Mark the center front, and then 10-11″ out on either side (total length 20-22″) (the picture says 12″, but I forgot the seam allowance was added to the 3″ x 24″ length). (adjust measurements for your waistband size)
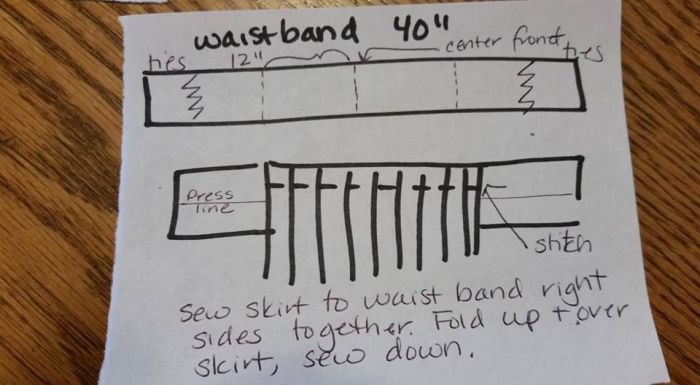
Match the CF of the skirt to the CF of the waistband, right sides-together. (This is a costume, so the inside of the waistband will not be finished. If you want a finished inside, you would do it “backwards” as shown in this post). Pin the side openings to your marks that you made 10-11″ from the CF. Start pleating at one side with the pleats going towards the center. Pin securely. The pleats do not have to be even, or to match (if this is distressing to you, google “fork pleating” for some easy tips on how to make really even pleats). Have the last pleat end about where the “dip” ends so the center front is flat. Repeat on the other side with the pleats going the other direction. It may be easiest to sew this in two sections so that you are always sewing “with” the pleats. Repeat with the back. (The above post also shows an example of a pleats pinned into a skirt).
***After pinning in the pleats, carefully try the skirt on with your bum pad. Not all bum pads are stuffed the same. Make sure you like how the waistband fits and how the pleats fall. The skirt should overlap on the sides to hide the slits. Adjust the size of the pleats and the size of the front and back pleated distance to suit your preference.***
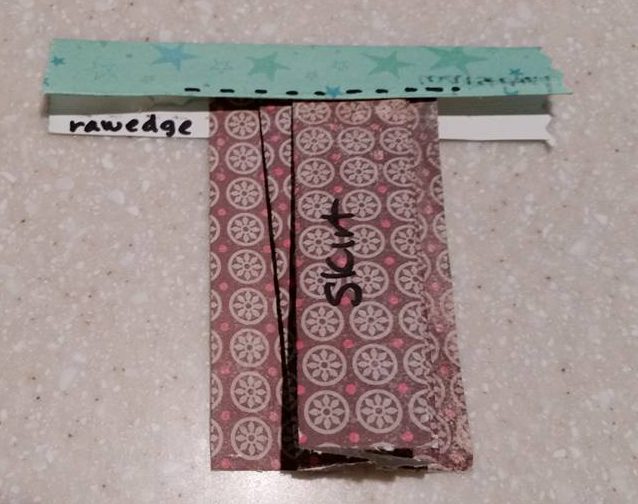
Easiest Method: (Addendum per comments). Fold the waistband piece in half right sides together. Do NOT open it up. Sew the pleated skirt on the the waistband along the raw edge side. There will be three layers–two raw edges from the waistband, and the skirt. It probably is easier to do this the other way, with the waistband on the bottom. Pretend the paperclips are pins.
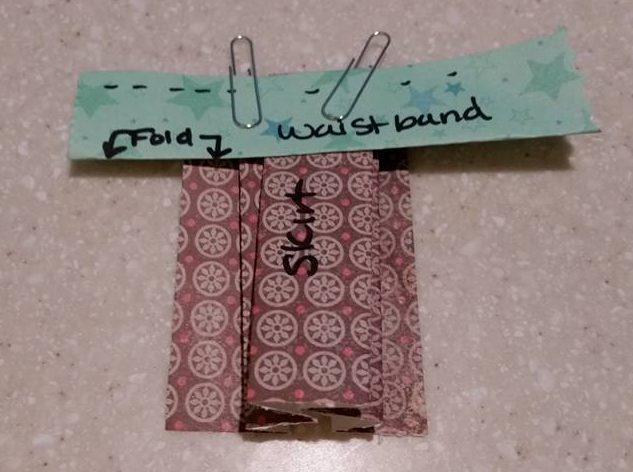
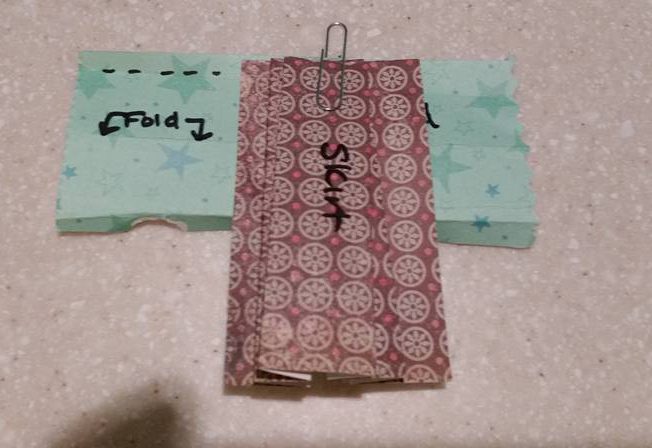
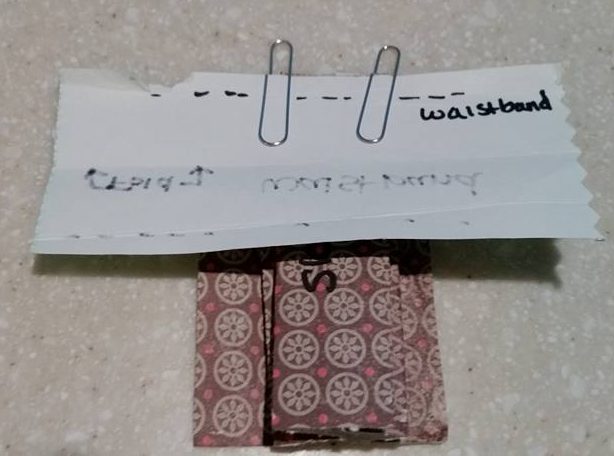
The waistband piece then folds up along the seam line. From the front and from the back. (The white tape is substituting for stitching).


Consider adding a row of top stitching along the seam line of the waistband on the front for strength and to help hold the pleats in place.
Up-and-Over Method:
This is my preferred method. Perhaps because I am right handed I find it easiest to pleat on the right-side of the fabric.
Lay the waistband out right-side up. Pleat the fabric right-side up and stitch.
Press a seam allowance on the unsewn edge of the waistband. Flip the waistband up and to the FRONT. Pin down, and topstitch.


Up-and-Back Method:
Lay the open waistband out right-side up. Pleat the fabric on right-side down (the picture is shown from the back as I am getting ready to fold the waistband–but the orientation of the fabric is correct).
Flip the waistband up and to the BACK. Pin and stitch. You do not need to finish the back edge of the waistband fabric.
Long Tie Method:
The skirt is pleated to strips of fabric long enought to form the ties. Fold them lengthwise in some logical manner (for the weight of the fabric), press to hold if needed. Zig-zag along the length.
Short Tie Method:
If you are using two short waistbands, after the skirt is pleated and sewn on to the waistband you can finish the waistband in one of two ways. The main difference is whether you sew the waistband sides before or after to turn the waistband to the back to sandwich the pleats. Either way, back-stitch over the place where the ties are inserted a few times to reinforce the insertion spot.
For the ties: cut four 18″-ish pieces of tie material for either method described below, OR, for the second method only, cut two 40″ish ties and sandwich it in the INSIDE of the waistband.
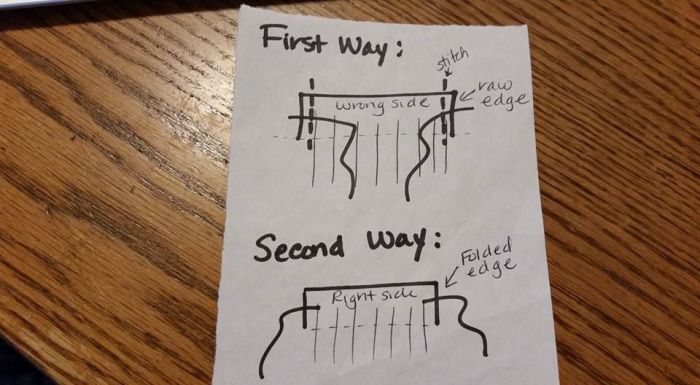
First way: This method you leave the waistband as it is and fold the right-sides of the waistband together. Insert the ties into the waistband seam from the INSIDE, and sew. Clip the corner at an angle, and then TURN the waistband right-side out, so the waistband now sandwiches the pleats, pin in place, and stitch the back down.
Second way: Press in the sides of the waistband along the seam allowances. Fold unstitched waistband over the pleats. Insert the ties between the pressed edges. Pin. Topstich the sides of the waistband together. Pin the waistband to the back of the skirt, and stitch down.
There really isn’t a right or wrong way to do this, and there are lots of online tutorials on how to put on a waistband if you get confused. Any commercial pattern will help explain the process as well . . or, call and ask if you need help.
Finish the skirt:
Make a narrow hem. (1″ was allowed in the above measurements). Don’t worry of the skirt ends up too long . . . it is easy to shorten a straight hem like this by either turning it up again, or adding a pleat near the bottom.
I hope this tutorial helps you make your skirts. Let me know if anything needs to be rewritten or explained in a different way.
Thanks again for helping make this the Best Production EVER!


In the paragraph where you tell how to cut the “dip”, you give the 3″ measurement, but it reads to me as if you are doing that @ the 5″ from CF position, rather than at CF.
I got confused over the waistline application. When I made mine, I just kept the waistband folded, right sides together, sewed it on to the skirt and left the raw seam in the inside of the skirt. Not that that is the best way to do it–it just seemed like the easiest way, and eliminated pressing, pinning and stitching.
LikeLike
Good point on the waistband. That would be easier.
LikeLike
Pingback: Petticoat Upcycle: Youtube DIY Companion Post | costumecrazed
Pingback: Dressing Baroness Bomburst: Simple Costume Plot & Costume #1 | costumecrazed
Pingback: Dressing Baroness Bomburst: Simple Costume Plot & Costume #1 | costumecrazed
Pingback: Fiddler on the Roof: Peasant Costume #2 | costumecrazed
Pingback: Fiddler on the Roof: Peasant costume #3 (navy blue) | costumecrazed
Pingback: Pattern Testing: Turn-of-the-Century costumes; Pink Ensemble (Meet Me in St Louis) | costumecrazed