A “little blue dress” is to Fairy tales what a “little black dress” is to cocktail parties . . . it is highly favored by Belle, Little Red Riding Hood, Dorothy, Alice, Cinderella and even Jasmine & Ariel wear variations on the theme. So, for a generic dress-with-no-specific purpose, choosing blue seemed like a good place to start.


In addition to the color, this dress was appealing because I’ve been wanting to try flipping some dresses around to take advantage of the back detailing. This dress was an easy one to start with since it did not have a train. The dress features an open corset back, with a short zipper at the back waist. It has a full bodice lining that attaches to a net petticoat.

For this particular dress I was intrigued by the idea of utilizing the decorative back corseting on the front of the dress. Based on how it looked on the dress form, it seemed like a reasonable thing to try. The sides were narrow enough that it looked like they would fall to the sides of the breasts. The loss of fullness is a concern with reversing a bodice.


The first step was to shorten the skirt. I imagined that this dress would be worn with an apron, and so I opted to leave the skirt opening in the front. This was an experiment that I would say has mixed results, and I will discuss the pros and cons as the process continues. Since the zipper would remain, I planned to cut around the zipper and leave it in place. The waistline was determined by tying a string around the “waist” and marking this line with pins. I determined how long I wanted the finished skirt by folding it up and “eyeballing” it. When I was happy with the length I marked the fold with a pin (it is kind of hard to see, but it is on the seam line, below the zipper about 8″).

At this point, I could either just fold up the skirt and top-stitch it on, or, I could cut the fabric out between the pin lines. I chose the second option for this project.
Since the bodice was fully lined, a line of stitching was done along the pin line at the waist to secure the two layers together.

The bodice was then cut off the skirt below the thread line including a 5/8″ seam allowance. I cut around the zipper.

I measured from the bottom of the skirt to the pin that indicated the desired finished length, plus a 5/8″ seam allowance.


Tiny sharpie marks were used to mark the cutting line. It was then just a matter of aiming the scissors from mark-to-mark to trim the skirt to size.
The top of the skirt was pleated to the bottom of the bodice, right sides together.

I didn’t have a clear idea how to deal with the front opening since it is in center front. The ones I have dealt with before have been in center back, so appearance is not as much of a concern. As a trial, I sewed the skirt fabric right up to the edges of the zipper, leaving a “pooch” of fabric over the zipper so that the skirt could still expand.


I did consider running elastic across the front. Another option would have been to strategically place a pleat so that an opening for the zipper could have been created. Again, there are pros and cons to this approach that I will discuss as I go along.
The easiest way to deal with this would be to reverse the skirt and put the center back in the center front. The center back seam could be opened up and topstitched with a narrow fold along the edges of the zipper. This works great in the back of a dress, but I balked at doing this in the front. No matter how many times I try . .. I just can’t put a seam in the center front.
This is where we are to this point:


I decided to add the petticoat back under the skirt. By luck it turned out that my finished skirt length was almost exactly the same length as the petticoat. Note to self: check this out before deciding finished skirt length.

The excess lining fabric was trimmed from the top of the petticoat. I also opted to add two rows of flat eyelet around the bottom so it could peak out. I have a HUGE roll of eyelet that I bought at a resale shop, so I can add eyelet to tons of things for pennies. Once the eyelet was sewed on the petticoat was stitched into the waist seam so that it sits between the bodice and the skirt to keep it from being scratchy at the waistline. It was slightly larger, and so the quarter method was used to divide the fabric and then the petticoat was squish-gathered to the bodice.
The dress is hanging a little fuller now:

I decided to go with an attached blouse and a set of curtains that had a deep eyelet ruffle were just the thing. The wide eyelet ruffle edging would make a great sleeve decoration for elbow length sleeves.
I started with a sleeve from a commercial pattern, and then drew it larger on newspaper.

")
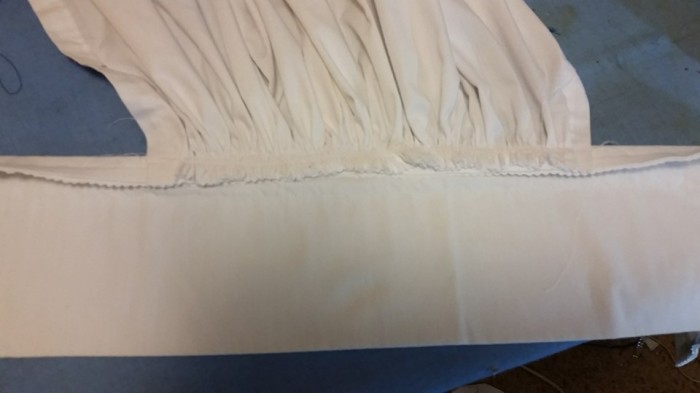
After cutting out the first sleeve, I used it as the pattern for the second. One really nice thing about these curtains was that the eyelet was sewed on in such a way that a small channel was made–premade casing! Score! I sewed the underarm seam up and stopped right at the casing part, skipped over it, and then sewed the eyelet ruffle part. This way I could later pull the elastic through.

I ran two rows of gathering threads along the top of the sleeve. It is always tempting to only make one . . but . . if you’ve ever had your one gathering thread break 3/4 of the way through gathering and pinning something … you won’t make that mistake again. The other advantage to two gathering threads is that the fabric will lay flatter, which actually makes it easier to sew. If you only have one gathering thread, the fabric will often twist around the thread, as well as buckle up and it is harder to keep from catching it in the seam.
The sleeve is then pinned into the armscye and topstiched into place.


Sleeves in place, but without the elastic at this point.

For this dress, I used a piece of the curtain left from cutting out the sleeve to fill in the bodice. One side was sewn into the bodice and the other side flaps overand a 1/2 strip of velcro is used to secure it to the other side. It just hangs loose at the bottom.


At this point, I decided I should do something about the back. The bust-shaping in the “front” wasn’t horrible, and it probably could have stayed (and there might have been an advantage in case you ever want to flip the dress and wear it “backwards”). But, I decided to take it out. I folded the fabric this way and that, and ran into the issue that it was harder to keep the lining from pulling than I thought. In the end the excess fabric was folded toward the center back and pinned down and topstiched. Another time I would definitely do this BEFORE putting the skirt on, as I would have liked to have continued the tucks all the way through the waistline.
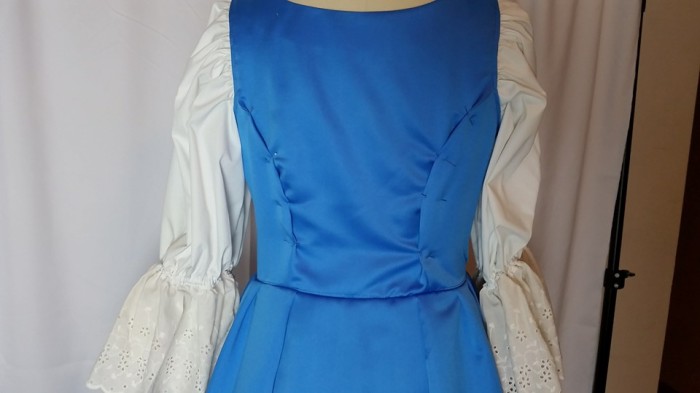
I also decided to cut the top two lacing loops off (it just went too high), and added them to the bottom of the front “hole”. I cut the loop off that was right above the zipper in center front.
Then . . what to do with the “pooch” that I ignored before? I think the best way to make this lay flat would be to use either snaps or hook & eyes. I tried using velcro and that was less than successful as the velcro is too bulky and doesn’t hold down tight enough.


One unexpected bonus is that by leaving the zipper open, I think that you could expand the dress to fit a larger size person. To do this, I would probably should have spliced another piece of the eyelet to make a more expandable bodice piece.
I am not sure how happy I am with the zipper in the front, however, from a distance, the zipper is not really noticeable. And, in truth, the slight bulging of the front velcro’d pleat isn’t really noticeable either. So many of these decisions depend upon your intended use of the costume! Distance viewing is a very forgiving genre!

The Apron:
The apron was very simple. A strip was cut from the end of one of the curtain (I had three). Here is is shown folded over on itself:

I cut the top casing part off the top of the curtain panels and used that to make the waistband and the sash. I used a pinking sheers to keep it from raveling–fine for distance viewing, not so great for up-close.
I gathered the top of the apron, and pinned it to one of the hem sections wrong-side of the apron to the right-side of the waistband.
Once it was sewn on, the waistband was folded in 1/2 over the top of the raw edges, and sewn in place.

Next I cut the thick hemmed edges off the ends with a pinking sheers and layered them together and stitched them together. This was less than stellar as the sash is really thick and heavy. The heavy double layer worked well for the waistband part, but, I should have cut single layers of fabric for the ends of the sashes. (In this picture the back of the dress has not yet been taken in).

The Bow:
The bow is made out of the piece of lining fabric that came from the chunk of fabric that was removed from the top of the skirt. Every once in awhile I THINK I am taking a picture with my phone, and the picture doesn’t “take”. So annoying. At any rate, this piece was actually rather arc shaped, as it was make of the top of the gores of the skirt. I backed it with a piece of petticoat net to give it some shape. I simply folded the edges of the piece of fabric over the net, and stitched a hem in. I then folded the ends of the piece of fabric to the center (overlapping at the center) and shaped it into a bow.

I used a zip tie to secure the center. I like zip ties because you can place it on the bow loosely to begin with and adjust the bow as you wish, and then tighten it once you are happy. And, if by chance you don’t like it, you can cut it off and try again.

For the center of the bow, a scrap of fabric was tied in a loose knot.

This was wrapped around the center and glued to the back with hot glue. A french clip was also glued to the back.
The finished dress:


Cost: blue dress $5, 3 curtain panels @ $2.59 each. Flat eyelet from a large roll, elastic from a large roll, one french clip, velcro from a large roll
Time: about 3 hours
Evaluation:
This was a super quick project. The apron nicely covers any issues at the front waist. The bodice shaping should have been done before adding the skirt. The lacing precludes this dress from being used as a “Belle” dress for a theatrical show as it takes too long to do up for the quick changes in the second half–altho ?
The blouse part was easy to do, and is a great way to fake a blouse, especially if you have limited fabric. I had plenty of curtain fabric left over though, and, in retrospect, it may have been just as easy to actually make a peasant style blouse, and then it would be useful for different applications.
Definite changes would be to remove the bust fullness before adding the skirt, measuring the petticoat before deciding the finished skirt length, and re-thinking the front zipper area. The apron ties should be a single layer of fabric, and I maybe should have made the skirt just a bit longer.
Overall, I am pleased with this costume, and the zipper issue is merely a new challenge to be improved upon in the next version.
Addendum:


Lots of my Ren costumes have that lace up the front or even harder the lace up on both sides. When I decided to use them for Cinderella we had to deal with the quick change issue you talk about. Two things worked. If I made the laces super long (which was easier when doing the side laces) and I put something substantial on the bottom so they couldn’t pull out, we could manage it. But, the best solution for us was elastic lacing. I used the silver and gold cording elastic. The kind you sometimes get on a package. When that wasn’t appropriate (my peasants wouldn’t have had gold lacing) I used colored elastic in the narrowest width possible. It actually worked out well. The actors could just pull the laced up part over their heads. Someone just had to make sure their laces looked straight before they went on stage.
Love the zip tie idea. Did you ever use Frixion markers. They are a life saver. Pilot makes them and they come in all colors. You can write all over your costumes and then one touch with the iron or a shot of steam and the mark is gone.
The costume looks great!
LikeLike
Elastic lacing sounds like a good idea. I will have to try that. You can buy 1/8″ baby elastic in all manner of colors. So, what did you use the markers to draw on your costumes? I can see they might be good for writing name labels 🙂
LikeLike
I use the markers for construction markings. You can mark where you want to cut or match things. Kind of instead of marking with a pin. I hadn’t thought about using them for the name labels. I wonder if the body heat of the stage would make the ink disappear. I don’t know but I am going to try it.
So many of my costumes have multiple names in them. I actually use that to decide who will wear a certain garment since I can picture the last actor and if gives me an immediate idea if it will be a good fit.
But after a while it is too much. Some of my costumes are 28 years old. I just used Bye Bye Birdie circle skirts for Grease and they were 27 years old and still have lots of shows left in them.
LikeLiked by 1 person
That is a great idea. I was thinking more in terms of temporarily decorating the costumes for a show, but I can see they would be great during fittings for marking needed alterations. I am going to have to try some.
LikeLike