What is a period gown without a coordinating headpiece? Not nearly as much fun . . THAT is for sure! I have to admit my favorite Princess hat is the tall pointed kind with a veil on the end. But, for this outfit, a French Hood is probably more appropriate.
I started by doing an internet search and found some really fascinating tutorials and blogs on the history of hoods, the varying shapes, traditional colors, theorized construction techniques (apparently not too many survived history). I will be honest that they look pretty complicated to make, and the list of needed supplies tends to be pretty long and intimidating.
As per usual, I decided to just go for it.
At the bottom of the post I have listed several of the blogs/tutorials I found most helpful.
I happened to be at Michaels and I saw foam visors. For 99 cents, that seemed like a great starting point.

Truly, they come with a curly plastic elastic-y piece that holds the visor on your head. If you wanted a super-quick French Hood, you could just cover the visor, and use it just like that–especially if you were just doing Halloween or something. I elected to take that elastic off.
I thought the visor shape was a little too pointy and a little too I-am-wearing-a-visor-upside-down-on-my-head looking, so I gently bent it in half at the center, and trimmed off a bit. In retrospect, I could have trimmed off perhaps a bit more, but, oh well.
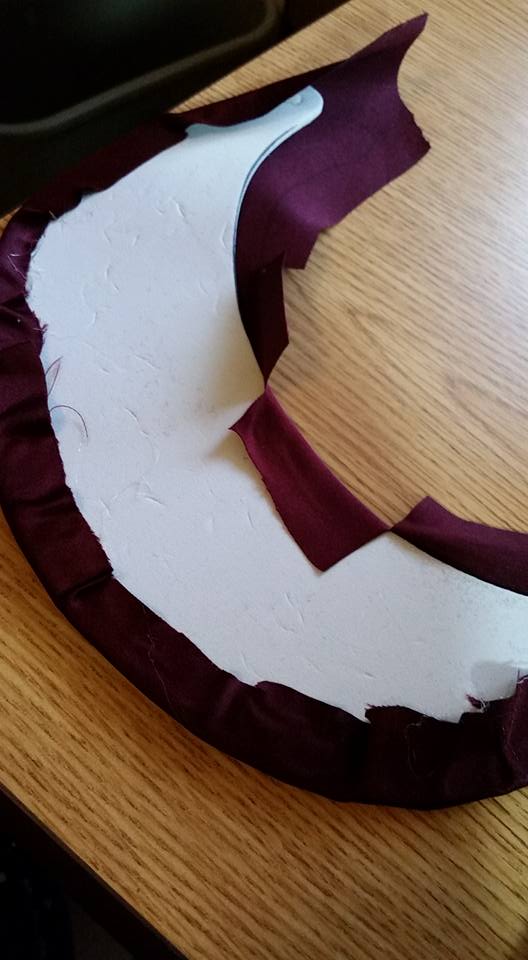
I picked out a coordinating satin to go with my dress (if you’ve read the post about the dress you know I ran out of fabric. I had a scrap that was close, but not quite the same color. It looks the same when it is on your head). I traced around the visor, and then cut that shape out, adding 1/2-3/4″ of fabric around the edge. I pulled out some pieces of cheap craft felt, and cut a second visor shape out, only this one I trimmed a little bit off of the edge, as this would be the backing.
Fashion fabric traced and cut somewhat larger. Felt backing traced and trimmed slightly smaller.
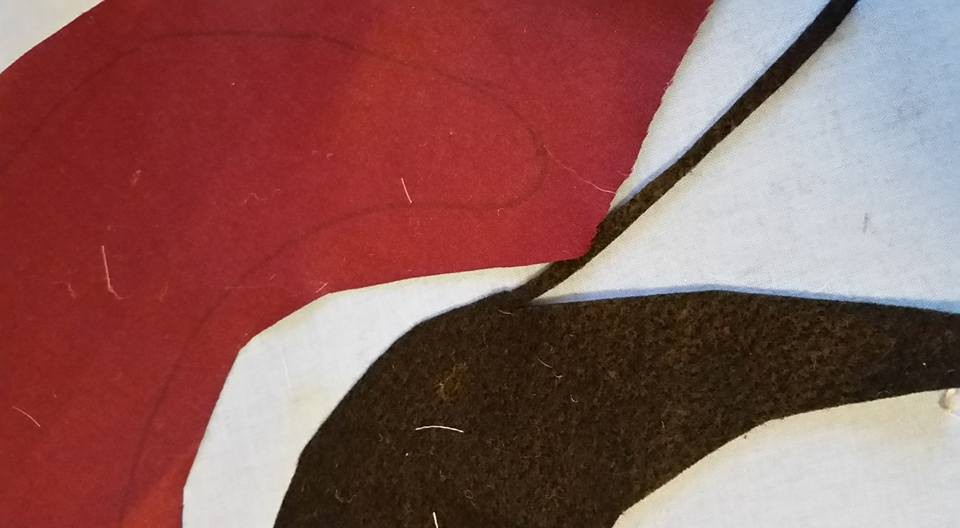
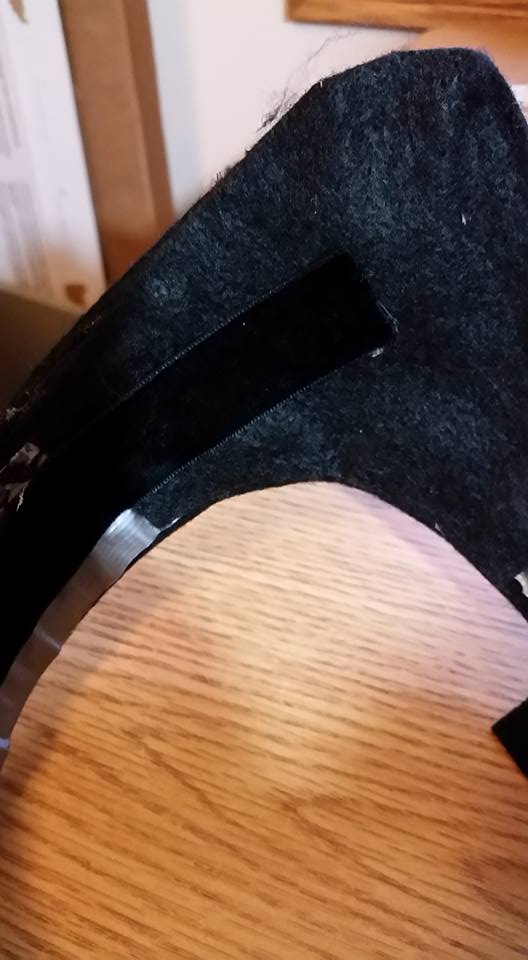
Next, I secured the fashion fabric to the visor with one dot of hot glue. Then I folded the fashion fabric around the visor and tacked it down with hot glue. I clipped the fabric as needed to go around the curves.
Next I glued on the black felt backing to cover the clipped edges.
I needed to make the band that goes on the head, which is called the “paste”. This can be various shapes. I liked the version that goes over the head, and then wraps around the back of the head to help hold it in place. It looks like two “L” shapes attached together at the top. Once it is made, you adjust the fit, and sew/pin/close the tabs at the back of the head.
I used the pattern I printed from here. I used the idea of making it out of cardboard covered with tape as suggested in this post.

cut out of cardboard
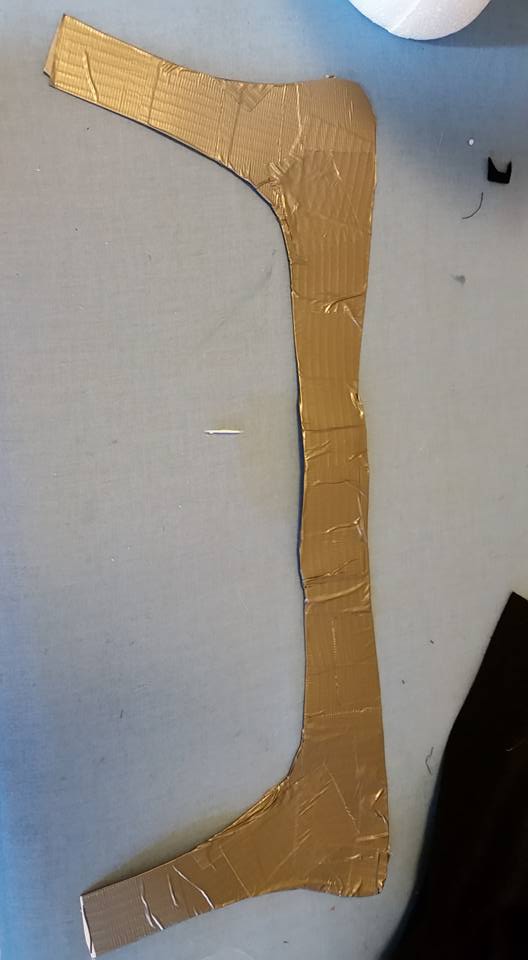
When I put the original piece on the model it was a bit long, so I just sliced it at the top, and taped it together with duct tape. I then covered the whole thing with duct tape to give it added strength.
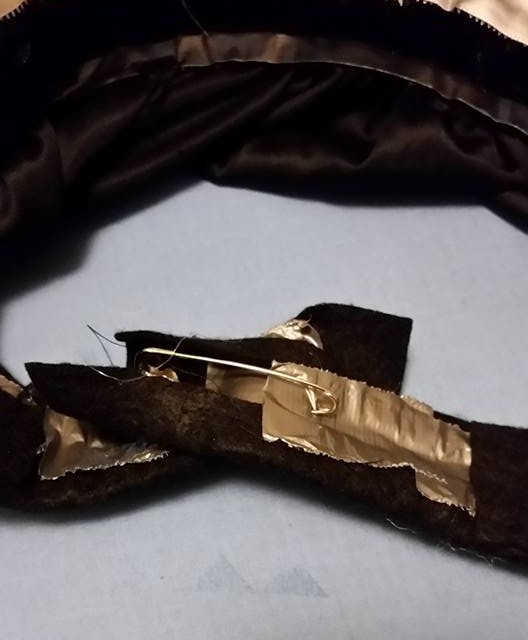
Next, I cut out a piece of felt (actually, done in two pieces as I was using cheap 8 x 11 sheets of 4/$1 craft store felt) that was larger than the paste (similar to the process of covering the visor with fashion fabric). I used pieces of duct tape and taped the felt around the paste to cover it. If you do this, trim the felt so that you are taping felt-to-duct tape and not felt-to-felt, as that stays better. When that was done, I ran one reinforcing piece along the length of the paste, covering all of the small pieces.

I didn’t want the duct tape to show, so I added an additional layer of felt on the inside at the point that goes over the ears (the corner that you see in this picture). I hot glued that in place. Any little bits of duct tape that showed, I colored black with a black Sharpie marker.

Then I put it on the styrofoam head to adjust the back.

The head doesn’t have any hair, so, I just pinned the back pieces of felt together. That way it can be adjusted if someone else wants to wear it at some point. This is all covered by a veil, so no one sees it anyway.
The last thing I did was glue a piece of velvet ribbon to the inside of the headband part. Velvet ribbon is AMAZING at keeping headbands from slipping. I planned to add ribbon ties to the hat (or you could use hairpins), but I figured the velvet would help keep it in place. (If you are making a really nice hood, most tutorials have you sew heavy gauge wire to the edges to help shape it and hold it in place. For my purposes, ribbon ties would work just as well).
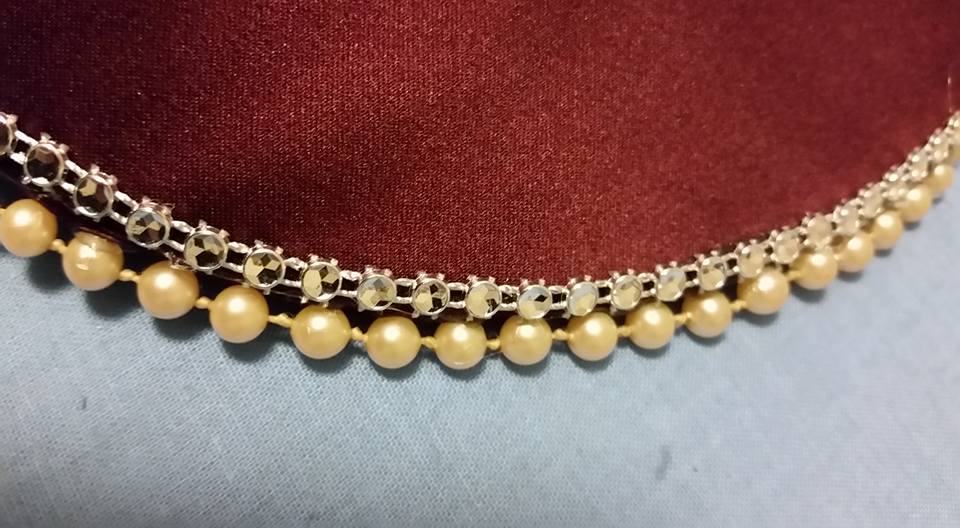
The next step was to decorate the visor piece. I chose to hot glue an old pearl necklace to the very edge. Hot glue CAN show when it dries. Depending on the glue sticks (clear or cloudy) the color can vary. It is easy to get too much glue and have it be sloppy looking. “Threads” of hot glue can easily be cleaned up by running a blow dryer over it after the project is complete. Try to use as little glue as possible, and glue short distances at a time so that the glue stays hot. Hot glue works best in areas that will not be subject to stretching.
Some French Hoods have a ruffle on the inside of the paste, and I decided I liked that look, so I glued a scrap of ruffle trim to the inside.
After that was done, I attached the visor piece to the paste. I did this by putting the paste on the fake head. I secured the visor piece to the paste with a couple large corsage pins to make sure it was sitting where I wanted it to sit. Then, I ran a generous line of hot glue on the back between the paste and the visor.
Next I put a line of braid between the visor and the paste, and then added a thin row of silver glitzy stuff around the edge of the visor (I picked silver as my dress had silver decorations). The silver mesh I used is visible in the second picture.

The last thing I needed was a veil. Veils are traditionally black, although, when you look at images of costumes they come in all manner of coordinating colors. I chose black. I had a piece of thin lining fabric that was leftover from deconstructing a dress for a different project. I ran a row of gathering thread along one end (the only sewing I did . . and this could be easily eliminated with some pleating and/or pinning), and then hot glued it to the back of the paste behind the visor.
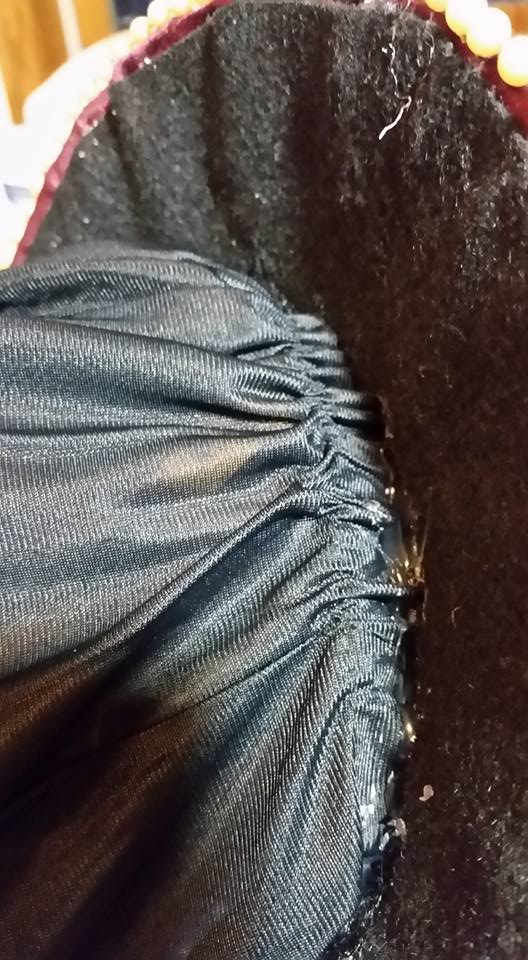
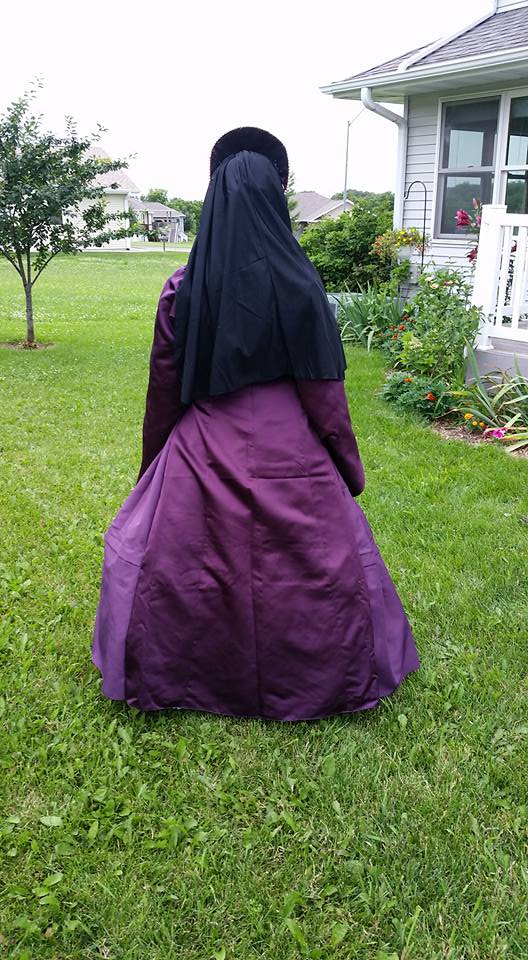
I didn’t get the gathers as even as I should, so it is a bit “off” looking from the back. That is one problem with hot glue. I tacked the veil down at the sides of the visor to help it hang the way I wanted it to. Of course, it looks a bit more lopsided just the way it is draped over her shoulder. We’ll get better at this picture taking thing!
I then safety pinned pieces of black ribbon to the inside of the paste near the ears. I chose to pin it so that it could be removed for flexibility. If the safety pins showed, they could easily be covered with a piece of black electrical or black duct tape.
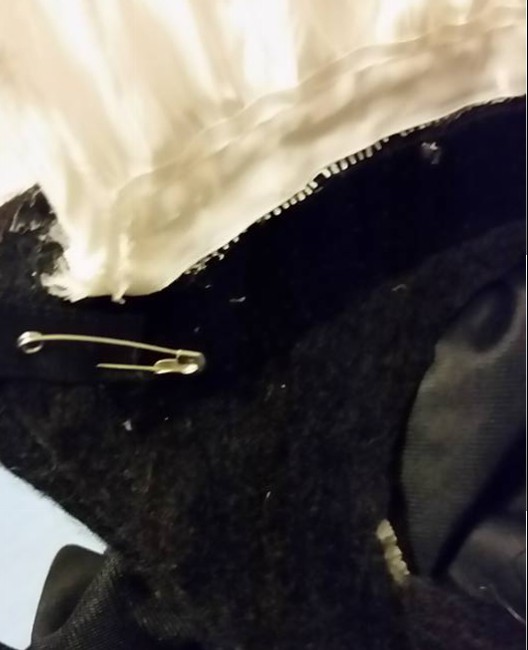
Ribbon tie pinned to paste.
And . . the French Hood is complete (you can see a description of creating the gown in a previous post Dress ).


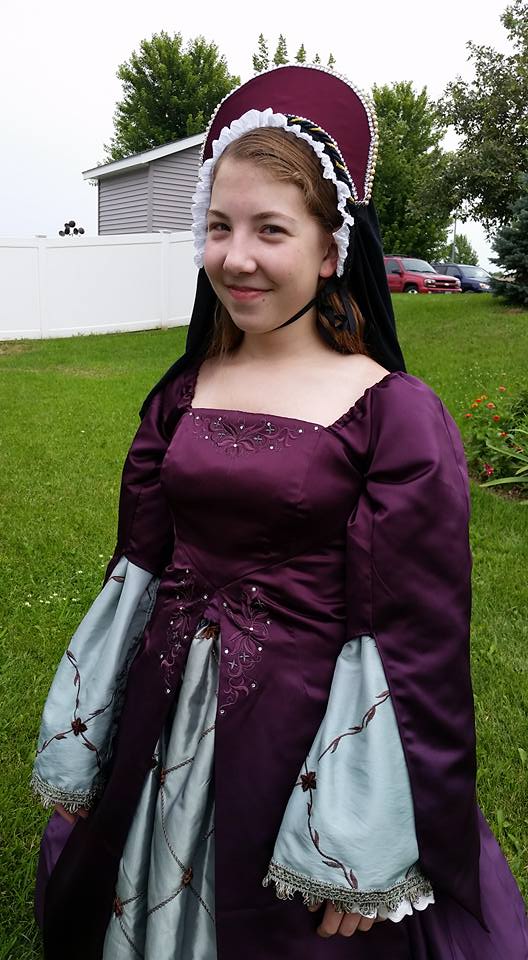
I regret not giving the dress a good pressing before we took pictures.
Cost: Visor $1, felt $0.75, necklace about 50 cents-$1 (trade at the Create/Exchange in Cedar Rapids Iowa), plus scraps of cardboard, fabric, trim & hotglue.
Time: About 1.5 hours . . . and that included digging for supplies like the trim and veil.
Resources:
http://rosewoodbuttons.blogspot.com/2010/10/project-7-anne-boleyn-gown-part-six.html
https://adamselindisdress.wordpress.com/2014/09/16/how-to-make-french-hoods/
–pattern for the paste came from here
https://hathawaysofhaworth.wordpress.com/2012/09/20/the-easy-gable-hood-guide/
–idea for cardboard wrapped in tape came from here


Pingback: Concept Costume: Carmen Miranda/Conga Dancer | costumecrazed
You are awesome. Completely and totally brilliant!!! I’m so glad I read this because I wanted to make a French Hood out of a visor and wasn’t sure how to start. Thanks for the inspiration.
LikeLike
I’m so glad you found it helpful! Good luck. I wish wordpress allowed photo comments because I’d love to see your creation 🙂
LikeLike