Our High School did “Grease” this Spring. One of the big specialty scenes is “Beauty School Dropout” . .LOVE IT! I envisioned lots of bling . . .towering curler hats . . . . maybe even feathers!
Then we had auditions . . and over 70 kids tried out. When it was all said and done . . we had about 50 girls in the show.
Oh My! This is when I started losing sleep over the equation: # of Girls x yards of fabric x curlers divided by budget . . . you get the idea.
Things got a little better when the Director decided to limit this scene to 25 girls. So . . then the work began . . I spent TONS of time online searching ideas & for fabric (25 girls x 2 yards of fabric = 50 yards, minimum), plus the fabric had to be thick enough and heavy enough to stand alone (not need a lining) . . and the costume had to be quick change as the girls were all in the Dance Scene, and I STILL wanted bling (but that is another post!) And . .then, the BIGGER QUESTION: How to do the hats?????
This is what I came up with:

The best way to get inspiration is to just have an idea of what you are trying to do . . . and then walk around stores and LOOK. I found the white mesh metal trash cans at Dollar Tree. When I find something that I “think” will work, I buy one, and make a prototype . . and go from there.
The easiest & cheapest “thought” for curlers is the iconic toilet paper tube. However I quickly dismissed that on a couple of grounds. First, the number needed. I did an internet search and you CAN buy blank toilet paper tubes in a box . . however, they are amazingly expensive. Second, TP tubes would crush, and third, often have those little pieces of paper left on them, which would all have to be picked off–and who has time for THAT?.
I happened to have a tube of pipe insulation sitting around from making a previous costume. That proved easy to cut, easy to glue, and gave me the right “look”. These also were available locally, and cost $1.79 each.
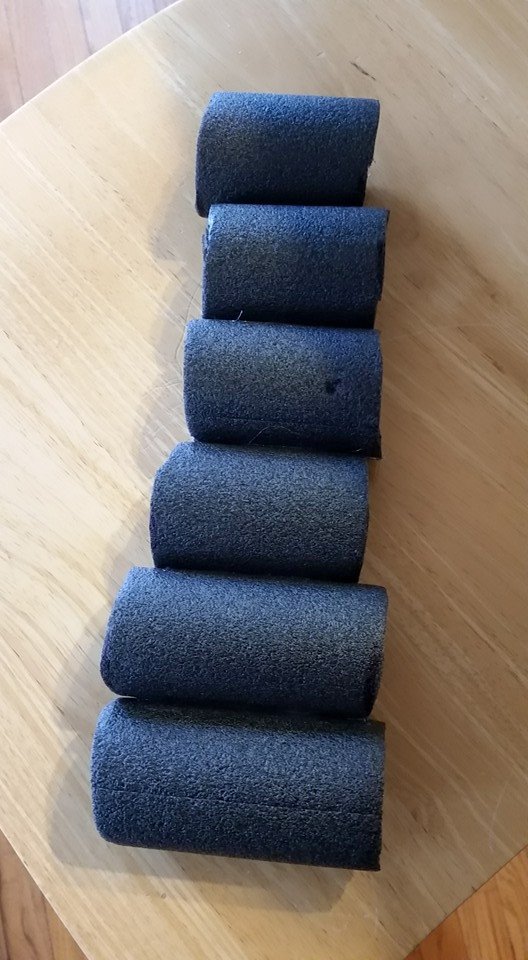
Graduated lengths of curlers glued together to make a “column”. A strip of cardboard goes on the back. Total of 6 rows (this will vary by the height of the hat, and the diameter of the tubes used).
Next, I needed to figure out how to keep a trash can on someones head . . not as easy as you’d think! I tried a stocking cap (too heavy and cost prohibitive), a knee-hi panti hose, and finally hit on the idea of making a “sling” of sorts for the head, and then using elastic to hold it on under the chin. I found out that if I tied the elastic high on the inside of the hat it gave extra stability and they didn’t tip as much.

Inside view of the hat. You can see the mesh of the basket with the head sling tied to the sides in four places. The elastic is tied about 2/3 of the way up the sides of the basket.
Next came the painting. I used white spray paint. Good thing is: it is easy, quick, and readily available (I recommend getting a spray attachment for the tops . . . I still have a numb spot on my thumb a weeks after I painted them all). Bad thing is: the paint does tend to chip off . .but more on that later.
Once we decided the prototype would work . . .then we went into mass production.
First, I did some math. I decided I wanted 8 rolls of curlers. I measured the circumference of the wastebasket at the top, bottom, and then at intervals in between (based on the height of the wastebasket and the diameter of the tubes . . do something logical that looks good). I divided the circumference numbers by 8 (number of columns). That told me how many inches the curlers needed to be. I then multiplied the length of the curler x 8 (the number of columns) x 25 (the number of hats) for each row (total of 6 for me), and added those together. I divided that by the length of the tubes of pipe insulation, and that told me about the number of tubes to purchase. It WAS a little overwhelming when I realized we would need 1,200 “curler” pieces!

Top view: 8 columns of curlers around the basket.
Since I was planning on having a “work day” and having the cast help . . I decided to make a template with each of the curler sizes marked on them (I used strips of cardboard). We used a marker to mark the pipe insulation tubes, and then cut them. We would put a “set” of 6 graduated curlers in a bag, and then send that to the “gluers”. You COULD cut them in groups by size . . . however, I decided against that as I didn’t want an enthusiastic student to cut all of my tubes into 2″ pieces . . and then I’d have none left for the larger ones.
We then glued the curlers together in “columns” and glued them to a strip of cardboard (cut from leftover Christmas gift boxes). Don’t worry if they aren’t perfect . . they are being seen from a distance, and no one is looking at just one. (It does work to glue the curlers directly to the basket . . but this worked better for us for the assembly line method, and we thought it added stability and durability to the finished product).
We found that a low temp glue gun worked best on the pipe insulation tubes so they didn’t melt, but that a high temp glue gun worked best for the cardboard strips. We further put a small piece of cardboard on the INSIDE of the hat (making a sandwich: cardboard/wire mesh/cardboard) to help hold the strips in place.
Before we glued the curler rolls to the baskets, we tied in the head sling and the elastic. We used a strip of non-fraying, non-stretch fabric for the head sling. Cut two pieces, and, make two parallel slits in the center of one–slightly larger than the width of the strips. Weave the second strip through those slits, making a “+” shape, Then, cut small slits at the end of each strip–NOT ALL THE WAY TO THE EDGE–you are making a “hole”. Tie the “+” to the basket in 4 places, making sure your knots are secure, and/or putting a dot of glue on the knots. We used wrapping paper ribbon. Then, cut a piece of elastic your desired length (will vary by stretch), I used about 22″. Tie these high enough up onto the inside of the basket that it gives good balance to the hat.
Once all the hats were made . . . then came the painting.

Hats set out for painting. I painted the bottom edge first, and then flipped them over and did the rest.
I used basic cheap spray paint to paint them. I wanted to try using a sprayer and latex paint, and I even bought a sprayer . .but . .when I went to get the paint, the spray paint was actually cheaper, and in the interest of time . . I KNEW I could get that to spray . . so I went that route. It took about 10 cans of paint, and I did it in layers. I was OK with some of the gray showing through as that added definition and gave it almost a “silver” look onstage. Unfortunately, our show is in early March . .so I had to do this in my garage. I heated it up as best I could with space heaters, and wore a mask, and luckily it was a windy day and enough air came through around the garage door to keep the fumes down some. It IS messy to do this . . . there is paint residual on stuff in my garage and I tracked it into my house for a while. A little spray paint is one thing . . . multiple cans are completely different. If I had more time, it would have been better to do them a few at a time and make a draped space . . . but . . . the show must go on.
Next, I needed to figure out how to give the hats some “bling”. Jewels and sequins were out . . after all, there are 1,200 curlers!
I ended up making a “wash” with:
Liquitex Professional Iridescent Effects Medium, 8-oz
by Liquitex
(see link below)
Folk Art Folk Artextreme Glitter 5-Ounce Acrylic Paint
by Folk Art
(see link below)
and some water. Don’t ask me how much, because I honestly don’t know. I would guess a cup or so give or take.
***** I accidentally deleted the end of this post, so I will attempt to recreate it******
I absolutely LOVE the iridescent effects medium, and I can’t wait to come up with something else to use it with. It gives a really nice pearly-shiny look. I was also happy how the medium dried in kind of hard coating which protected the spray paint. I was less than satisfied with how the glitter looked. It would be great for a single wear-to-a-party-see-up-close costume, however, when I took a hat and viewed it on stage, the glitter was less than impressive. So . . .back to the drawing board.
The obvious answer is glitter. BUT, glitter really sheds. And our auditorium staff really dislikes glitter because it gets into everything . . . working its way down into the carpet fibers, and is super hard to clean up. Unless I am prepared to seal it down well, I don’t use it.
As I live in a fairly small town, my options are limited. I went to the local Farm/Hardware store and found some Rustoleum clear glitter sealer (which, guess what? Doesn’t actually have glitter IN it. Oops. Besides which, it REALLY smelled . . so that was out). Most of the cans of glitter spray paint suggest you follow them up with a coat of sealer, AND they are fairly expensive, so that was out. My next step was to wander around our national-chain-sell-everything-store and see what I could find.
My solution was LARGE glitter, and I decided to mix it with clear Elmers glue to make a wash that would hopefully seal it down, and if it did shed, at least it would be big enough to vacuum up.

Jumbo glitter
I again, thinned this wash with enough water to make it easily paintable. I stirred it often with my paintbrush as I repainted the 1,200 curlers. I was happy with how this turned out. It had enough bling that it showed up on stage–at least in the front. This was also relatively inexpensive. I could have used just one container of glitter (mixed with two bottles of glue + water).
I kept the remaining wash, and mixed a little bit of white paint with it. Of course, this covered up the glitter, but I just let it sink to the bottom and ignored it. I used this to touch up the hats between performances. I tossed what was left when the shows were done. I did like this mix also. If I were doing it again, I would make sure to coat the “bottoms” of the hats with something to keep the paint from chipping.
Here are the hats in the performance:


Overall I was very happy with these hats.
Total cost per hat: wastebasket $1, pipe insulation $4.50 (about 2.5/hat), plus paint, glitter & glue $1-2/hat. Elastic & fabric were donated.
I am really bad at this computer stuff, below are the links to the two products I used via Amazon. If you click on the link it takes you to a picture . . .then click on the picture and it takes you to Amazon. Eventually I may figure out what I am doing wrong . . this is as good as it gets today (and how I originally deleted 1/2 of this post 😦 )
Link to purchase Liquitex Iridescent Medium:
Link to purchase Folk Art Glitter:


