This next costume is a quick & dirty costume that I made in less than 90 minutes one night–finishing shortly after midnight. I originally wasn’t going to post about it, but, I like how it turned out, and so I thought the idea was worth sharing. Please bear with the after-the-fact pictures. I think you will get the idea anyway!
The main base garment that you need is a boho/bohemian style loose-fitting dress. Ideally it will have an empire bodice, and a fullish skirt. It can be sleeveless, or have long/short sleeves. This particular dress is the one I used for Marie in “Cinderella”. but it gives you a picture of the general shape we are looking for.


My project was to make a dress for the blind Hermit in “Young Frankenstein”. I did not know the size of the cast member, so I was just making a costume with what I had. I picked a dress that had a wrinkled skirt (by design), and an embroidered top, which I think gives the impression of stains/dirt/patches from a distance.
I began by slitting the skirt up the center front to the bodice seam. I turned the edges under and made a small hem.

I wanted a contrasting underskirt. I had an old discarded skirt made out of a soft thin old-fashioned velour. The skirt had been made out of a single width of fabric so it was very narrow, and had served it’s purpose. I cut the skirt in half the vertically. I then cut one of those halves in half horizontally. I supplemented the fashion fabric with a scrap sheet and made a skirt.

spliced underskirt
I pleated the fashion fabric to the front of the dress, and the spliced part to the back. The back was a little fuller, but that doesn’t really matter. I figure if a flash of white shows it will just look like a petticoat.


The velour doesn’t fray, so no need to hem, and at any rate, I wanted the bottom to be a bit raggedy so I chopped it up a bit.

ragged bottom of underskirt
For the sleeves, I happened to have a pair of capri pants laying on top of my “to do” pile (they were supposed to become a pair of breeches). Instead, I cut out a rough sleeve shape using the legs as my almost-completed sleeves.


I insert the “sleeves” into the dress. This type of sleeve is top-stitched in place. Start and one underarm seam and proceed around to the other side to avoid needing to squish the entire garment through your machine. I use the free-arm feature to make this easier.


I thought the dress needed a little something so I put some eyelet along the neckline to look like a chemise. I wish I had used flat eyelet instead of pre-gathered, but, it is what it is.
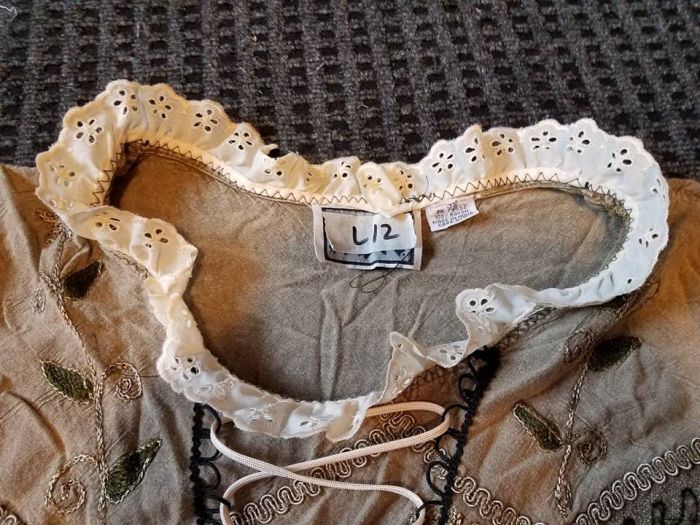
Many of the other costumes had lacing on the front, so I added some mock lacing. For this garment, I used strips of button-hole stuff. This works for mock lacing. I recommend using small stitches to catch the loops as much as possible so they don’t stretch out. In this garment I laced every third loop. The cream lacing may be a bit “clean” for a blind hermit–a darker brown might have been better for that character.

Then my dress was done:


I thought she needed a shawl, so I found an old curtain, and stained it with diluted black fabric paint and brown acrylic paint.


I really like this style of dress for my larger cast members. This allows the dress to hang from the shoulders, and gives the nice corset look. The dress can be done as a one-piece garment as I did, or as a two piece outfit. In the one below, the sleeves were cut out and the edges bound. The bodice was opened to add the lacing, and the skirt was opened to show the underskirt. The underskirt is attached to the bodice/skirt seam as I showed n the project that I did. A full length chemise was made to wear underneath and this one is trimmed with eyelet at the hem to create the look of a petticoat. The outfit below was created by one of my wonderful volunteers for “Cinderella” last year.


Supplies:
- Base boho style loose-fitting raised bodice dress, with or without sleeves
- skirt or fabric for underskirt
- something for the sleeves, fabric, or I used a pair of loose weave capri pants
- optional trim, I used eyelet, button loop trim and lacing.
I spent the majority of my time messing with the underskirt (I sewed the pieces together wrong more than once–sometimes it doesn’t pay to try to go TOO fast), and then adding the trim, which is optional. If you wanted to enhance the impression of the corset, you could applique a piece of white/cream material into the space between the lacing loops, and then use the same fabric for the sleeves.
If you can’t find a dress in this style, look for a shirt or vest with a neckline that will work. Then, cut the shirt/vest off slightly under the bust and attach your skirt. If the original garment is not designed to pull over your head, make sure you allow for that when creating your upcycle.


