I started my Orphan Dress series using a flowy summer top and a casual short sleeved man’s shirt. This made a dress in the size 8 range. For my next project I wanted to make something a big larger. I am guessing this would be more in the 12-14 range. Length is obviously a limiting factor in using a single shirt, as well as the width of the bottom. What will work for a little girl won’t quite make it for a pre-teen. Part of my goal for these costumes is to complete to project quickly–so speed is taking priority over creating something wonderful.
THE DRESS:
I decided to start with a pair of vintages PJ’s. This pair was a size large, which means it probably is more like a medium in a modern cut. The nice thing about this vintage cut is that the sleeve is fairly narrow and the armscye didn’t need to be adjusted. I am guessing a more modern pair might have a looser fit, and so would need a bit more tweaking.


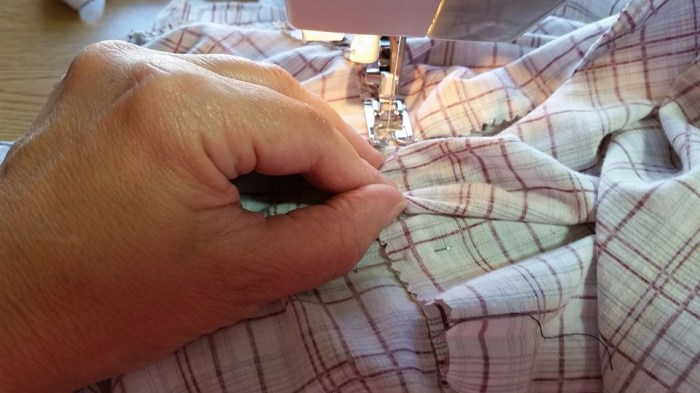
The first thing I wanted to do is raise the shoulder seams. The dropped shoulder-loose fit is a fairly modern look. Quite often vintage styles had tight fitting sleeves and bodices, even to the extent of having an added gusset under the arms. Just raising the shoulder seam gives the top a whole different look. I made a pleat over the shoulder in the fabric, and pinned it even with the shoulder seam. I opted to angle it in toward center front on that side and left it straight on the back. I ran a row of stitching along the pinned pleat.


The neck actually opens to the button that you can see. The top button is strictly decorative. If I were really going to use this costume I would either make a button hole for the top button, or add a piece of velcro or a snap at the top to keep it closed. I might also choose to make the collar rounded on the ends, either by adding some vintage looking lace, or by sewing a row of applique-type zig-zag in a curve, and then trim the excess off. Since I have no to plan to actually use this, I just left it as is for now and didn’t finish up those details.
The additional length for the dress is going to come from the pajama pants. I removed the elastic waistband and the front opening placket using a pinking shears. I measured the length of the pants and divided it into three (with a little accommodation for the pre-hemmed bottom edge). I cut the first layer from the top.
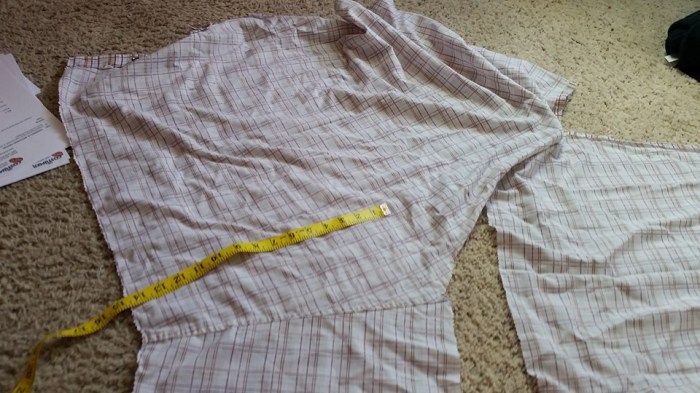 Then I cut the rest of the legs into strips. I sewed all of these strips together. Some of the seams were straight and some were diagonal. I just curved the bottom and evened them up where it was needed. I sewed the unhemmed ones together first and hemmed then, and then attached the hemmed pieces. I trimmed any uneven spots so it was all (give or take) the same length and hen I sewed the final seam so I had a large tube of fabric.

I decided to just squish-gather the skirt to the dress. First I divided the dress into quarters and the ruffle into quarters, and pinned those marks together. I then further divided them into equal lengths, until I had it down to about 6″ between pins on the dress layer. I just squished the ruffle fabric together as I sewed it down. Instead of sewing a tradational “right sides together seam, since the bottom edge of the shirt had a nicely finished hem, I put my ruffle on the shirt right-side-to-wrong side, and added it “behind” the hem. This went super fast.
The finished dress looks like this. I plan to put a pinafore over the top, so I just left the pocket. The style of dress is wrong, but, I really only care about the top and the bottom.

THE PINAFORE:
This pinafore starts with a 16 1/2 34-35 dress shirt.

Using a pinking shears, I began by cutting the collar off. Then I cut the sleeves out, leaving a 5/8″ rim of fabric to turn under to finish the sleeve holes.

I cut the cuffs off the sleeves and removed the pocket from the front of the shirt:

I turned the 5/8″ of fabric to the inside of the armscye and sewed it down.
At this point, I determined that I would flip the shirt around and put the front button opening in the back, and put the solid piece in the front. I left the yoke at the top of the back to give it a little extra height in the front.
I cut off the top of the front and the back to make straight edges. I ran a gathering thread along that edge, and sewed it to one of the cuffs. I repeated this on the other side, and then flipped it over and ran a row of top-stitching to keep the seam in place.


Then I tried it on the dressform . . and realized I had twisted one of the front sides. Grrrr . .rip, rip, resew. Then I could figure out about how long the straps would need to be.


To make the straps I folded the leftover sleeves in half along the straight-of-grain and cut out a strip of fabric. I folded this over on itself to conceal the raw edges and ran a line of stitching down the middle. I sewed it to the corners at the front of the pinafore. On the back, I overlapped the two sides (the button part) and basted it together. You could probably also just butt them together. I put the pinafore on the dress form, adjusted the straps to where I liked them, and ran a row of large basting stitches to sew the back straps on. This could be easily removed to change the length.


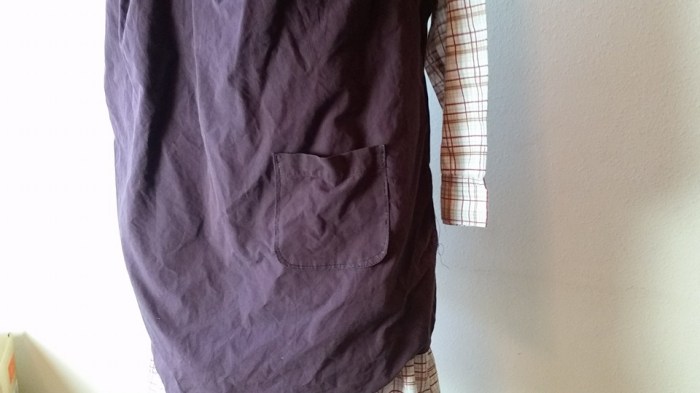
My final step was to sew the pocket to the front:
You can leave the bottom slightly shaped as it is shown here, or you could hem it up so it is straight. By leaving the back open, it gives some freedom of movement. I kind of like the curved look in the back. I might be inclined to straighten the front edge and leave the back as it is.
Obviously, if you were making this smaller, you could cut the top of the shirt down farther before attaching it to the cuffs. This would raise the arm opening. There is a lot of sleeve material left. This could be used to “patch” in under the arms, if desired, or add additional pockets.
Time: This took less than two hours, and that included the time to figure out what I wanted to do.
Cost: $1.00–the Pj’s and shirt were both 50 cents.


