I am now moving into the “variations on a theme” sort of post. Shirt + skirt + linen = outfit. I have a few more ideas for different base garments, and hopefully I will get to those in the next couple of weeks. This is college-apartment moving season for daughters #3 & #4, and I tweeked my back helping daughter #1 with a garage sale last Saturday (and re-tweeked it Monday helping load the van with moving stuff with #4), so am spending more time with the heating pad than doing the things I SHOULD be doing (like unloading the van, reorganizing my fabric, cleaning the path to the laundry room for the new dryer being delivered Friday, etc). But, I DID get my last two posts written, so that is a plus. I’d love some feedback on if you like “variations on a theme” posts, or if you find them redundant. Comments, likes and follows are always appreciated 🙂
This costume began with the blouse I made for a Youtube tutorial.

It began with a man’s shirt and the remodel process was similar to the one outlined in Fiddler on the Roof: Peasant costume #3 (navy blue). A couple of points from that project include the difference between the original cuff and the smaller cuff with trim. It’s a little difference, but I think it helps to disguise the original garment. I debated on the eyelet . . . is that too pretty? too rich?

Here is the excess fabric I cut out of the armscye. The tapered ends are where it reaches the underarm seam and the widest part is at the top of the shoulder. If you don’t have a dress form, by measuring the neck-shoulder distance you could try reshaping the armscye by cutting out similar shapes. You could also put the shirt on and mark the shoulder and upper edge of the armscye and then use that as a pattern for the other side. I was pleasantly surprised how similar my two pieces ended up being.

The peplum was made by cutting the shirt off just below the waist. The left-over shirt tail was measured, and then divided in half lengthwise (allowing for a hem on the longer top portion). Different pieces were spliced together to make the piece longer, I even used the placket part of one of the fronts, and it is turned sideways–but it doesn’t show. This was pleated to the bottom of the shirt.


Other key remodeling features include removing the collar and leaving the collar band, and gathering the sleeve into the newly shaped armscye.


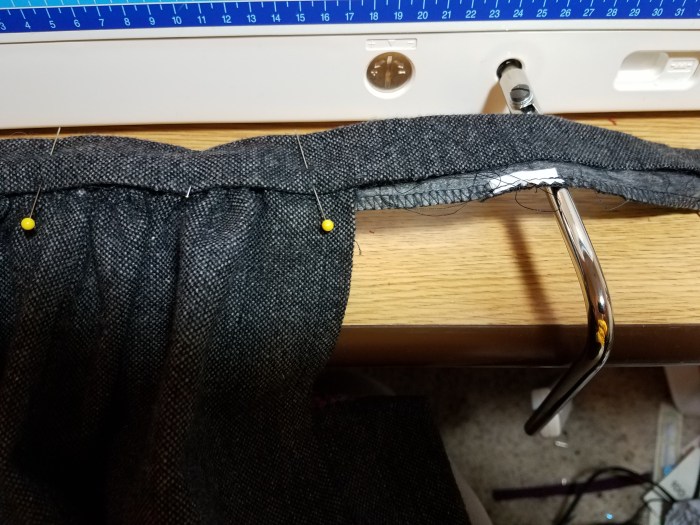
I had found this nice wool skirt with a border to make into an apron. I began by deconstructing the skirt. I opened up the back seam, saved the zipper, and removed the waistband.


The top of the skirt was trimmed to shorten the apron, this also (conveniently) cut off the darts at the top of the skirt:
 A gathering thread was run across the top of the skirt and the skirt was gathered to the waistband. Note I marked the center front, and then how wide I wanted the apron to be (using white tailor’s chalk).


I stitched the open edges of the waistband shut up to the apron, and then used the stitch-in-the-ditch across the front. I had considered running elastic through the waistband, but I forgot while I was making it (and used a fairly wide zig-zag to close the edge). Later I went back and added a bit on either side of the band to help make it more adjustable. (There’s a lot of threads on the last picture–originally I tried stitching the elastic with two rows of stitching, but thought that was bulky, so I ended up with one row down the center).


The skirt was made from a large rectangular tablecloth (half-price, so it was really $2.50). It was 57″ wide and 100″ long.

I liked the rough texture of the tablecloth. I cut the tablecloth in three lengths, allowing for a hem on the middle section. I opted to do this because if I had divided it lengthwise, I only would have had about 27.5-28″ in skirt length, which seemed a little short.

Then I cut a strip off the side (NOT the bottom–I needed the length) of one of the sections to use for the waist pieces. I constructed an apron waist style skirt, using one panel in the front (since it would be covered by an apron) and two panels in the back. This should make the skirt nice and flowy for dancing (but I really did this so I didn’t have to finish new side slits since this fabric really wanted to ravel). I used some black twill tape for the ties. I did not do a great job measuring, and the back was longer than the front. I just ignored this when I made the skirt, but it shows at the side slits.


The extra fabric easily tucks to the inside and doesn’t show. It also would be taken care of if a bum pad were being worn. If it is a problem when the costume is being worn (ie it stays inside the slit on my dress form, but may not with movement), a quick tuck or safety-pin fix can shorten the back side of the opening. I should have taken the time to even up the top of the skirt–at least at the slit. Lesson learned.
My finished outfit:


Here is the apron back with some elastic, and the blouse pulled up a bit so the waist sits where it should:

I really like how the colors on this one turned out. The bordered skirts are all the decoration that is needed. I wasn’t sure about the fringe on the bottom of this one . . . but it just disappears in the skirt, and certainly is not distracting.
*****
I recently purchased a new-to-me sewing machine . . and Elna 7200 quilting machine with a longer arm–the better to shove lots of fabric under. There are some things I like . . I can fill a bobbin without removing the thread, it has an automatic thread cutter, and I can tell it to stop with the needle down. Some things are driving me nuts . . . the first couple stitches are slow, and it doesn’t always reverse when I think I’ve told it to, and every time I switch from straight-stitching to zig-zag it defaults to the original setting (I may be able to change this . . I’m still learning . . . the manual is my friend right now). And then . . . the foot control sits differently under my foot, and I can’t quite figure out where it should be. The slow stitches at the beginning are taking A LOT of getting used to. I keep forgetting, and by the time it “goes”, I’ve got the thing floored.
It also has a knee-lift for the presser foot, which I appreciate. Years ago, the first machine I learned to sew on had a knee control instead of a foot control for the power, so that comes very naturally to me. My main grief with this knee-lift?
My sewing table is quite wide, and I am in the habit of shoving my machine back when I want to pin something, or take a picture of it. This machine is heavier and doesn’t shove as well, AND, the knee-lift catches. First world problems, I know. I think I’ll like it . . . once I get used to it and we become “friends”.


I really like the apron with the decorative trim on the bottom. Did you do the button closure for stylistic reasons?
LikeLike
No . . . I did it out of practicality. Finding something that matches to make ties out of can be a problem. In this case, cutting strips off the side of the skirt would have been a possibility, but, wool wouldn’t be the best tie. I have ordered more wide black ribbon, but, the button was there, and it seemed like it would work.
LikeLike
I do like the variation on a theme posts because it helps me get familar with the process as I see it repeated, and to see potential in different looking items, identifying the features that work for different looks.
LikeLike