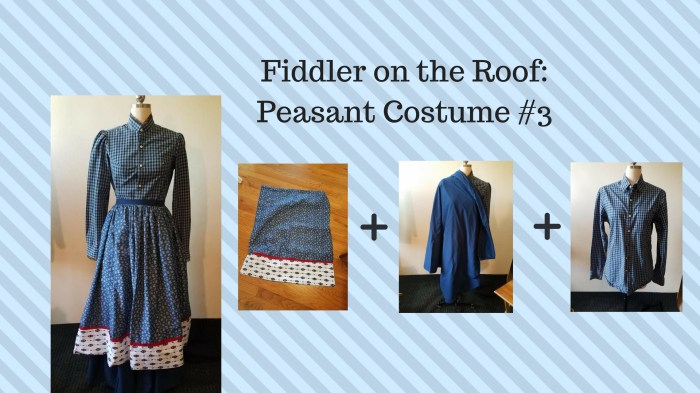
My last project began with a woman’s blouse that was already fitted through the body, and I liked the shape of that shirt (see Fiddler on the Roof: Peasant Costume #2). So, for this project, I wanted to do a little remodeling with the shirt. I also liked the look of the blouse worn outside the skirt (see Fiddler on the Roof: Peasant Dress #1) and wanted to adapt that look. My starting point for the project was a blue pillowcase with a border that I thought would make a nice apron:

I found a blue shirt that toned with the pillowcase:


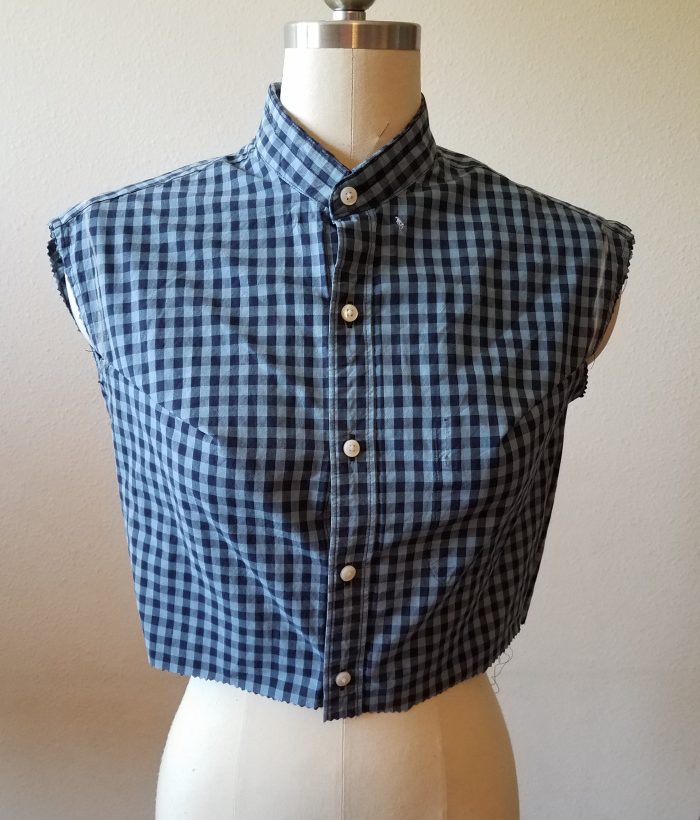
I began by trimming the collar off the collar band (see description in previous projects), leaving about 1/2-3/4″ to turn to the inside to finish the edge. Next I removed the pocket.


I did manage to put a tiny hole in the shirt when I was removing the pocket, but for my costume purposes this won’t matter. As the shirt fabric relaxes (and especially one it has been washed), the old pocket stitching will be less noticeable as time goes on . . and from a distance, gotta love that 20 foot rule!
I decided I would shorten the shirt to the waist, so I tied a string (aka my tape measure) around the waist and marked it. Hint: if you are going to remodel the shirt, wait until AFTER reshaping to cut it off–lesson learned. Next I cut the sleeves out of the shirt.


I put it on the dress form inside-out as I think it is easier to mark darts and tucks this way–they are ready for sewing and you don’t need to reverse the darts etc.
I want the body to be less boxy, and the shoulders to be narrower. There is no one-and-only way to alter a shirt–it just depends on the cut of the shirt and how much smaller it needs to be. Just start pinning in tucks and darts and see what happens.
I often begin by taking fabric out of the shoulder seam, but I didn’t like how it pulled this shirt. Instead, I folded the bottom of the back yoke up.


Next came some darts along the bust in the front. First they are pinned in on the wrong side, then I flip it around to check the right side, eyeballing that they are symmetrical. Since this is just a costume, I don’t worry if it isn’t perfect


Next a little fabric was removed from under the arms.

And a few pleats were added in the center back.

Reshaped blouse:
There are a few minor drag lines. I try to avoid huge ones, but small ones I don’t worry about. When the costume is on a body, in a group, and moving, you won’t see them in the same way that you do when you are staring at them.
The shoulders were too wide, so the armscye was redrawn and recut. I use narrow seams, but if you plan to make a wider seam, remember that the stitching line is farther in than the cutting line.


Next the top of the original sleeve is gathered, and the sleeve is re-inserted in the armscye.
I wanted to add a peplum to the bottom of the shirt so I cut the curved part of the shirt tail off and hemmed the cut edge.

If you have any usable fabric scraps, you can splice some fabric in the back to make the peplum a little wider. You can plan how you cut the shirt tail to accommodate this. I leave the button plackets intact so they line up with the original shirt front. The peplum was peated around the bottom of the shirt. Then I added a bit of black lace around the collar and the cuffs


Before and After:


I wanted a matching skirt so I found an old blue sheet:

I made an apron skirt (minus the front dip). First I fold the skirt lengthwise, and then in quarters. I cut the fabric along the folds so that I had two long pieces. Each piece was already hemmed (the side of the sheet).


If you have a nice piece of fabric, you can tear the fabric in half lengthwise. However, if you are using old linens, they can often be off grain, in which case, tearing can create some very uneven pieces.
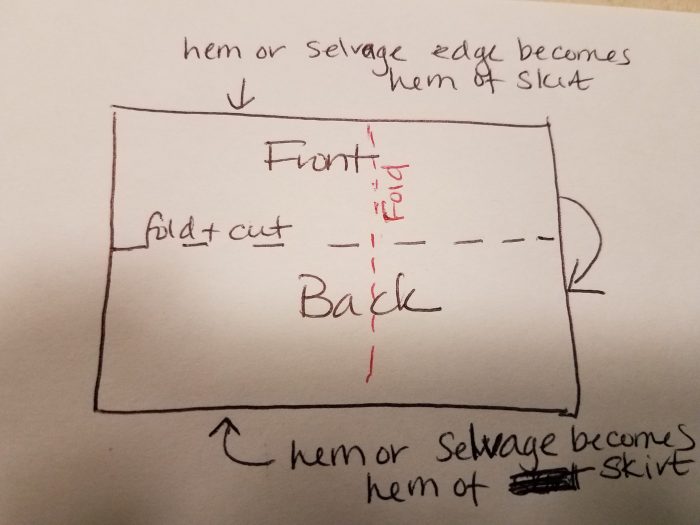
I fold it in half lengthwise, and then in half width-wise just so it is easier to manage.
Next, I cut the waistband and ties off one side of the skirt. For this project, I also cut off the wider hemmed top section of the skirt to use as the apron ties.
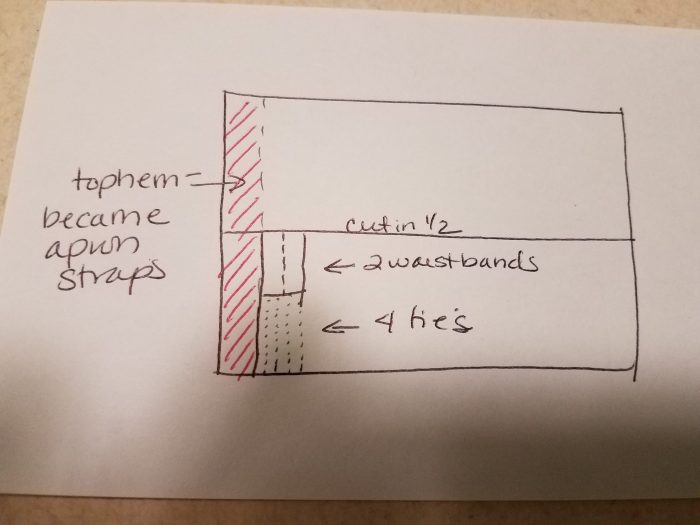


The apron was made by opening the pillow case along the seam. The edges were hemmed. The top was gathered, and attached to the strip of fabric cut from the top of the sheet.


And, my outfit is done:


You can find some added information about making the blouse on my youtube video.
The advantage to making this outfit from thrifted materials? Budget. The shirt and sheet came from a free-will offering garage sale. I went in the last few minutes of the sale, and was able to pick some stuff up really cheap–either I took it, or they had to pack it up to haul away. The pillowcase was a quarter at a different thrift sale. I added a bit of black lace, but other than thread, that was it. Time is the other advantage. Most of the detail work was done–the hems, buttonholes, cuffs, collar etc.
This was a really fun costume to make and I am having a lot of fun coordinating different prints and colors.


Pingback: Fiddler on the Roof: Peasant Costume #5 | costumecrazed