I started the component costume project with the Gray Dress #1 post . I wanted to explore creating different looks out of core costume pieces, largely with a goal of reducing the cost of costuming, especially if a character was envisioned to be dressed in variations on a theme of color. This has been a fun exercise up to this point, and I have some more ideas so hopefully there will be a “Gray Dress #3” at some point. If I don’t get distracted by other things in the meantime . . .
Since my inspiration for this project is “Cinderella”, I wanted the second variation to be fit for the ball. The “classic” Cinderella-look features the iconic hip poofs and this skirt lent itself to that variation. Ideally, any changes would be temporary and easily added and removed. I decided to try pulling the skirt up with matching strips of fabric. I started in the back, and while visualizing how much to poof up the back, my hand brushed the tail of the zipper. When pulled up and around, it was just about the perfect length. I used a tape measure to poof up the front which gave me the length my fabric strip would need to be.
")
")
The back was fairly straight forward. Since the seam flipped wrongside-out when it was pulled up and over the skirt, I cut the fabric strip off at the base of the zipper. All it took then was trimming and folding the edges over to make a nicely finished edge. Once that was done the strip was sewed back on so that when pulled up and over the right side of the fabric showed.


For the purpose of this exercise, I just attached the strip to the dress with a safety pin. If I were to actually use this costume in this way, adding hook & eyes, much like are used to bustle a skirt, would be a good option.

The front piece was done in a similar manner. I ended up using a piece of the lining from the dropped waist that was removed (from the previous post). I chose not to use the fashion fabric as I have a couple ideas what I might want to use it for, and so preserving as much as possible was appealing. I cut a strip off one end of the lining. It did not need to be the complete 14″ as the top would always be hidden by the skirt. I thought that I would want something to stabilize it, and the waistband left from cutting up the cheer skirt for the “Serena” costume seemed ideal. In retrospect it was probably a bit heavy, and something more like a piece of ribbon would have done nicely.

Once the strip was made, I carefully pinned it to the center front (inside the dress) and sewed along the previous stitching line made when the skirt was sewn on. It is attached wrong-sides-together so when it comes up and over the right side is facing out. Again, were this costume to actually be used, I would take the time to add hook & eyes. Right now, a pin works.


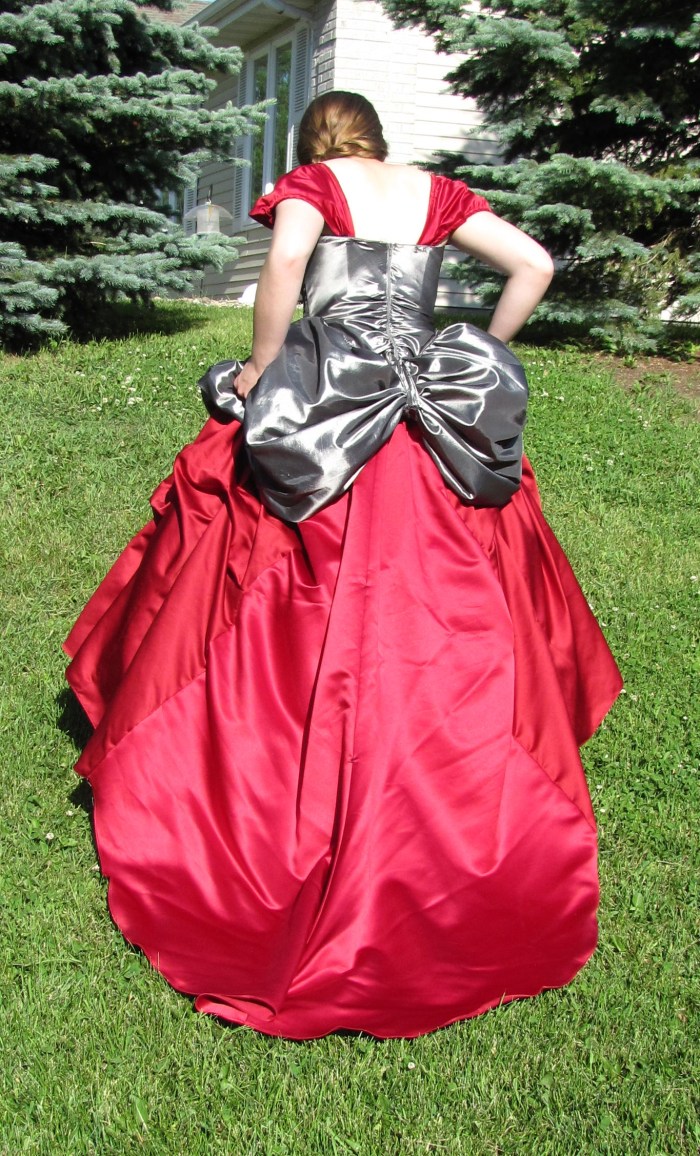
Using the same fabric as the overskirt works well . . . however, I am wondering how a wedge-shaped piece of a contrasting underskirt fabric might look. Would it give the illusion that the overskirt was open all the way to the waist? When you look at the pictures farther on of this dress, keep in mind that the gray skirt is a bubble skirt, and therefore it poofs and folds differently than a single-layer straight skirt would.
On to the underskirt:
The first variation was fairly monochromatic with all grays and black. I wanted a bit of a pop color, and one of my daughters picked a dark red dress. It is your basic strapless A-line bridesmaid dress with a bit of a train (and a huge black sash). I regret that I did not take a picture of it without the hoop underneath. At the time my thought was this would show how much too narrow the skirt was, but, an un-stuffed picture would have been better. The dress has a full lining. There is a small separating zipper in the lining and an outer zipper in the dress itself. The dress is fairly small, as my dress model is a (small) size 4, and I can’t close the dress.


I had every intention that I would supplement the skirt fabric with the lining as I have done in previous posts. The lining fabric is often a really good color match and will supplement the fashion fabric quite well. Unfortunately, when this dress was taken apart, it became clear that this dress was lined with a fabric of inferior quality with a totally different look (picture toward the end of the post).
To deconstruct the dress, the first thing I did was take the zippers out to save them. Next came detaching the bodice from the skirt. I knew that I would want as much fabric preserved as possible, so I picked out the seams instead of cutting the dress apart. The lining also had black petticoat net attached to it–this added another layer of “oops” to the idea of using the lining. This particular lining fabric seemed rather friable, and I felt like the odds of getting the netting detached without ripping a hole in the fabric was pretty slim. The second picture shows the “guts” of the dress.


At this point, it was tie for Plan B. Since this was a fairly popular color several years back, I crossed my fingers I might have something “close enough” in my stash. As luck would have it, there was Red Dress #2:
 Once again, this is a regrettable picture choice. This is a slightly dropped waist strapless dress. It has a corset back, and is missing the modesty panel. It too, was a fairly small dress. The gap in the back is a good 6-8″. The entire skirt is ruched–and that is what you really, unfortunately, can’t see.
This is the inside of this dress. The top is fully lined and the waist seam is visible running up the center. That was the first thing I took apart, again, removing the stitching instead of just cutting out the seam. I was able to rip quite a bit of it apart. I would clip a few stitches, and then could “tear” along for another 6-8″ before needing to clip the threads again. You always want to ease into that first “rip”, because sometimes the thread is stronger than the fabric, especially if the fabric is cheap and/or old.
In order to incorporate the two skirts together I decided to put the original dress in the front and back, and the ruched skirt on the two sides. The next step, therefore, was taking out the side seams on both dresses so that there were four pieces of skirt. I did a rough measure by laying the ruched panel on top of the flat panels, and the length was pretty close. In the process of removing the seams some of the ruching had been removed, so knew I would need to add that back. I started pinning them together at the hem so any uneveness would occur at the (hidden) waistline. The pleating could be flexed to make it come out pretty even. I pinned these seams because the skirt panels were cut a bit on the bias. A line of stay stitching could have helped with stretching, however pinning just keeps things together better and eliminates pulling especially when fighting large, heavy pieces of slippery fabric.

It was tempting to just ignore those stitching/fold lines and sew the seams up, but, since eventually those creases were going to have to come out, I went ahead and sucked it up and ironed all the seams before I re-sewed the skirt together. Sometimes you just have to be a big girl and do the right thing.

Now I had a lovely large skirt. Since it was so large at the top, and could potentially fit a wide range of sizes, it stimulated the “bright” idea to made an elastic waist. This was a mistake. Honestly, while it seemed like an easier option in theory it took just as long to mess with making the casing and threading the elastic etc. Then too, the binding selected to make the casingwas a bit wide–at least that is what I am attributing the very coarse gathers at the top. In addition, even with the supporting hoop, the skirt is just WAY too heavy to be supported by elastic. I have pulled that elastic pretty tight and the skirt still slides. It will be interesting to see if the skirt stays up when it is actually worn.
But, this is an evaluation post, and I am not going to pretend I always get things right. So . . .elastic waistband here we come.
First I found some blanket binding (cut on the bias so it has a little stretch) and attached it to the top of the skirt. I used a stretch stitch for the lower edge since the top of the skirt is a bit curved. A small gap was left in the center back to thread the elastic through.


I sew the ends of the elastic together and then use a pin to adjust the size. This keeps the elastic from inadvertently getting pulled out at an inopportune time. This skirt, however, is heavy enough to create concern that there will be enough stress on the pin that it will want to pop open.

Overall, this is an awesome skirt. I love the way the ruched panels look on the sides. The middle picture shows the train down and the right-hand one shows it bustled up. For right now, the train can just stay where it is. I tend not to like trains onstage, especially in an outfit considered “chorus-quality” (lots of chances of it being stepped on), BUT, since there really isn’t a purpose for this outfit, it can stay on for now. It would be a simple matter to cut it off and add a narrow hem at some point if that was the best option.


I really want to make another one and put a contrasting fabric in the center. It looks like it would be an effective one piece “look”.
One of the drawbacks to some of these costumes is that there are a lot of PIECES. That isn’t a problem if you have time and a cast that will keep track of their stuff. If you have fast changes, lots of pieces can be a problem. Another disadvantage to multiple pieces is that there a greater chance that they will come apart and overall the costume will look less put together, especially if you really are not wearing period-appropriate undergarments. Flexibility can come with a price.
Now to put it together:


I am not hugely fond of the look of the hip poofs with the ruched skirt, especially on the sides, but I am happy with the front and the back.
Sleeves:
I wanted this dress to have sleeves. My original plan was to try and do something with the remaining gray fabric. At this point, however, I was reluctant as I wasn’t quite ready to use it up. I had thought to make separate puffed off-the-shoulder sleeves. The gray fabric would have been pretty skimpy, and the results may have been less than satisfactory.
The whole sleeve issue is something that deserves some serious pre-planning before blindly plunging into a project. The projects I am doing are sort of using a go-with-the-flow approach as often I don’t have a set finished end-goal. I am learning, however, that finding enough fabric for sleeves is a huge issue. I have tried using lining, shoulder wraps, parts of skirts, and pillow shams among other things. As limiting as it is, if you really want long sleeves . . you need a plan. It can be a piece of fabric or a second garment–either of matching or contrasting fabric, but, the odds of finding enough fabric within the garment itself are slim. It has opened my eyes to appreciating the stroke of luck that comes with finding matching dresses. If I have a specific project in mind, I will go on the hunt for something to go with it. It helps to snip a sample of the fabric and carry it with you so that you can easily see if something will truly be a match.
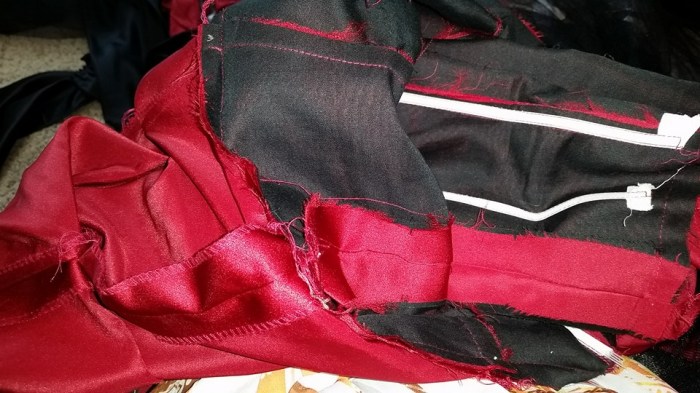
Since the gray fabric was out, that left me with red. I had the yucky lining (on the bottom) and the nicer (but with petticoat net attached) lining (on the top). In this picture you can see the difference in the fabrics.

There was no reason not to use the 2nd lining, but, I kept looking at the bodice that I had cut off of the first dress. It had that fairly firm interfacing, and it sort of sat there and teased me–challenge accepted.

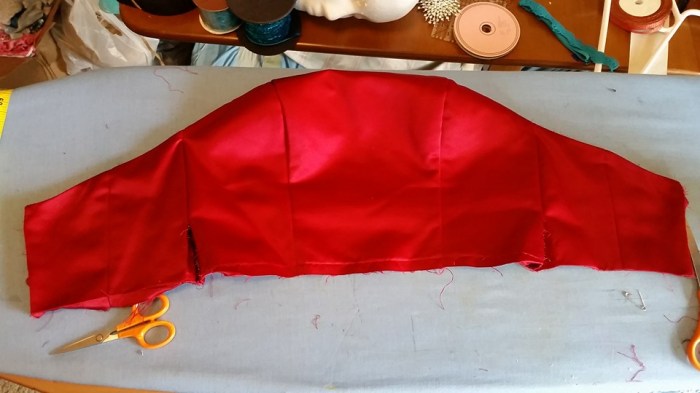
I played around with it by holding it up to the dress form and messing with folding and shaping. The measurement from the bodice front to the back was about 14″, so I knew I needed that much length to go up and over the shoulder. When I folded the bodice in half amazingly I had about 14″, so, it seemed like it was worth a shot. I wasn’t sure it would work (did I mention pre-planning just a couple paragraphs ago, lol?) However, I didn’t have much to lose. Sleeves come in 2’s, so I would have to divide the fabric up somehow, and it didn’t seem too far out on a limb to divide what I had in half.


Again, those shapes went to the dress form and were moved around trying to get a feel for what might possibly work. I decided to make casing on each side and use some elastic to provide a bit of shaping. Before doing this, all the raw edges were finished with a line of zig-zag stitching. Once the casings were done, 14″ of 3/8″ was elastic through and pulled for a bit of tension. A few pins prevented the elastic from pulling through. Then, the ends were pleated together and sewed down.


These “sleeves” were then attached to the bodice with pins. They could easily be basted into place at a later time. If they needed to be attached & reattached during an event, it might be reasonable to consider snaps or hook & loop tape instead of pins.
The final product even met “daughter approval”.

Who would have thought 1/2 a bodice would make such cute little cap sleeves? Since the weight of the dress is supported by the strapless construction of the gray dress, the sleeves are strictly for “looks” and don’t serve any real function.


Cost: red dress w/black sash $3, ruched red dress $10, elastic–from a large roll
Time: About 4-5 hours. This was a little more time consuming because of deconstructing the dresses by ripping out the seams instead of cutting them out. I also spent quite a bit of time trying to figure out how to make the sleeves.
Addendum: We finally had a good picture taking day!