More Dance Team stuff!
Tulle Tree:
We needed a big Christmas tree as part of the set for the “Nutcracker”-themed Production Dance. The tree needs to be larger-than-life because this dance will be done on the floor of a 17,000 seat arena.
Originally I had the idea to use a round clothing rack. It sits about 4′ off the ground with a 36″ diameter. We had a height limit of 8′. I was hoping that a different parent would volunteer to make the form for the top of tree and I would just do the cover. Unfortunately, that volunteer didn’t come forward, so we went with Plan “B”.
We had a wooden form from a Novelty Dance a few years ago. It is 6′ tall, and 4′ wide at the base. It has handles on the sides for carrying on stage, and also can come apart for transport (ignore the box on the top for now). This tree would have a little different look than a round tree, but, it would be easy, and we already had the base piece.


I had previously ordered a 10 yard bolt of green satin, and three 40-yard bolts of green tulle from http://www.tulleshop.com

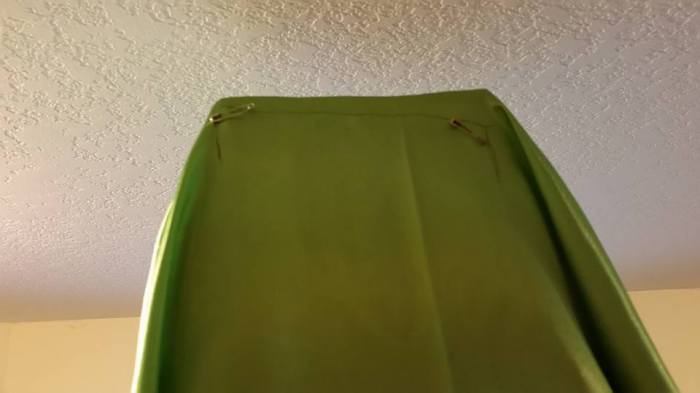
The first thing I did was make a fourth tier for the tree. I have 8′ ceilings, so that was an easy measuring guide. I wanted to leave a little space at the top to allow for any “topper” that might be added for decoration. I cut the box down into a tapered shape. It extends off the back a little bit, but that doesn’t show. The front flap is taped down to the form to keep it in place. This is removed for transport and will be replaced once we are at the Competition venue.


The cover ended up being very simple. It is basically one big rectangle with a few tucks and ties in the back for shaping. I draped the fabric over the form and used some pins to pull it loosely around the form (these were later replaced with tucks and ties). I used a Frixion pen to draw across the tops of the different layers. I decided that toward the top the layers needed to get smaller, and so the top two tiers have two layers each–for a total of 5 tiers of tulle.
I marked the top back with the pen and with pins so that I would know where to line things up to replace the cover.
I measured the height of the tiers before I took the cover off and jotted those measurements down.
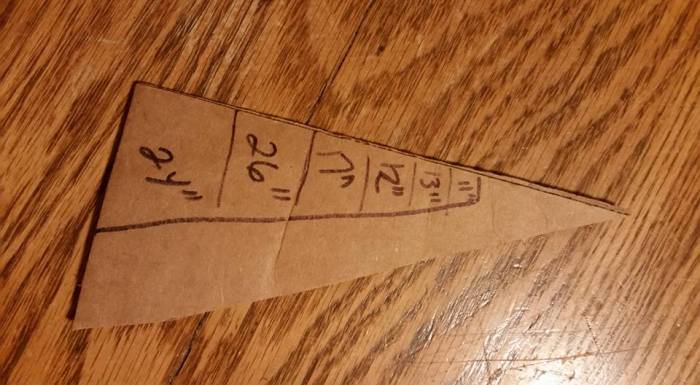
Then I measured the tulle. A 1/2 width was about 24″. As I looked at it on my floor, I thought a double layers was kind of wimpy, so I used two bolts of tulle at a time, and sewed them both on at once, so each tier has four layers of tulle.

I squish gathered the tulle along the lines I had drawn and zig-zagged it in place. The bottom row was conveniently 24″. The next tier was supposed to be 26″. This is the only one I sewed on in two places. I sewed the first layer on about 2″ below the line, and then the second layer on the line. For the 17″ layer, I sewed the two layers on together, and then trimmed the extra 5ish inches off after I had the cover on the tree. The top three layers were simply one piece of tulle folded in quarters and sewn so that the fold is on the bottom layer, with the two edge pieces on the top. Originally they were all measured different lengths, but, I decided it really didn’t matter. I used about 3/4+ of two bolts of tulle to do this, so probably in the 70ish yard range.
The width of the satin was just barely wide enough to cover the bottom tier. I added a couple pieces of satin to the lower front of the cover to make it a bit wider. I replaced the shaping pins and tucks with some stitching and some ribbon ties. I later added extra ties on the bottom layer.
To make the tree, you line up the top layer and then line up the rest of the layers up with the tiers on the form. The front spreads open and the edges of the front cover are brought around to the back.


Then you open the back layer up, tucking it under the front layer.

Tie the ties shut . . .and it is a tree!


I threw on a small strand of battery operated Christmas lighs, and a few gold snowflakes just to get a feel for the tree. I am leaving the actual decorating up to someone else . . my part is done.
Since I had most of the base, the whole project took me less than 3 hours. I am pretty please with how it looks, and I think it should do the job nicely in an arena setting.
Cost: satin $9.50/10 yards, tulle $17.85/(3) 40 yd bolts (plus shipping), ribbon: leftover
Peppermint Bustles:
Four of the dancers will be dressed as Peppermint Sticks. The Dance Coach purchased red leggings and red long-sleeved turtlenecks for the base costume. Another mom cut some white-on-white stretch sequin fabric into 4″ strips. These strips will wrap around their bodies to make the stripes. They will be pinned in place.
When the Coach asked for something a little “more”, I thought of a bustle. This will also echo back to the bustle on the Mouse Queen outfit. I think it is always good to repeat themes within a costume set.
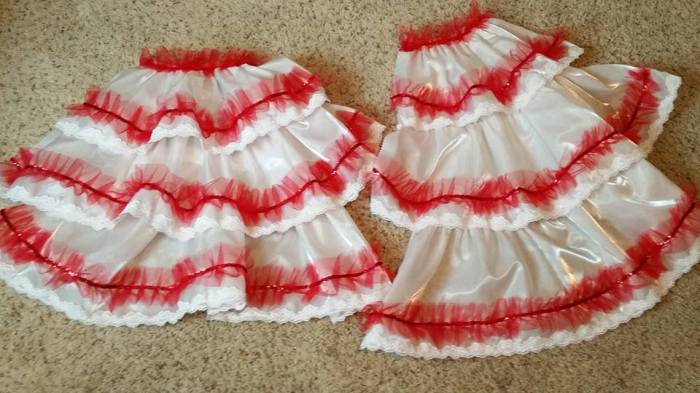
I started this project with a child’s white satin dress, probably a First Communion dress, or maybe a vintage flower-girl.
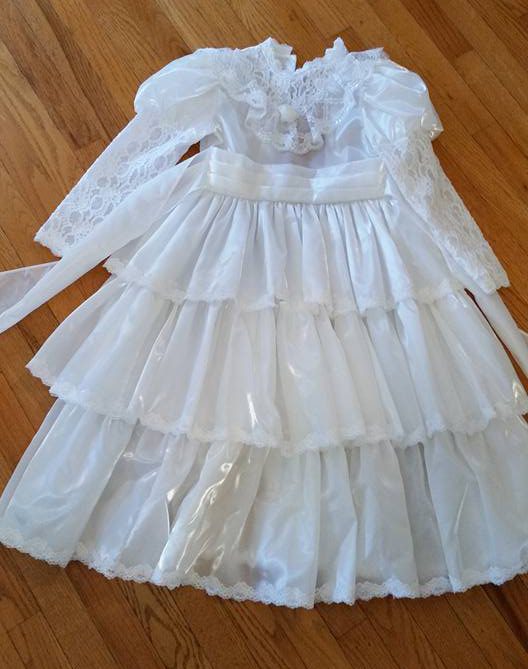
Using a pinking shears, I cut the skirt off the waistband, preserving the gathers.
I folded the skirt in half front-to-back, and cut down the back seam, and through the center front. I then divided these two pieces in half again so I had four. I continued to cut with the pinking shears so I didn’t need to finish the raw edges.
To add some stripes, I used 6″ tulle and string sequins. I folded the tulle in half, and lined the folded edge along the trim at the bottom of each tier. I squish gathered the tulle and sewed both it and the string sequins down with a large zig-zag stitch. When everything was lining up, and the tulle wasn’t twisting or pulling, this really went quickly. For the four skirts I used about 30 yards of of 6″ tulle.
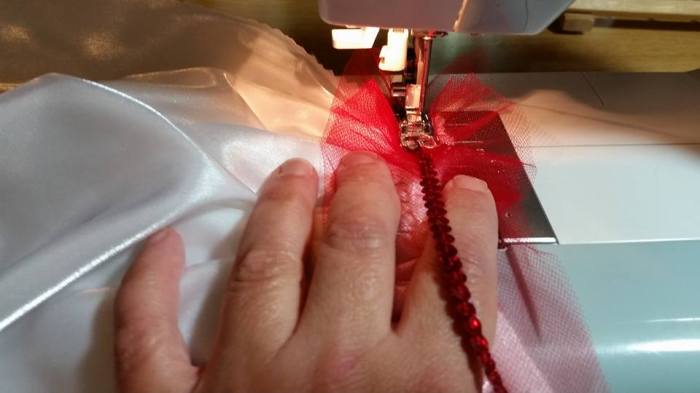
To start each row I stitched down the red tulle a little bit. Then I lowered the needle into the fabric and raised the presser foot. The string sequins were tucked under the needle and the presser foot was lowered. I could then squish the tulle against the needle as I went.

When the trim was on, I thought the layers looked a little long, so I folded up the lining fabric and tacked it down in about three places on each layer. This was not done neatly. I pinned it, and then stitched a line of zig-zag stitches across the lining, catching the pinned up areas as I went. I thought I took a picture of this, but apparantly I didn’t. The camera on my phone is dying. It doesn’t focus well any more especially for close-ups, and it doesn’t always take pictures when I push the button. I hate to use a legit camera, since this is more convenient, but . . . .
This picture shows the shortened bustle and the original length.
At this point, I am sending them as is. The girls and the Coach can decide show they want to attach them. I would opt for velcro myself, but pins or a waist tie would also work.
This took me less than 2 hours. My biggest problem was I ran out of tulle and had to go buy a second roll.
Cost: dress $1.50, tulle $3, sequins: a few from a roll.


