We have sent out the call for donations for the show, and I have had a number of dresses donated which is really awesome. I want to make a point of using them if at all possible. Some may be disguised beyond recognition, which is OK too. If I have contact information for the donors, I usually try to send them a picture of what I did. Community support for a project like this through volunteer help and donations makes a huge difference in the quality of our shows.
This is the dress that I started with:


It has an 80’s feel, with a ruffle peplum that extends down back. It has a large ruffle with elastic at the shoulders/sleeves. The ruffle has drooped over on itself so the wrong side of the fabric actually shows on the top. I am not sure if a good pressing & spray starching would help it stand up, or if 30 years in the closet has imprinted on it forever. (I’m also not sure if it is worth the time to try, lol). The straps are a bit stretched out, but that is a simple fix. It has a detachable self-fabric sash.
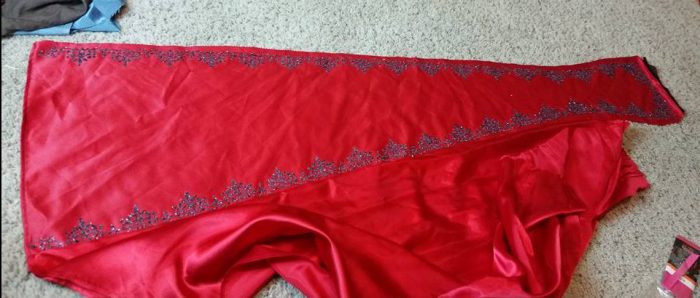
I thought the top would be adaptable as is and so my plan was to make a two piece dress. Therefore, my main focus will be on the skirt. To do this project, I knew I would need some additional dresses to supplement the skirt fabric. Looking through my options, I came across a black, strapless, gored dress with a full skirt with a red inset in the front with some beading. Unfortunately I did not take a picture of this dress in the intact form. The shape was quite similar to this third dress that I picked for the skirt fabric:


This is the center panel. Just imagine it with a strapless black satin, moderately flared A-line dress around it. I thought this would be a nice source of decorative detail for this project.
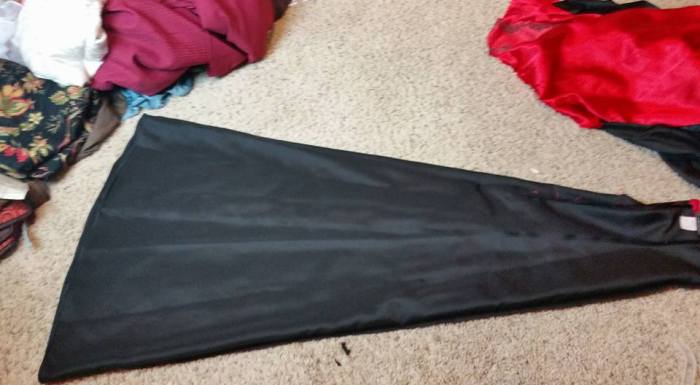
To begin the project I started with my donated dress. I cut the skirt off using a pinking shears, right under the waist seam. The dress closed with a long zipper. I cut down and around the zipper leaving about an inch of fabric on each side. This long “tail” will just tuck down under the peplum when worn. It is kind of hard to see in the picture, but it is a long zipper. It tucks right into the slit in the peplum.

I thought it would look nice to have the center red section of the skirt wider than than the decorative panel. I plan to use the center decorative panel, bordered on either side by sections of red skirt. Then I will use the two black skirts for the back.
Things to keep in mind when planning a combined skirt like this are:
- Do any of the skirt have trains? Obviously this will affect the hem length.
- How gored are the skirts? Even skirts that measure the same height when laid out together may have different seam lengths based on how flared the skirt panels are.
- Do any of the skirts have design features? ruching? pleats?
- How long are they? Do you want the extra length? if so, where do you want it? sides? back?
- Are the fabric weights different? Where will your hoops and pads be?
None of the dresses I was using had a train, so that was easy, and they were all about the same length. I wanted to try and eek as much length for the skirt that I could since I plan to put it over a hoop, therefore, I cut the pieces as far up as I could. Even if you extend up into the waist/chest area, it will probably be and OK shape By combining multiple dresses, and then pleating/gathering around the waistband it all blends together. If by chance it doesn’t hang well once it is pleated, you can always cut it down a little bit.
To begin, I look at the skirts and try to take them apart in a logical place. Typically this will be center back and center front. I like to make my skirts as symmetrical as possible, so even if the skirts look the same, I will cut them into two pieces. Seams can either be cut out, or can be torn down stitching line (depending on the strength of the fabric, the strength of the stitching, and whether the edges are serged together or separately, etc). Cutting vs ripping is partly personal choice, and I go back and forth depending upon the size of the seam allowances, the easy of tearing the stitching line and whether the fabric ravels. The first picture is a cut seam, the second is a ripped seam.


To cut the center front apart I lay the skirt out with a fold along center front, and cut along the fold.
The shortest piece for this project was the original red skirt. I lay that along the red center to estimate length. I cut across the top of the insert, however, in retrospect, I should have waited and trimmed it off later. I would suggest that it may work better to just leave the tops attached for the time being, and trim the waist once the whole skirt is put together.

The two red sides attached to the center panel.

One key to making a skirt like this is to sew from the bottom up. You can easily even out the fabric at the top with a scissors . . . but you REALLY want the hems to line up at the bottom.
Next I added the two smaller black skirt panels from the red and black dress. For the last dress, since the skirt was one length I opted to leave it intact and sewed it on as one big piece. I had opened it along the center back seam, so this left me with the original center front as the new center back. That did leave me without a back opening which has it’s own pros and cons.
Next I needed to decide on the waist size. I already had a top, so I knew that would determine the size of the person wearing this dress. I measured the waist of the top and used that to make my waistband. It was 28″.

I didn’t have any fabric left from the dresses that was usable for the waistband. I found a piece of black fabric to use. I wasn’t too concerned about how it looked as it would be hidden by the peplum. If you wanted a matching waistband, I would consider cutting a strip from the center front panel of one of the skirts before cutting the skirt panels. This is your best source for a long piece of fabric on the straight grain.
Here is my waistband with pins marking the quarter divisions. I cut the waistband 5/8″ longer on one side for a seam allowance, and about 3-4″ longer on the other side for an overlap as I planned to close this skirt with velcro. This also would give a little flexibility in sizing as the velcro can be overlapped a little more or less.

Since I had the center front in the center back and I didn’t have an opening, I had to make a slit for the skirt. I zig-zagged a narrow “V” shape, carefully slit down between the stitching lines, and then folded the narrow edges over. I put some extra stitching at the point to reinforce the fabric and keep it from ripping.


I pleated the skirt on to the waistband using a combination of forward and backward pleats. I do it one section at a time and make each side as symmetrical as I can (no measuring, just eyeballing and making similar pleats go in similar directions). I added a couple of rows of velcro in the back to secure it, and my skirt was done:

I didn’t like the way the red side panels wanted to overlap the center panel, so I added a line of top stitching on the panel section and it fixed that little problem. Then I tried it on with the top. And I HATED it. I just totally disliked the way the peplum looked over the top of the skirt. I found some black lace and tried adding that. I tried appliquing the remaining piece of red embellished stuff to the top. I tried changing the shape of the peplum. I hated all of it. So did my daughter. Finally, my daughter verbalized the very large elephant in the room and said “The top just doesn’t fit the skirt”.


Ok. Throw in the towel time. Honesty works.
I happened to have another red dress sitting on the floor that I had just brought home from the high school that very day. Here it is shown with the embellished scrap already sewn on.

This looked 1000% times better.
I had one little tweak because the back of my skirt had a hole. With better planning I could have hidden it in a pleat, but I had expected it to be covered by the peplum.
 I cut a rectangle of black fabric and sewed it to the back waistband so it hangs behind the slit. Not gorgeous, but from a distance, no one will notice.

I was much happier with this dress.
IF I were going to start over I would do a few things differently. I COULD have planned the skirt so that the embellished panel covered the waistband. I COULD have made the skirt so that it didn’t have the coverage issue in the back. I MIGHT have tried to bring the black sides completely over to the center panel make the red section a bit narrower. However, this is “good enough”.
One thing that is nice is that I didn’t have to cut the dress that makes the top. This just tucks down under the skirt and hoop. The applique could easily come off the dress for a different show.
This outfit does need a hoop.
Cost: original red dress: donated, last red dress: donated, red & black dress: $5.89, center panel dress: $2. Also included some black fabric and about 8″ of velcro.
Time: about 2 hours.
One small problem . . .I used the bottom of the donated dress, but the top . . you know . .the identifiable part? The part the donor would be looking for? That, I hadn’t used.
Watch for Part 2!


Pingback: “The Prince is Giving a Ball”: Dress #4 (Red Satin top, Pt. 2 ) | costumecrazed