There is something really fun about a Flapper dress . . . it probably has something to do with combination of the fringe and the feathers. The costumes I am going to show today are more of a Halloween-style costume than anything that would look remotely historically accurate.
To make a Flapper dress you will need a base dress, and fringe (or fringe substitute). If you want to make a headband you will need some stretch sequins and a feather at a minimum, and then the sky is the limit for other decorations. You can upgrade your costume by adding a long pearl necklace, gloves and/or a feather boa. Fair warning: fringe can be expensive, and it is not easily found in adequate quantities at a thrift store. Your best bet is finding an old dance costume (or two), but, since many of those are designed for children, one costume may not be enough. You can often purchase fringe at a fabric store, but be prepared for it to cost $$. Ordering it is an option, but you will need to plan ahead, and to get a reduced price you may need to buy it in a quantity lot.
The amount of fringe needed depends on what you want to do with it, and how many rows you want. If you want a fully fringed dress I would highly suggest pricing out the cost of fringe before committing to make your own costume–you might be able to purchase a really nice ready-made costume for less. You can try using the keywords “fringe”, “chainette” and “tassel”.
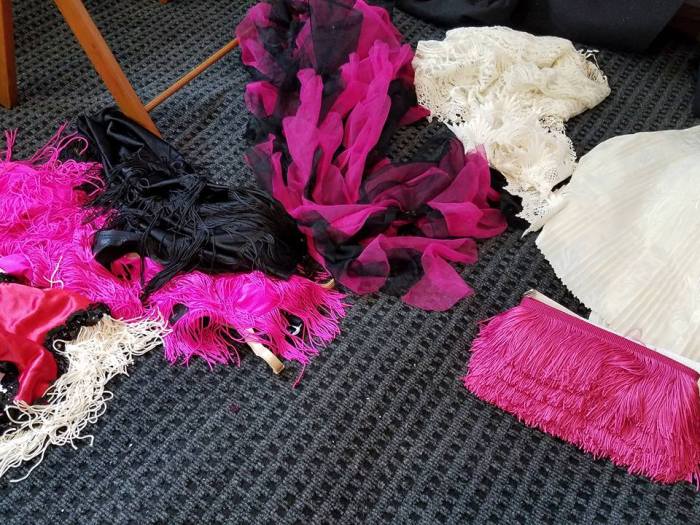
If you don’t have fringe, you will need to find something for a fringe-substitute. Unfortunately, there isn’t a whole lot that looks like fringe, other than fringe. The picture below shows a few ideas. On the left are some old fringed dance outfits (OK, this is fringe . .). The chiffon pink and black circle ruffles that came from the bottom of a dance costume (although this was too small a piece to work on any of my dresses). The cream is a scarf with some dangly lace, followed by some vertically pleated fabric. The final pink is fringe by the yard.
The base dress should be fairly straight. You can pick a tight-fitting “wiggle dress”, or a shift/slip dress. Don’t discount a floor length dress as you can cut the bottom off. I would like to figure out an easy way to use those fully beaded silk dress that were popular a number of years ago. They are gorgeous, cheap, and the right narrow shape. If anybody has used these and has good ideas how to keep the beading from fraying once cut, and how to sew the fringe on (other than by hand) I’d love to hear them. And lastly, don’t overlook your own closet. You may have a dress that you can temporarily alter.
I had fringe, I had dresses, and I had a little time, so I went a bit overboard making dresses (this is what I started my Etsy store for, lol).
First, the headbands. I made the headbands using some 5 row stretch sequins I happened to have on hand. You can measure around your head, and cut an appropriate size (which will probably be in the 16-18″ range). Hot glue the cut ends together, overlapping them about 1/2″. I glue the feather to the inside, and support it with a scrap of felt. Then, you can add decorations to match your dress.


I ordered the black feathers from a wedding supply website, but you can often purchase them individually at craft stores. The green one is actually a glittery plastic fake feather I found in a floral department. The headbands are decorated with an assortment of satin flowers, buttons, broken jewelry and string sequins. Tulle, fake pearls, and ribbon make good embellishments. I have also made “fascinators” using fabric cut from the bottom of skirts to cover scavenged bra pads. If you don’t like stretch sequins, you could cover elastic with fabric, or make a solid fabric band with some hook and loop tape or a bit of elastic in the back.
Dress #1:


This is a floor length black dress with a lace bodice and short sleeves. The skirt is fairly straight, with a few small pleats in the front. The dress has a zip back and a slit in the back. I cut the bottom of the skirt of, just above the level of the slit and hemmed the skirt. I added two rows of fringe around the bottom of the skirt and one row along the bottom of the sleeves.


I like this dress because it is fun, but not too bare.


Dress #2:


This dress is fully sequined with spangle sequins. It has a wrap front, an inset of satin around the midriff, and a side zipper. I originally bought this dress thinking it could turn into a mermaid dress (and it could have). The dress was fully lined, and the lining ended a few inches above the hem of the fashion fabric. I wanted to add fringe around the bottom, however, the sequins were heavy and I was worried about how they would lay if I stitched through them (if I even could without destroying multiple needles). I opted to sew a piece of scrap knit (no need to hem) around the bottom of the lining, and attached two rows of bright pink fringe to that.


I really like how this dress looks, and, if you have stretchy fabric this is a way to keep it laying nice. If you wanted to temporarily turn a dress into a costume, you could easily remove the fringe from the underskirt later.


I opted to pick up the contrasting pink with a flower on the headband. I think a pink boa would look great with this dress.
Dress #3:


This is a simple little stretch sequin dress. It has no zipper. I thought about putting fringe around the neckline because it would look nice on the back, but was concerned about loosing the stretch. I added fringe around the bottom. I also added pieces of fringe to the armholes. I just simply left it as-is, but you could also back it with some elastic or a piece of ribbon. The bottom of the hem stretched a bit, but I don’t think this will be bothersome when it is worn.


Dress #4:


This dress was a simple slip dress in a gray/purplish iridescent fabric. It is actually much prettier in real life than in the picture. It definitely looked better with a little pressing!
I measured up from the bottom to mark the hem and marked it with a heat sensitive pen. I pinned the fashion fabric to the lining above the line while it was hanging. I cut the bottom off, and then hemmed the two layers separately.
I put fringe along the bottom and along the top of the bodice.


I thought about adding a second row of fringe around the bottom of the skirt, but I was running a bit short, so I opted not to. I used the glittery fake peacock feather with this dress.
Dress #5:


This dress is a black sequin sheath dress with a side zipper. The sequins lay flat together (like scales) on t his dress. I made the mistake of washing this dress with a number of other garments, including one that had something that caught on the sequins. Many of them were flipped the other way when it came out of the wash. This was easy enough to fix . . I just had to “pet” the dress and push the down the way they were supposed to be, but, next time I will wash sequin dresses alone.

I chose to use a sequin fringe in a bright pink for this dress. I added it around the neckline and along the bottom hem.


I really like he way the sequins look on the back. I thought the sequin fringe might really tangle, but, it didn’t. I emphasized the pink on the headband.
Dress #6:


This dress was made out of a skirt. The top of the skirt is made out of a fabric that has fringes of sequins. The bottom is two layers of net and lace ruffles. I pulled the dress up over the bust (this dress form is a size 4, with a 34″ bust, and the stretchy skirt fabric accomodates that nicely). I needed to extend the lining for decency. I opted not to add straps but it would be easy to pin or stitch on some ribbon or elastic.


This is a good example of a fringe substitute.
Dress #7:
I unfortunately forgot to take a “before” picture of this dress, but it basically looked the same only it was 8″ longer. I used a thick, short fringe that is more of an upholstery fringe. I had a 4 yard piece. The dress has 4 layers around the bottom, and then the strip across the front. I had about 4″ left, if that helps give you an idea of quantity.


I do like how this dress looks. I regretted not having enough fringe to add it along the back neckline. I also like the shorter fringe along the neckline.
Dress #8:


This is another little stretch sequin dress with no zipper. This dress has some fun cut-outs in the front. I added two rows of fringe along the bottom of the skirt, and across the top of the arms.


The bottom of the dress bubbles just a bit where I stitched the fringe on. I did this before I did the dress where I sewed the fringe to the lining, and I think another time I would do that with this dress as well. I like the say the fringe on the sleeves accentuates the accent holes. I used the jewels off a broken necklace to make the headband.

Dress #9:
This dress was a stretch sequin dress with no zipper. I upcycled it with a single row of fring along the bottom of the skirt. The varigated sequins provided a lot of visual interest. I think this dress would look good with a boa as well. A bit of fringe could easily be added to the sleeves, either across the shoulder or as a drape, if you thought it needed something more.


Conclusion:
As you can see I was having a little too much fun playing with dresses and fringe. The headbands are fun to make as well. I see the real advantage to making your own Flapper dress is that you can have a better fitting, nicer quality base dress.


