So . . . this isn’t my normal sort of costuming adventure, but, it is what I’ve been doing for the last while, so I thought I would share what I have learned/done.

If you follow my blog, you know that I opened an Etsy store this summer. I am excited that I just recently had my 100th sale. So, as you can imagine, that has been taking up most of my “play” time. My goal was to push really hard to get my store established, and now that Halloween is over (or will be soon), I want to get back to making upcycled costumes (you’ll notice cleaning my house still isn’t on the list . . .). I also took the time to take a trip to Rocky Mountain National Park with one of my daughters–so much fun


Making zombie/vampire costumes was something I sort of stumbled into . . . I was sorting some of my collection/stash, trying to decide what to keep, what to sell, and what to re-donate, and some of the items, especially ones that didn’t like going through the laundry, were pretty sad. I hate throwing things in the trash, and so, why not try my hand at “Zombifying”?
I began with some online sleuthing: watching YouTube videos, reading some tutorials and looking through items for sale on Ebay and Etsy. One thing I noticed was that many of the tutorials use the washable fake blood that is readily available this time of year. It makes great looking costumes, but, it is washable, and, according to the Amazon reviewers, it really does what it is supposed to do, and washes out of things. Another commonly used product is discount-store fabric dye sprayed onto the fabric. The problem with that is those dyes are made for natural fibers, so if your garment is a blend or a polyester, you aren’t dying the fabric, you are just painting it, and the dye has a great risk of washing out. Other products I saw being used included acrylic paint, latex paint, dirt, nail polish, natural dyes and dyed/tinted glues.
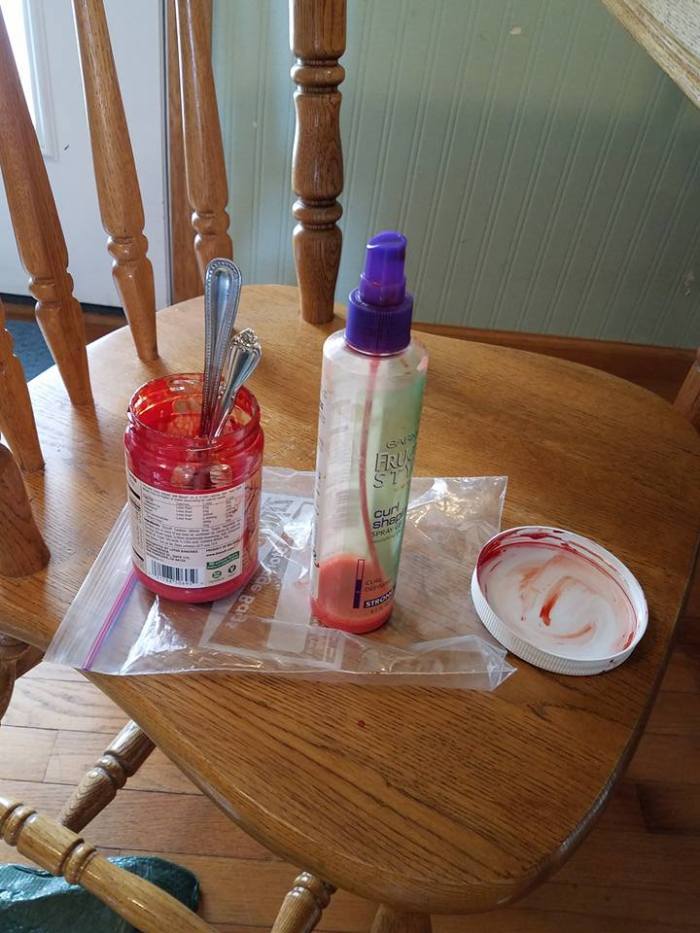
Supplies:
I began by researching fake blood. I ended up trying two different kinds: Perma-blood by palenightproductions, and Blood Bath by Dead Head Props.. They both are very similarly priced. Both were shipped promtly and both were great products, and while they had some differences, I wouldn’t necessarily recommend one over the other.


I also used fabric paint and black tea. Later on I added acrylic paint and nail polish to the list. I distressed the garments using a saw, a dull scissors, and a wire grill brush.


I diluted both the blood and the paint with water, and used a combination of spray bottles and sponges to apply it. On some costumes, I used up to four dilutions of blood.
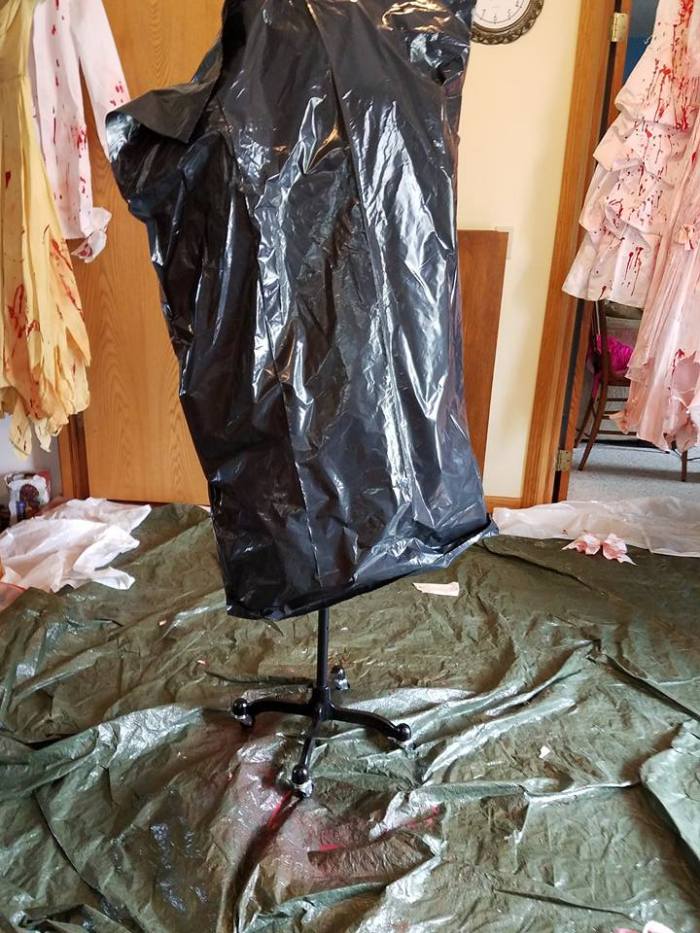
I also covered my floor with a tarp, and covered my dress form with a heavy plastic bag. You will want a good supply of gloves, and a syringe for the applying the blood is nice. Don’t forget some place to hang your creations to dry. If you can’t let the garment dry on the dress form, and if you are trying to keep the blood in certain places, you may want to line the inside of the garment with plastic before painting. If you don’t have a dress form, try to make a way to embellish your garment while it is hanging, and make sure it is hanging straight . . . the blood will drip down, and it looks kind of funny if it is running sideways across your garment.
Speaking of drips . . . there will be lots. Go ahead and have an extra garment that you use to wipe up the blood/paint and allow the drips to fall on it as well. It will be completely random, and may end up being one of your favorite garments. Why waste good paint?

How to pick a garment?
You can zombify just about anything, but it IS much easier to do light colors. You will need some different supplies if you decide to try to do dark colors. I’ll touch on that a bit later. You will also want to decide if you are trying to create areas that look like gunshot wounds, and if your zombie has been eating things, which requires more blood near the neckline. If you are making a costume for yourself, you might also want to consider what sort of makeup you want to wear, as that may affect how you paint your costume.
The great thing about a zombie costume is that you are going to destroy it. Therefore, clothes with tears or stains already in place are perfect to use. I have used some really nice things:


But I have also used some really worn, dated, vintage garments that ended up making some of my favorite costumes.


What next?
You want to begin by distressing your garment. Your goal is to look like you crawled out of a grave, or at least someplace nasty. You do not want to use a nice sharp fabric scissors as that gives the wrong look. And a pinking shears, even frayed, looks like a pinking shears. I used a dull paper scissors, and cut jagged edges on the bottom of the hems, sleeves, collars, pockets etc. I took the metal grill brush and further frayed these cut edges. My next tool of choice was my saw. I went around the garment (carefully) and basically tore holes in it using the saw. I liked to emphasize the shoulders, sleeve bottoms, elbows, neckline and bottom. I tried to think where clothes would naturally catch and wear. You can do as much or as little as seems “right”, or to your personal preference. If you are going to bullet holes, cut small holes and distress the edges a bit.
Now comes the fun part–the painting.
I began by making a container of a very strong black tea. While this was steeping, I prepped the other paints.
I began by mixing dilutions of fabric paint. I used the readily available Tulip paints and diluted them in water to varying degrees. I found out that yellow stays very bright, and that green should be used in the smallest amounts and darkened with a bit of black. Brown paint requires a lot to create a color. I tried diluting a white to spray on dark clothes, and it will work, but the paint can’t be diluted too much. (I actually had better luck with sponging diluted acrylic paint on–and it comes in more colors like grays).
For the blood paint, I had a fairly dilute mix in the hair spray bottle. Then I had a thinner mix in a cup to apply with a sponge. I also had a syringe and a stick to apply full strength blood paint. I used my fingers a lot. There is a lot of fingerpainting in this sort of project.
I tried to create layers of dirt on my garments. I did mine without letting it dry between layers (except for final applications of blood). However, allowing the garment to dry between some of the applications of paint might have created better outcomes in some cases. But, it also adds a lot more time, so, you have to weigh the variables. It is almost impossible to predict what the final garment will dry to look like. So much depends upon the fabric content, the grainline, and the underlying colors. You will think the garment will look one way, and when it dries it may look very different.
I began by sponging tea dye in the areas that would have sweat–neckline, down the front, underarms, and back. I would also use it for random spots and areas of discoloration. It showed up better on some garments than others. On some darker ones I mixed a tiny bit of yellow paint into the tea to give it a bit more depth. The tea may wash out, but, it would also be very easy to reapply, and, for most fabrics, it will stain, especially if it has sat for a while.
Next I sprayed on the diluted fabric paint. In general, I progressed from lighter to darker with the paint. I sometimes used just gray, and sometimes used a brownish-greenish color as well. To add more dirt, I would take small amounts of fabric paint (black, brown, silver/white) and smear it on my gloved hand and then apply it to the garment. I would focus on the bottom of the garment, and then on the torn areas. You just need to experiment on how you like to apply it. Applying it over wet areas helps it to smear. You can also spray it with a bit of wetter paint if it needs to blend a little. Acrylic paints can also be finger-painted on (and they come in more colors).
Last, I added the blood. I begain by spraying the most diluted blood around the bottom, and in areas of distressed fabric, bottoms of sleeves, etc. Next I sponged on the diluted blood, and then I added full strength blood using a syringe. On some garments, once the garment had dried, I would go back and add more drips and bright spots. The dried garment provided a semi-sealed base, and the second application soaked in less and had a better chance of staying on top of the fabric.
What if the garment was a dark color? I used white and/or silver paint and diluted it. Sometimes I sponged it on, and sometimes I wet the garment and smeared it on. The idea is just to make the garment look “dirty” and have variations in color. If it is, for example, a dark gray, black paint can be used. I like to use light-colored paint on the edges of the tears/rips to “highlight” those areas.


You can also buy spray fabric paint. It is not cheap, but it works really well for adding lighter colors to darker garments. I tried using some diluted bleach to lighten areas, and it might work for some garments, but it didn’t work the the suit jackets I tried it on. I didn’t want to use too strong of a concentration as it wouldn’t be rinsed out and I didn’t want it to eat away at the fabric.

The permanent blood paint takes some playing with, and I don’t pretend to be an expert. Both permanent blood paints that I used are good, and in many ways are interchangeable. Blood Bath has a couple of drawbacks. It dries shiny, to the point of sparkling, when it is very thin, like on a veil. It also dries to an almost iridescent green on dark fabrics.


It does dry darker and flatter (in the first picture I am applying it with a spoon).


I really like it one white fabric. Here are some examples of how it dries on white.


It can also dry a bit too pink if it is very diluted, depending on the fabric type (especially silk).

Perma-blood is a bit darker in the bottle, and dries just a bit darker.

I like the way it dries better on dark colors because it doesn’t get the same iridescent look the Blood Bath does. However, it does not stay very visible either. I don’t have great comparison pictures, because I was learning as I went, and I didn’t attempt to put drips of blood on dark fabrics after the first go around. The one drawback to Perma-blood is that sometimes when it dries it leaves a yellow ring.
I liked to take advantage of the layers of fabric in the garments. A skirt that had an overskirt and an underskirt allowed the overskirt to be ripped quite a bit, and the underskirt could by painted darker for depth and left mostly intact for modesty. For the jackets, I would cut through the dark outer layer, and if I was lucky, the interfacing/lining would be a lighter color and the blood could show through.


In the end, I also purchased some darkish red nail polish. I used small amounts of this to “tip” the frayed areas. The drawback to this is that nail polish does not dry flexible, but, I didn’t use a lot.
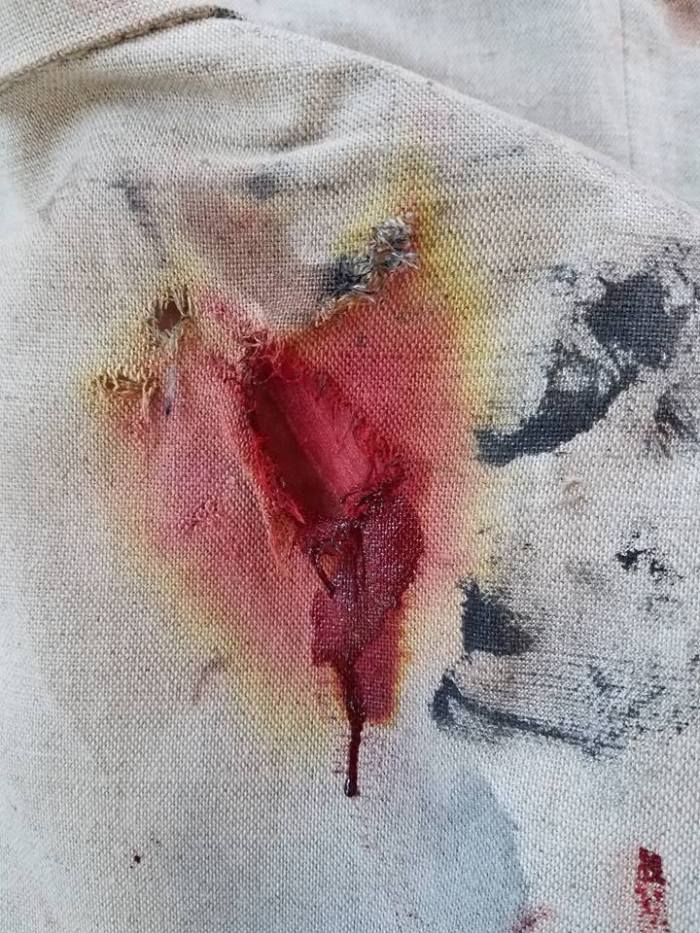
Another way to help your blood show is to put lighter colored paint on the garment before the blood. I did that on this sleeve, and it helped. And, going back to add a final layer of blood on the dried fabric can make a big difference. The syringe works really well for this as you can squirt little bits out.

As I mentioned, initially I did not want to use acrylic paints as I was concerned about the durability/washability. Eventually, I did use them however, especially for dark colors and jackets. The jackets won’t be washed anyway, and, how many people will really be washing their zombie outfits in the washing machine? At best, you would need to hand wash for the ripped parts.
One thing I did watch for when choosing paints was how the paint was cured. I did not want to have to heat set the paint. I wanted it to cure on it’s own just by drying.
Vampire:
Vampire/bloody costumes are also popular. For those, either you are the vampire, or the vampire victim. That will make a difference where the blood goes. Blood can also go on costumes like lab jackets, chef jackets and anything a murderer might wear.


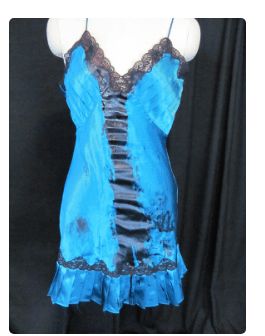
I did learn about how the blood flows, what looks more realistic, and that sometimes, less blood is a better look. If you are going to drip blood, the garment itself can affect the blood paint. This particular “fail” was cut on the bias enough that the paint dripped down the dress sideways. Then, it obviously dried way too dark, and it caused the fabric to ripple. It could have been a really cute costume but . . .
I am sure there are lots of other ways to make distressed costumes. While I focused on zombies and vampires, the techniques and ideas that I used could be applied to other costumes that needed to be distressed. When buying supplies, a little goes a long way, and the permanent blood paint, especially by diluting it, can go much farther than you think it will.
I hope this gives you some good ideas . . . and there still is enough time for you to make your own Zombie costume for Halloween.


They look so realistic that some of them made me queasy haha. Great job.
Congrats on the success of your Etsy shop! I knew it would be popular. Isn’t it fun to hear that little cash register sound on your phone.
LikeLike
I actually have those sounds turned off as I don’t want them to wake me up when I am sleeping after a night shift. The most fun for me is when people give happy reviews or message you later to tell you how happy they are with what they bought. I wish more people would do that, since many of the items I send out (especially a costume I made) is like a “friend” and I’d just like to know that they went to a happy home. (I am weird, I know, lol). We recently sold all of the “Cinderella” props, set pieces and costumes to a different area high school–it was amazingly hard to pack them up and send them away. I offered to come and help assign costumes (since I could do it quickly if I compared their measurements with my cast list), but they didn’t bite. I have attachment issues.
LikeLike
And this is why I have 30 years of costume (well a big percentage of them) still with me. No one else would take good care of them. I think about selling them but since I am back to costuming for my daughter’s shows for now they will remain.
I love when I get even a little feedback in my Etsy store. Lots of time I get beautiful notes through conversations with pictures of the babies wearing their outfits. Nothing makes me happier than seeing the babies I sew for wearing their Christening gowns.
Are you going to go and see their show. It is very weird seeing a show with your things on stage when you have no part in it. We donated dance costumes to another school when our school closed. Many of our girls went there so they got to wear them. I am sure they would have let me come help but it is no where near where I live.
We have a town near us that is holding Zombie walk on the boardwalk this weekend. Those people would have loved your Etsy shop.
LikeLike
Pingback: Frankenstein’s Monster: A very simple costume | costumecrazed