This is a little project that I did before Christmas. I probably should have made a point to be a little more timely in my blogging . . but better late than never, right?
By now, any of you who follow my blog know that I love to start projects with a tablecloth. This is a variation on a theme . . . isn’t a tree skirt basically a tablecloth with a hole in the middle?
This particular tree skirt was red and green fur. It seemed like it would make a great cape or skirt.


The main body of the tree skirt was red, with a dark green border. The tree skirt had a slit on one side that closed with hook & loop tape.
I decided I wanted to make a Mrs. Claus/Santa’s Helper outfit. I dug around until I found a red top in a complimentary red.


The jacket had a scooped neck, button front, and a loose fit. The fabric was a heavy knit with actually quite a bit of stretch to it.
I wanted to shape the jacket for a more form-fitted look. I could pin it as is, but then I need to transfer the darts/tucks to the inside. To make this process easier, I turned the jacket inside out, and then pinned in my alterations.


I took fabric out of the center back, and along the underarm seams (this shirt had an unusual inset under the arms, so there was a front and back seam). I then made darts under the bust. I did make a bit of an error and must pinned in the front darts without measuring. This was OK, but, another time I would measure so that the darts were equidistant from the center front. (It wasn’t so noticeable on this 34″ bust dress form–but the fabric was stretchy enough I could put it on a 44″ bust form, and then it was more evident).


Larger dress form:


I left the shoulders as they were at that point as because I rather like the drop-shoulder bat-wing effect, however, the sleeves could have been tweaked to tighten the silhouette. The next step was to trim out the excess fabric. I later wished that I had not trimmed the fabric in the center back as this decreased the flexibility of future alterations, and it would not have been objectionable to leave it in the garment.


Selecting the white trim was the next step. I didn’t have white fur, but I had a selection of other options including tinsel garland, mariou feathers and thrifted wired ruffles (remember the coffee cup costumes from last year?)

I decided to use the garland. I have been reasonably successful sewing over beaded fabric in the past, so I figured I could probably (carefully) sew the garland on by machine. I set my machine to the largest stitch length and width that I could and tried to fold the fringes over to one side and zig-zag over the top of the center wire.


I quickly abandoned this great idea. First, it was not very time efficient to try to fold the garland to one side and second, I very quickly hit the wire and broke a needle. I had also hoped that it would fluff up over the stitching, but it didn’t seem like that was going to happen. In the end, it was much quicker just to whip it on by hand.


I used large stitches and kept the needle and thread on the back side, just making a “stitch” with the needle through the fabric. This kept the thread away from all the fringe ends and kept if from tangling.


I think this turned out pretty cute. The garland was a little itchy, so another time I would have stitched it on a bit farther down onto the jacket to keep it a bit farther away from the neck. It isn’t bad though.
Next came the skirt. I planned to use wide elastic for the waistband as that would mimic a black belt. I wanted the top to have a bit of ease/gathers, but not a lot, therefore, I had two measurements to think about when I started–what the circumference of the waist opening should be, and the length of the finished skirt. My dress form has a 25″ waist, so I started with an online circumference calculator.

I only needed a radius of 4″. That made my skirt a bit longer than I wanted it to be, so I ended up marking my cutting line 4″ down from the current center opening. I did another calculation with a 6″ radius, and thought I would be able to stretch the elastic that far. I used a sharpie to mark the cutting like. The fur was cut from the back side, sliding the scissors along the backing fabric to avoid cutting the plush strands.


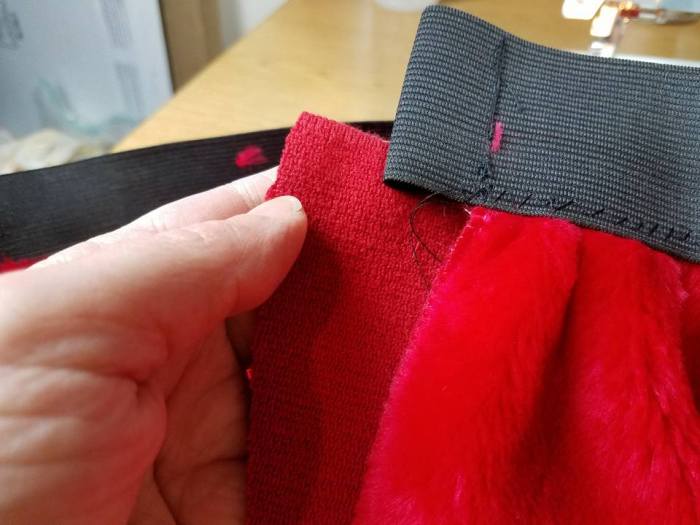
I stitched the slit closed, leaving the top section open.

I cut a piece of elastic that was just a bit smaller than 25″ at rest. I folded the ends under and stitched them to give added support for the edges. I divided the skirt in quarters, and pinned it to the quartered waistband. I stretched the elastic as I zig-zagged the elastic to the skirt. The stitching isn’t gorgeous, but the black stitching disappears into the black elastic.


After the skirt is stitched on, I made sure that I had “caught” the skirt to the elastic, and that it was reasonably uniform. I did have to re-do a few places.
I hadn’t planned for much overlap, and the shirt didn’t extend down far enough to fill in the gap in the skirt. So, I used a scrap of the shirt and stitched it to one side of the skirt to make a flap that covered the gap in the skirt.
A few snaps, and the skirt was done.
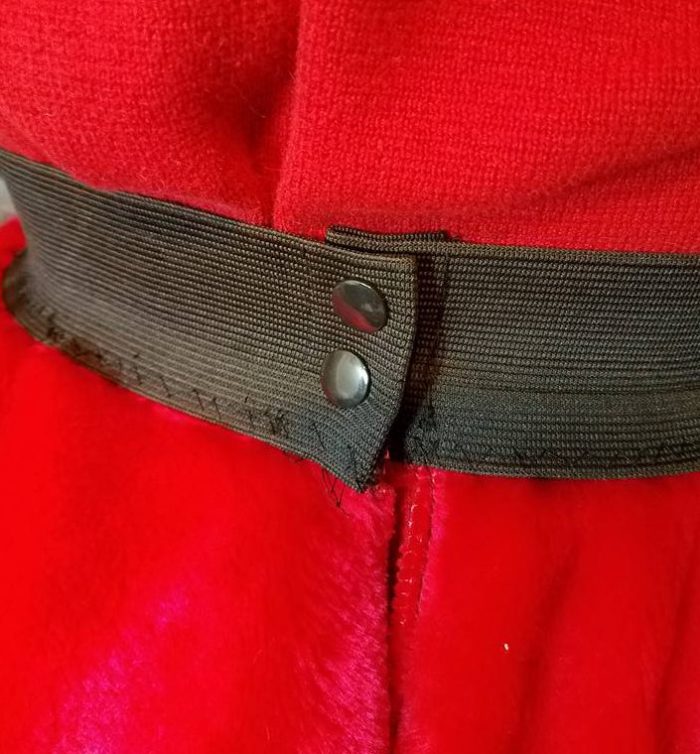
The buckle is a simple cardboard cutout covered with metallic non-woven material. The prong is a piece of zip tie. The opening is backed with some black fabric. The “buckle” pins to the waistband. I cut cut a somewhat free-form whimsical shape,


I tried to make a hat for the outfit. I didn’t have much to work with, but I thought the circle from the center of the skirt might make a sort-of pancake ruffled hat. I ran a bias tape casing and some elastic around the inner hole and added some white ruffle trim to the outer edge. And . . it was . . a weirdly shaped “thing” that didn’t lay well on the head, and looked bizarre. (A full circle was really too much fabric).

So, deep breath, and I added another row of bias tape casing and elastic to the outer edge, and a 4″ white fabric ruffle with lace trim (remember by 400 yard roll of lace I have committed to use, lol?)


The hat is so-so. It probably needs bobby pins to stay in place, or perhaps a tie under the neck. I wouldn’t say it is my greatest creation ever, but, I think it suffices.
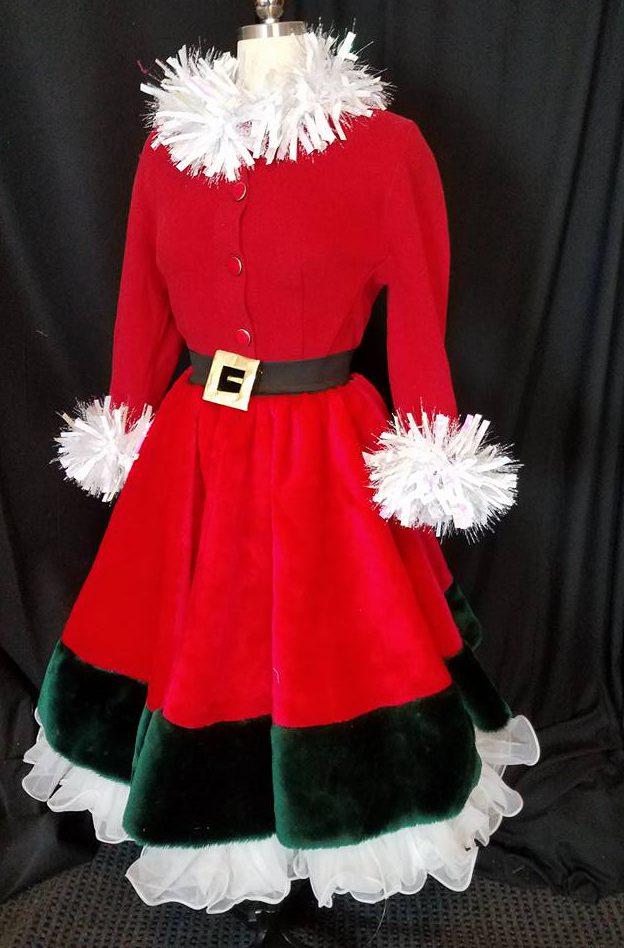
The finished outfit:


And then . . I thought that this costume had a very retro-5o’s “White Christmas” sort of vibe, so I couldn’t resist adding a petticoat, and I actually really liked the way it looked sticking out the bottom.


This was a fairly quick project, and I really like the fur skirt. If you didn’t have a white petticoat, adding a row of white trim to the bottom edge could give the same look. Don’t forget to figure out your circumerence, because a circle skirt can be quite large at the bottom. The cost of the thrifted tree skirt was a small fraction of what this much fur would have cost new. I like the sparkle look of the garland.
You can find the Youtube companion video here.


