My nephew recently messaged me asking for help with a costume. He sent me this picture and wanted to know if I had any tips or tricks to help make the blue shirt costume.

Well . . .let’s just say I fired up the old computer and sent him a LONG email suggesting where to buy a shirt, and how to make the dots. Basically, I told him to buy some purple fabric of some sort (giving suggestions, of course) and then followed that with about 6 paragraphs describing different ways to attach the fabric, including fabric glue, hot glue, iron on film, and sewing. Of course, this would require special supplies like a fabric scissors, maybe an iron, possibly pins, and other good stuff. I broke it down and made it really simple (I’m rolling my eyes).
Jump forward to the weekend when I saw him. He had found a t-shirt, and then he and his mom “discovered” the Tulip fabric spray paint and were decorating his shirt with stencils. (Any name brand products shown in this blog are done strictly on a consumer basis, and all items were purchased. Any pictures taken in a big-box store do not imply anything other than proximity to my house). They were super excited about the paint, and eagerly asked if I had ever seen it before. Well, yes I knew about it. And I’ve used it. And that was when it really struck me . . . why didn’t I suggest it? And it struck me like lightening: I AM IN A FABRIC RUT.


I took a mental step back and did a little internal brain-picking and came to realize how much my costume-view is skewed. Not only did I only focus on one way of doing something, I forgot to begin by assessing my end goals.
My nephew is a college student, and a guy without many crafting skills, so cheap, fast and easy should have been at the top of the list. I thought I had covered that with felt and hot glue . . but what if there are other options?
Now, obviously, I knew that my nephew lives in a college-student guy apartment–they don’t have random crafting stuff sitting around . . . but what if they did? Would there be ways to make this costume with what I had sitting around. Or, could I find inexpensive items at the store that wouldn’t require other special equipment to use?
I decided that it would be OK if this was a one-time use costume, which opened up further options. I do plan on doing a “wash test” after my samples cure . . . but that is for another day.
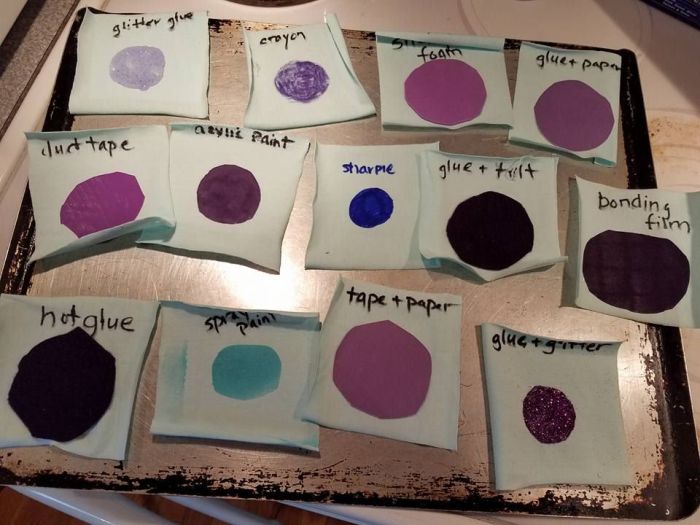
Here is my expanded (and certainly not all-inclusive) list of ideas for making “Spots on a Shirt” :
- Crayon.


Most people (OK, maybe not college students) probably have a box of crayons sitting around. I ironed a piece of freezer paper to the back of my swatch to provide some stability, and then colored away with my purple crayon. This makes a great spot. Simple and cheap. I’m guessing it will be OK through a cold wash.
2. Permanent marker
")

I didn’t have a purple marker, so blue had to do. Once again, I stabilized the back with a bit of freezer paper, and colored away. Quick, easy, and it should go through at least a few washes before fading too much. It will be good for my party. The only consideration is that if I have a lot of spots, I might need several markers, and if I was unable to buy them individually, that could get pricey. I’m not completely happy with how uneven the color is . . but that goes back to the goals.
3. Sticky backed foam


Years ago, my daughter was the Gingerbread Man in a little play at school. My mom made her a costume, and my daughter decorated it with pieces of “candy” cut from adhesive backed foam. I don’t think we ever washed the costume, but those bits of foam stuck to the flannel fabric for YEARS in the dress-up box. The foam is stiff, so the pieces can’t be too large, and it might peel off if it covers places that stretch or move a lot, but, for some basic spots for a quickie costume–it works.
4. Duct tape.

If you are like me, you had kids who were into duct tape flowers, purses, etc somewhere along the way. I have all kinds of crazy duct I am in the process of using up. If you wanted large spots you might need to lay strips together. One advantage to duct tape is that it would move well with the garment, and when you are done . . .off it comes.
5. Glitter glue

All glitter glue is not the same. This happens to be washable purple glitter glue. I backed my fabric with freezer paper to keep it from leaking through. Will it wash out? The bottle says soak for 10 minutes in cold and then wash. This glue was also relatively inexpensive for the amount in the bottle. I could have done a whole shirt. It does run, so it would have to be done flat and allowed to dry before doing another side. I’m intrigued by the temporary factor.
6. Paper and washable glue/Paper and double stick tape


So, I wouldn’t normally think of making a costume with paper. But . . why not? This happens to be more of a very lightweight cardstock than an actual paper. I might worry that the dye would leech out of traditional construction paper, especially if it got wet, but I’m not concerned about this cardstock. Double stick tape isn’t cheap, and you might need a fair amount. This happens to be removable poster tape because that is what I had. The spot I glued on with regular old school glue really seems quite impressively secure. It is obviously stiff, and won’t stretch, but it seems like it would last longer than I might have thought it would. Sometimes the oldie but goodie is overlooked.
7. Glue & glitter

I opted to use a flexible fabric glue for this sample. I made a freezer paper stencil and painted the glue in the spot. I then sprinkled glitter on. It was pretty easy (although there are some random glitter specs clinging to the fabric). I will be interested to see how this goes through the wash.
8. Acrylic Paint


There are all kinds of paints made specifically for fabrics, and they come in a variety of colors. Using fabric paint is certainly a logical choice (like, so logical, why didn’t I suggest it in the first place???). I think part of my bias is that I think of fabric paint in terms of squirting tiny lines of paint out in outlines, not painting with a brush to fill a space.


However, acrylic paints are cheaper and they come in more colors. Acrylic paint used straight on the fabric does make the fabric stiff and it can crack. This can be fixed by mixing the paint with a fabric medium. For my project, I just used it as is because we are going for cheap and easy. Acrylic paint should probably be heat set if you want to ensure washing success.
9. Spray Paint


Spray paint is another option . . .although not so good this time of the year if ventilation is an issue and you can’t go outside. (The year I spray painted curler hats for “Beauty School Drop Out” during a January cold snap in my garage was not fun . . even with a mask and space heaters). There is a fair amount of information online about spray painting fabric, some more or less successfully. I think the key is to keep the layers light, and use it for embellishment. I used freezer paper for a stencil on this one also. Regular spray paint is much less expensive than the special fabric spray paint.
10. Iron on bonding film

I really like iron on bonding film. It helps keep edges from fraying. Here I used a lightweight knit, but you can use any sort of fabric. This brand of bonding film comes in large sheets and also in several widths of strips. I actually used a large sheet to make the circle. I bonded a square to the back of the purple fabric, cut out the circle, peeled off the backing, and ironed it on. You do need to be able to iron all of the elements (but don’t forget a press cloth or non-stick barrier can really help). The bonded area will not stretch. If you use it to secure something you want to sew over, the adhesive will gum up your needle. I do think that this material breaks down over time, and after several years it doesn’t hold as well.
11. Fabric glue and fabric/felt


There are all kinds of glues and adhesives designed to use with fabric. Some are flexible and some are not. I have had reasonable success with the ones I have tried with limitations. In my experience, they don’t last forever, and are often not satisfactory in an area that gets a lot of flex. Many of them take several days to dry/cure before they are washable. I’ve had the most experience with Fabri-Tac, but I have several other brands that I have been using (although not with the due diligence of testing the limits as I did with Fabri-Tac back in the day).
12. Hot glue and felt/fabric

Hot glue is always an option, and it has its pros and cons. The biggest problem with basic hot glue is that is doesn’t stretch. There are specialty hot glues for fabric, and ones that claim to be stretchable. A drawback is that it is that you basically need separate glue guns and a way to keep the separate. At one time I had white flexible glue that was supposedly for attaching items to wedding dresses. One of the series of costume books I have recommends using hot glue almost exclusively for putting costumes together (she sews as a last resort). She also recommends it for temporary hems, as you can wash them out. That said, hot glue can go through a cold wash, dries quickly, is cheap and is quite satisfactory for holding textured surfaces together.
13. Fabric Fuse peel adhesive & fabric


This is a new product I just came across. It comes in a bottle in liquid form, and also in this peel and stick tape. It says that it is permanent and can be used in the washer & dryer. I am will be interested to see what happens to my little sample.
14. Other options:


A quick wander around the store offered up some other options including fabric specific markers and crayons and pom-poms. You could also glue on other items like yarn (fashioned into spirals), ribbon or other embellishments.
Sewing is of course, another option. Spots could be hand sewn or machine stitched in various ways. Safety pins are also a time-honored way for a quick attachment.
My plan is that I am going to let my swatches sit for a few days, and then I am going to do a little informal testing on “spot stability” . . . how much effort will it take to get the glued paper off the fabric? How about the tape? After that, I will put most of them through the wash on cold, gentle and hang them to dry and see how they compare.
If any of you have any other good ideas for quick, easy, inexpensive ways to make spots . . . I’d love to read your comments.


