It’s always a major bummer when you begin digging through your stock costumes hunting for pieces you can adapt for your next show and you come up . . . empty. When you combine that with a large chorus . . . it’s well, just a lot of work. My sister is estimating she needs to find/create/borrow etc in excess of 150 costumes for her production of “Chitty Chitty Bang Bang”. They are aiming for “historically inspired” versus historical accuracy. I thought I’d see if I could create a few quick-and-dirty “good enough” costumes for the chorus.
I happened to see this skirt at a thrift store. I liked the mermaid/trumpet shape, and thought it had a turn-of-the-century feel. I combined it with a vintage tuck-and-lace embellished blouse to form the base of my costume project.


This was more than slightly boring, so I added a plaid A-line skirt.

And to create a little visual interest, I “pin-basted” some gathers on the side and found some velvet ribbon to use for a belt. (You can see the lining sticking out on the side).


My sister confirmed this would be an acceptable chorus/Fair-goer costume, so I went ahead with the project.
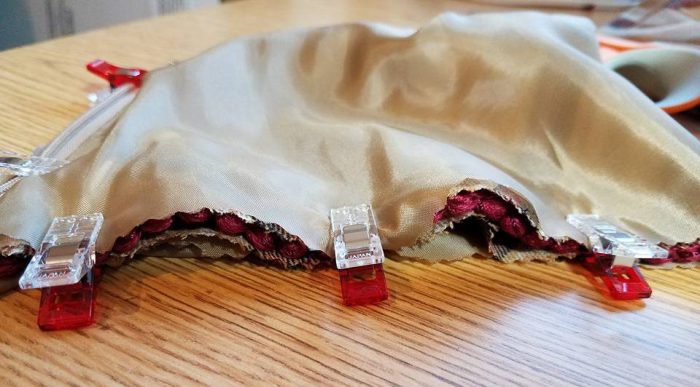
I began by cutting the lining out of the skirt. Next, I thought it would be nice to have adjustable gathers on the sides. I used a piece of double fold bias tape and stitched it along the side seam. I ran a piece of twill tape through the two channels (and tacked it at the bottom so it wouldn’t pull out), the sides could then be pulled up, or let down, at will. Some coordinating upholstery fringe finished the edge.


In retrospect (especially after looking at the pictures while writing this post), I realize how much less the costume was gathered on the sides from the prototype. I should have made the gathering channels longer, as I do think I preferred the deeper gathers. As it was, I thought the overskirt looked too long, and so I decided to shorten it, and stitch it to the underskirt. It always is a difficult choice whether to leave pieces separate and preserve flexibility, or to create a simpler costume, which makes costume changes easier and prevents lost/missing piece (I find it vastly annoying to sit in the audience watching a show and have cast members come out on stage missing pieces of their costumes). In this case, I decided to go with a one-piece skirt.
I decided how much shorter I wanted the overskirt and I cut off the top of the skirt, following the curve of the waistband.


The plaid skirt had a side zipper, so I closed that and left it in place. I cut a slit in the center back to accommodate the back zipper of the base dress. I folded the edges under and made a narrow hem.

The cut skirt was now larger than the base skirt, so I ran a line of large stitches along the top edge to ease the stitching line. The overskirt is right-sides-together with the base skirt, but upside down when stitched in place.


Annnnnnddddd . . . my zipper hole looks really bad . . and seriously . . . . what was I thinking?
So, never fear, I found a bit of bias tape that blended with the skirt, and sewed it to the edges. Not gorgeous, but definitely improved. Thank goodness for the 20 foot rule!


Next I made a belt. I’m not going to show any details on this because it pretty much was a hot mess. I used some elastic and plastic mesh for the base. I made a cover from the discarded skirt lining and some velvet ribbon. The front is the stiff mesh, the back is the elastic, and it closes on the side with velcro. The cover was hand stitched around the plastic mesh. It works, and I like it, but . . . that’s all I’m going to share!


I also made a reticule with the scraps from the top of the skirt and a bit of fringe. Here the bottom is sandwiched together ready to sew. It is basically just a double layer with some loops for handles, and a bit of hook & loop tape to hold it closed on the top.
And I thought I was done:


I happened to see a jacket at a thrift store and couldn’t resist a little addition.


The velvet ribbon is just fudged around the curves and angles of the jacket.

My dress form was otherwise occupied . . but this gives you an idea of how the completed outfit would look.

I do regret not making the side gathers on the skirt deeper, but otherwise, I think this cosutme is “good enough”, and I think it does what it needs to do.
Cost: skirts: $4 each, jacket: $4, blouse: $4, plus some velvet ribbon, upholstery fringe and a bit of bias tape.


