One of my last projects was the formal jacket for Baron Bomburst (I’m going out-of-order . . I got tired of writing about Fun Fair costumes). My instructions were that it should be over-the-top and made in red & black, and it could have some gray, but no white. While my jacket works well for Baron Bomburst–the basic idea could work for any Prince. I initially had picked up a couple of black suit jackets for a base, but then I came across this great black coat:


The jacket had a rounded collar, a button front, long sleeves, and a gently A-line skirt. It may have once been part of a two-piece jacket and coat set. I was making this jacket for a tall, slender teenage boy, and so the first thing I needed to do was eliminate extra fabric in the back–as evidenced by the two parallel tucks that I already have pinned in place.


These are top-stitched in place down to waist level. My plan was to make a cross between a frock coat and a tailed jacket. My next step was to cut the bottom of the jacket off at the waist. I had the nape-to-waist measurements, so I marked out where the waist should (hopefully!) hit, and using tailor chalk and pins, marked the waistline. After it was all pinned in place, I checked that the lining and jacket front were pinned in line so there was no weird pulling.


I ran two lines of parallel stitching along the waist line and then cut between them. This keeps the lining and the fashion fabric joined together.

Next I refolded the front to reshape the front and made it smaller. That was top stitched in place, and then the lower part of the jacket was pinned and pleated to the back of the jacket.


Remodeled jacket:


So, at this point, I really didn’t have a set plan for embellishment. I really very rarely plan these projects in any sort of detail before I start. I just sort of go with it, and see what happens. Typically, when I do try to “force” something, you guys never see it because it ends up in the trash (or I send the pieces to my mom, who cuts them up and makes them into mission quilts).
I dug around for embellishments and ended deciding on a 6 1/2″ wide sequin and fringe trim.
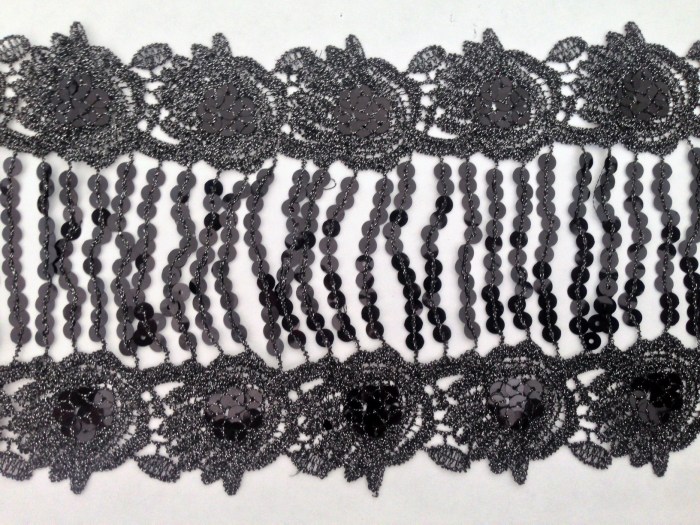
My plan was to make an embellished front panel. I measured across the front of the jacket and cut a piece of very stiff interfacing to size. I covered this with some shiny red non-woven material, and stitched it around the edges. I pinned the trim in two parallel lines, and then stitched it in place (and forgot to take any pictures along the way). I positioned this on the jacket front and stitched down one side.


I marked where the other side overlapped onto the jacket and marked it with chalk. I stitched red sequin trim around the panel and the rest of the jacket too.


The front panel is secured on the non-sewn side with hook and loop tape.

I made coordinating cuffs in a similar fashion. I didn’t have enough stiff interfacing, so I used black felt as the base. I covered this in the same shiny red non-woven material, and trimmed it with sequin braid and more of the fringe. I added some sequin trim to the bottom of the sleeves, and then the cuffs attach above that with hook and loop tape.

I made some epaulettes out of silver “pleather”, red fringe and sequin trim. These pin to the jacket and could be removed for washing or to move to a different costume.


For a final bit of over-the-topness I ironed on some silver embroidered motifs to the jacket.


And . . the jacket was done.


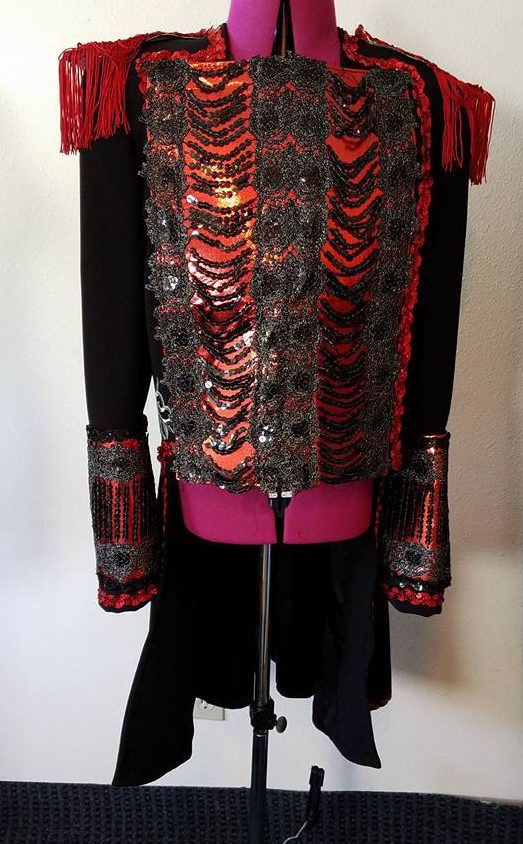
I envision that this will be worn with a high neck white or black shirt. I think black pants or breeches would be nice, possibly with a red strip down the sides. But . . that isn’t my part of the costume to create. I briefly toyed with making an embellished black stand-up collar on the jacket, but, decided not to. I thought if it needed “more” it would be easier to embellish a shirt to look like a collar. My two rows of trim on the front panel ended up shifting a bit so they aren’t quite even, but, I think it is “good enough”. I think the huge cuffs added a great final touch, and they were quite easy to add since I could just use rectangles and didn’t need to shape them to fit the sleeves.
I’ve since looked at some other epaulettes that are padded so that they add a stiffer/straighter look to the shoulders, but, I think these are fine. I think this would be a great Pirate jacket as well.
Cost: jacket $6, black trim $2.50ish/yard, plus black & red sequin braid, hook & loop tape, stiff interfacing (a piece I picked up for a quarter at a thrift store), black felt, red shiny non-woven material (I think this was in the $3-4/yd range, but I’ve used my yard for multiple projects now), about 1/4 piece of pleather (@ 1.47/piece) and about 18″ of red fringe.
In retrospect the front panel may be a little too stiff, but I think it will be OK. I really can’t wait to see pictures of this costume on stage under the lights.


