
The outfit for Peasant Girl #6 was a fairly quick upgrade, and required very little additional fabric, which is a plus if you don’t happen to have any lying around. I also did something a little different with the blouse, which, while (somewhat) unintentional, didn’t turn out half bad–and has given me a few other thoughts for future upcycles.
I began this out fit with a large tiered flannel skirt.


The skirt had an elastic waist, and the elastic was totally worthless. As with many skirts, the elastic was sewn into the waistband–which is nice when you are wearing it, not so nice for replacing it. I opted to leave the old elastic in place, and use the stitching as channels for the a new drawstring. I made small holes in the fabric on the inside, and treated them with a non-fray liquid (a more detailed description can be found here I threaded a new drawstring through. If you come to a point where the elastic is sewn into a seam, just make some holes and “skip” the drawstring over that part. Since this skirt is not as full as some of the other ones, I wanted to give it a little “something”, so I added a row of pre-gathered eyelet to the hem to give the look of a petticoat.

I think it would have been nicer if I had sewn the eyelet to a strip of fabric and attached that fabric to the seam above the hem. The eyelet could have hung freely and wouldn’t stick out quite the same way. But, this was quick and easy, and it looks “good enough”.
I moved on to the blouse:


This is a white blouse with small cap sleeves, a collar and rows of vertical tucks on the front. I began by cutting the collar off. I ran a row of stay-stitching along the back.

I was inspired by the tucks on the front to try to make a square neckline. Paying attention to where the button holes were, I cut the top part out. I flipped the first piece over and marked the opposite side. Then I ran some stabilizing stitching along the raw edges.


I buttoned the blouse up, and was flummoxed to realize I had cut the blouse incorrectly and the sides were uneven? I had a momentary thought of: “How did I do that?”, but, never one to hesitate (or double-check, apparently), I got out my trusty shears and cut down to the next button.
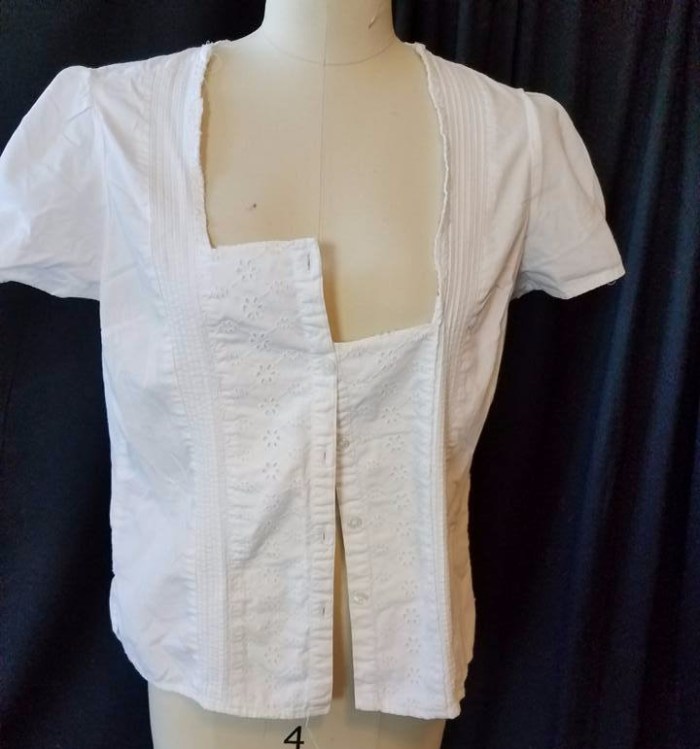
Well . . . oops. Apparently I HAD measured and cut correctly the first time, but in my haste to button it up and look at it . . . I buttoned it incorrectly. The lower side is a bit risque for high school students, and I couldn’t think of any good, quick way to reattach the piece in any sort of satisfactory manner . . . so I cut the other side off.
I then used the discarded collar to make an insert. I stitched it to one side, and attached the other side with snaps.

I put two snaps on the side, but, once I saw it worn, it was apparent it needed another snap, or some hook and loop tape on the lower edge of the ruffle as well.
And here we are at this point:


I made a waistband out of a coordinating blue fabric (see previous posts in this series for more details). Here is the lining, stiffened with 5 rows of sew-in rigilene boning.

Some rick-rack and ribbon for trim:


I have made mock corseting in a variety of ways. So far, this is my favorite method. I have found it very time consuming to measure, mark, pin, and stitch down fake corset ties so that they lay nicely and look good. This is 1/8″ satin ribbon, which is cheap, and easily threads through a large darning needle. If it won’t pull through the fabric, making a hole with an awl, or VERY CAREFULLY with the point of a seam ripper, will help the process along.
Looking good:


And, the final touch is an eyelet apron (made out of a piece of a leftover bedskirt), pinned into the waist corset.


Of note–we made 30 peasant aprons similar to this in a very short period of time by using an assortment of linens. One of the methods was to use a pre-gathered bedskirt similar to this one. I cut it into appropriate widths. These sections were stitched to a length of twill tape. The sides were turned under in a small hem, and then several rows of lace or rick-rack were added to the bottom (a great way to clean out the “small pieces” trim pile!). These worked really great for the chorus members. Adding the apron to a thrifted blouse and skirt combo instantly transformed the outfit to a higher level of “good enough”. The kids all had fun picking out a coordinating apron. It also was a good way to tie all of the chorus members together.


I love this one. Not a mistake – a design inspiration. I have those often! Do you do the trim assortments from Home Sew. I loved always having a random assortment for occasions like this. Sometimes using what I had on hand worked out better than what I would have bought. It forced me to use color out of the box.
LikeLike
I don’t order the assortments–although I know what they are. Some of the thrift shops that I frequent get a fair amount of trim in and I have a low threshold for buying little baggies of stuff for a quarter 🙂
LikeLike
Living in NJ I have absolutely no chance of finding trim in Goodwill. There are not a great many people who sew here. I would kill for a good second hand store. I like to wait till Home Sew occasionally has those boxes of random trim assortments for some ridiculous price. They pack that box tightly of all kinds of stuff. That is my only chance of getting cheap trims other than some of the other places you recommended.
LikeLike
Wow! Great work!!
LikeLike
You actually make it appear really easy along with your presentation however I in finding this topic to be actually one thing that I feel I might never understand. It kind of feels too complicated and extremely huge for me. I am having a look forward for your next post, I’ll try to get the dangle of it!
LikeLike
My best advice is to just try 🙂 Start with some inexpensive garments and just start cutting. I have a large collection of pattern and pattern books. I very rarely use them as patterns, but I DO use them as references to help me visualize where I am trying to go. If you get stuck . . take a break. Think about it for a bit. Try not to get bogged down in little details–look for shapes and silhouettes. It may even help to go to a thrift store and walk around and try to imagine what things could be. I do have a post (from early on) that references several books. These were very helpful to me in the beginning, to jump-start the process of looking beyond what I see in front of my face. Good luck!
LikeLike
Helpful info. Lucky me I discovered your web site unintentionally, and I am shocked why this accident did not came about earlier! I bookmarked it.
LikeLike